Showing posts with label cake. Show all posts

Friday, March 10, 2023

Adventures in Cake Decorating #15 - Football-themed Cakes

0 comments

Eight-year-olds and football. Apparently.

I have now made two different football-themed cakes for two different little boys. The latest one just recently for my nephew's 8th birthday, and the first one several years ago for a friend's son... for his 8th birthday. What a coincidence! So, here are the cakes:

This first one was a football field. Just a rectangular sheet cake, with green icing for the field turf and orange end zones for his favorite team. Football candies from a party store decorated the sides, while little plastic figurines of players and goal posts adorned the field. The team logo in the center was simply a cardboard cut-out. 


It was rather quick to put together. My friend and I experimented with food coloring spray for the green. It works well for fast, wide coverage, and gave us a darker green very easily. However, I think you can taste the spray more than a mixed-in dye.

A cookie design inspired this year's cake. I originally thought I might go for the rectangular football field again, until I started browsing Pinterest and saw these football stadium cookies. So I enlarged the design and made it three-dimensional for this football stadium cake.


This was a round chocolate cake, with fluffy white icing between the layers (using this copycat Ding Dong cream recipe). The outer frosting is green buttercream, made by mixing in, not spraying on, the food coloring. Gingerbread football-shaped cookies stand around the side, and mini M&Ms are the crowd in the stands. 

How I elevated the stands: I leveled my two round cakes (gave them flat tops) by cutting off their domes before frosting and stacking the layers. Then, I stacked and sculpted a rough slope—like building an old-fashioned stone wall but with frosting and cake scraps. Then I covered it with more frosting and the mini M's. Ta-da! 

Baking and decorating cookies (while simple on their own) plus the 3D scene made this cake's assembly more complicated. Len called it the six-hour cake. But anyway, it was fun to make, fun for people to see, and delicious to eat.

.

Wednesday, February 15, 2023

Mini Lemon Crepe Cakes For Two

0 comments
Roses are red... sugar is sweet... Yes, I like Valentine's Day, and I prefer the simple, sweet celebrations over grandiose (expensive and stressful) romantic ordeals.


A short story: One Valentine's Day when Len and I were engaged (20 years ago yesterday, in fact), I had a romantic vision of an elegant home-cooked dinner and dessert for two. A recipe for roast chicken that was anecdotally so good it would make your sweetheart propose to you on the spot—was just roast chicken with lemons. It was good (because roast chicken is good!), but we weren't blown away. Maybe the recipe writer (and her now spouse) ever made roast chicken, and that's why they both thought it was so impressive. For dessert, a rhubarb soufflĂ©, for which we spent far too long in the grocery store trying to find fresh rhubarb, and then we had become too invested to abandon the recipe, so we settled on purchasing rhubarb jam and hoped to improvise. The soufflĂ© did not turn out great. In hindsight, I shouldn't have trusted a recipe that calls for rhubarb in February. Just because it's pink doesn't mean it's in season for Valentine's Day.

Since then, we typically have pizza or some other easy dinner on Valentine's Day so we can just crash on the couch and relax. I'm more inclined to put effort into the dessert.

I've posted here about a few of those desserts:
This year, my sweet endeavor was Lemon Mascarpone Crepe Cake. Time consuming, but not difficult.

I adapted this recipe from Completely Delicious: https://www.completelydelicious.com/lemon-mascarpone-crepe-cake/

First, I halved everything, because it's just the two of us. I used my lunch break (benefit of working from home) to make the crepe batter, the lemon curd, and some candied lemon peel, so the batter and curd could chill in the fridge the rest of the day. (Note: My candied lemon peel took a lot less than 20 minutes in the third stage of this recipe. Thinking I had more time, I wasn't watching it closely, and I got hard candy.)

Second, I did not have heavy cream, so I whipped my mascarpone with a splash (two tablespoons-ish) of whole milk and some powdered sugar. (I did this in the evening, right before assembling the cake)

Third, in the evening when I made the crepes, I used this tiny single-egg pan to make little crepes, instead of an ordinary 10-inch crepe pan. 

The size of the crepes doesn't change the flavor or—this is important to note—the time it takes to make them, so do what you want. I cut the recipe in half but still wanted to prioritize the height of the cake, so I decided to make two small individual cakes, stacking many small crepes instead of one larger, shorter cake out of half as many regular-sized crepes. Half the crepe batter recipe in my small pan created 33 4-inch crepes. Cooking the crepes one at a time, 1-2 minutes per crepe... Yeah, it took an hour. Plan for that.

Lastly, the additional decorations are hearts cut out of fruit leather.

The recipe linked above is a good one, but you could use your own favorite recipes for crepes, lemon curd, and mascarpone cream, and start stacking, alternately filling each layer with curd and cream. Or, don't stack the crepes into a cake and just eat them folded and filled. It's all good.


.

Tuesday, January 3, 2023

Gingerbread Experiments

0 comments

Happy New Year! It's time to catch up on some holiday baking.

We did not make a gingerbread model of our own house this year, but I did experiment with gingerbread in other ways. 

First were these gingerbread cupcakes.

Gingerbread cupcakes with browned butter buttercream and cookie toppers

Another hit recipe from Half-Baked Harvest. The browned butter frosting stole the show. I'm keeping that in my back pocket for other cakes.

I happened to have a boxed gingerbread mix (It was for Ninja Bread Cookies we didn't make with the niblings), so I whipped that up to make tiny gingerbread men for topping the cupcakes. It was a satisfying and manageable balance of from-scratch and from-box.

As you might imagine, just a baker's dozen of little gingerbread men doesn't deplete an entire batch of gingerbread cookie dough. I saved the leftover dough in the fridge until I decided to make...

Mini gingerbread houses for decorating mugs of cocoa!

Under construction - pieces of mini houses waiting as icing dries (and yes, some broken pieces, too)

I've seen these cute garnishes in catalogs, but I thought it would be fun (and far more economical) to make them myself. There are plenty of templates online you can copy, and it's not difficult to draw one yourself. All you need are two walls with triangular tops, two rectangular walls, and two rectangular roof pieces. Remember that both the front and back walls of the house (the ones with peaks) should have a door -- the two doors create the slot for the rim of the mug.

DIY IRL - Clumsy little gingerbread houses for garnishing mugs

I'd recommend a thick royal icing for constructing your little houses. I used the runny, takes-forever-to-harden, easy-mix icing that came with the boxed cookie dough, so my house construction took patience. Hours and hours of patience. I clumsily fit together the four walls and had to hold them in place for half a minute before they would precariously stand on their own. Then I had to allow each house frame to sit and cure before I could come back and add the roof pieces, which then needed their own time to cure before I could safely pick them up and decorate them. In the end, the tiny houses were kind of messy, and I ultimately ran out of care for any more dainty decorating. I reached the "good enough" stage, and decided I'd had all the fun I wanted. 

And it was fun; I'm glad I tried it. And maybe I will make them again, but I will make my own icing for better control of the assembly and decorating.

.

Thursday, June 23, 2022

Adventures in Cake Decorating #14 - Spider-Man Cake 2

0 comments

It's really more of a building cake or a city cake, and you certainly could top it with any superhero (or no superhero at all), but let me tell you the story of how this so-called Spider-Man cake came to be.

Once upon a time, I made a Spider-Man-Batman cake...


and afterward vowed never again to use red icing as the main color...


only to do it again on a Mickey Mouse cake.

The next time I included Spider-Man on a cake, I used red as the main color but only for his small section of the cake. That's right, it was the Multi-Hero cake!


A new Spider-Man cake request came up this year. Because the birthday boy and his mom had no specific design in mind, I had the perfect plan for using no red icing: a Spider-Man scene, instead of a cake that looked like the hero himself. 

I remembered that small toys make handy cake decorations (a competing interest with my preference for everything on the cake to be edible, but a much easier option than sculpting a Spider-Man figurine out of modeling chocolate!). And so I had a vision -- two skyscraper cakes, with a Spider-Man swinging from his web between them!

OK, in reality, two moderately sized city building cakes, with some spiderwebs piped here and there and Spider-Man standing atop one building, shooting a white chocolate web to the other. A white cardboard cake board underneath it all would provide a canvas for drawing city streets below to complete the scene. What follows is how I executed this plan, with a photo of the finished product, of course. One note: As with many of my cakes, I rushed to finish.

It started with one vanilla cake and one chocolate cake, each baked as large, thin rectangle. I used baking sheets rather than cake pans so I could simply cut squares out for stacking multiple thin layers of the two flavors:


I froze these stacks overnight. In the morning, I trimmed, shaved, and sculpted the uneven sides of the frozen cakes with a serrated bread knife. I spread a thin layer of light chocolate buttercream on all sides (the "crumb coat"), and froze it again just to harden the icing faster.

The light chocolate buttercream became the main frosting for the brownstone-like buildings. Fudge chocolate icing right out of the can is what's top. A little white buttercream with yellow coloring made the windows, with the remaining white used to pipe a couple of spiderwebs on the building corners.

The web coming from Spider-Man's hand is white chocolate. I melted white chocolate morsels and piped a web pattern onto wax paper (it turned out more like a net or a lattice, but within the scene it works). I propped the wax paper into a slight curve -- how I wanted the white chocolate to cool and harden, rather than just flat. It worked but was very delicate and broke when I moved it. Not to worry -- I melted the extra white chocolate and used it as glue to hold the web pieces back together... But I didn't have time to let the repair solidify before we needed to transport the cake to the birthday party. So, toothpicks are holding the broken web in place.


Ta-da!
.


Thursday, May 12, 2022

Adventures in Cake Decorating #13 - Dinosaur Cake and Cookies

0 comments

Three years after I made it, let me tell you about this dinosaur cake and cookies. It's a good example of combining two simple decorating components into one impressive overall look -- a frosting petal technique and cutout sugar cookies.


Sure, the dinosaur-shaped cookies on their own could suffice as a dino-themed party treat. There was indeed a plate of the dinosaur cookies served alongside the cake. But, by using the cookies as part of the cake's decoration, an otherwise nondescript (albeit colorful) cake got a thematic upgrade with a fun edible topper.

The color theme came from the party invitation or its paper decorations. I'm pretty certain the idea for the frosting "scales" look came from the images of cakes my sister-in-law sent me for inspiration. You know, the standard "I like this. Can you do it?" text messages that occur before each birthday. It was a new technique for me, and one I haven't used again but would like to.

To create these buttercream petals/scales, you pipe a vertical line of fat dots and then smear them to the side with a small offset spatula or the back of a spoon. Pipe your next line of dots over the tail of the previous line. When you've come full circle around the cake and make the final row of dots, you won't be able to smear it underneath the first set for an infinite overlap. Just smear enough to close the gap and make that the backside of your cake! You could of course pipe these petals/scales all in a single color simply for the interesting texture or arrange multiple colors in any other pattern.

For the cookies, just pick your favorite sugar cookie recipe, preferably one intended for cutouts, meaning it won't rise or spread very much while baking. My go-to sugar cookie icing is just powdered sugar, vanilla extract, and milk, combined in that order and starting with as little milk as possible, adding no more than a tablespoon of milk at a time until the icing is the consistency you need.

There are a couple of things I would do differently if I was making this cake again, and they both have to do with neatness.

  1. I would have baked a few of the sugar cookies on sticks (like cookie lollipops), which I could then just poke down into the cake to hold the cookies more neatly upright on top of the cake, rather than nesting the cookies in little piles of frosting. (I guess these dinos look like they're trudging forward through a swamp.)
  2. I would have been more patient when decorating the cookies so each base icing color was fully dry before I tried adding the icing accents (eyes, spots, etc.), which would prevent color seepage and help with neater, more defined details on the cookies.
We can take a brief look at the baking of this cake, in which pure happenstance resulted in rave reviews from those eating it. Something was wrong with the oven. The two 8-inch chocolate rounds were taking forever to bake. It turned out to be fudgiest cake I'd ever made, thanks to cooking low and slow and probably being a bit underdone. I also was running out of frosting ingredients and didn't want to make a late-night run to the store. I stretched what little chocolate frosting I had (for between the cake's layers) by whipping some heavy cream into the buttercream base. It whipped up fluffy and cool, and people thought it was delicious.

In addition to finding a reason to pipe petal-scales onto another cake because they look cool, I am also on the lookout for more opportunities to incorporate decorated sugar cookies into celebrations because I have so many cookie cutters I haven't used yet -- playing card suits, sports items, air/land/sea transportation, several holiday shapes... 

These are some of my previous cake-cookie combos:
Bowling cake – sugar cookie bowling pins bursting behind a bowling ball cake (baked in a bowl)
WordWorld cake – a few animals made of letters (it makes sense if you've seen the show) served beside the cake
Cookie Monster cupcakes – mini chocolate chip cookies in the "mouth" of each Cookie Monster as well as ABC and 123 sugar cookie sets served beside the cake
.

Thursday, March 17, 2022

Adventures in Cake Decorating #12 - Sonic the Hedgehog Cake

0 comments
One of the niblings just turned seven, and he's already very into video games. Hence, a Sonic the Hedgehog cake.


Given the block-grid look of the landscape in the Sonic the Hedgehog games, this would have been the perfect opportunity to bring back the checkerboard cake. Notice I said, "would have been." And the more I think about it now, the more I'm kicking myself. Why didn't I do the checkerboard cake? Dang, our nephew would have thought that was pretty cool. 

And now I'm thinking, is it possible I never mentioned checkerboard cake before? 

Quick background: My sister has this cool Wilton checkerboard cake set that makes it easy to pour two or more colors/flavors of cake batter into the same pan, creating a checkerboard pattern when the layers are stacked. We used it on my first nephew's first and second birthday cakes (and maybe others I have forgotten), and somehow, I failed to take a picture of the inside of those cakes or to even mention the checkerboard at all!

Back to the present: To be honest, checkerboard cake didn't occur to me until I started writing this -- even though I was already making both vanilla and chocolate cakes! I'll blame it on my Friday-evening mindset after a long work week. Instead, I made the next best thing to a checkerboard cake, I suppose. There was a layer of vanilla cake between two layers of chocolate, and the landscape decoration around the sides of the cake included a rough checkerboard pattern of light and dark brown.


And now, for some insight into the decorating techniques:

By working from lightest to darkest colors, I needed only 1 bowl for cake mix and only 3 bowls for all these different colors of frosting. I started with the vanilla cake, and then reused all bowls and utensils for the chocolate cake, without even needing to wash them, because the little bit of vanilla just mixes right into the chocolate and disappears.

For frosting, I started with plain white, which I used for the filling between layers, and then reserved just enough in a piping bag to do Sonic's eyes later, as well as one happy little cloud in the landscape (on the back of the cake, not pictured).

The bowl for white frosting gets reused, with the addition of two other bowls, for these three base colors: blue, green, tan/brown. Sky blue was first, to spread over the majority of the cake. Then, it becomes a darker blue, which goes into a piping bag to create Sonic himself.

The tan color of Sonic's mouth and ear was borne of trial-mixing a little orange, a little pink, and a little cocoa powder. Then, I emptied that piping back back into the tan bowl to add more cocoa powder and brown food coloring for the lighter dirt color. After piping that onto the cake, back in the bowl, a little more cocoa, but at a certain point, you're just adding more powder, not color, and you'll have to adjust by adding more milk. So, just a little more cocoa and some black food coloring for the darkest brown frosting. And then, with the small amount of chocolate frosting left, even more black food coloring, and back into the piping bag one more time for the outlines, eyes, and mouth.

Green was just green. One and done.

Colored sugar sprinkles saved the candy-dipped pretzels. Sonic's rings on this cake are pretzel rings dipped in candy melts. They do make different colored candy melts, including yellow, but I just bought white chocolate ones from the grocery store baking aisle and tried adding golden yellow food coloring to them. They turned peach. Maybe a lemon yellow coloring would have worked? Anyway, there was no fixing it with dye now. So, after I dipped a few pretzels, I sprinkled yellow sugar over the tops before the candy coating could dry. Yellow enough and even a little sparkly!
.


Thursday, February 3, 2022

Adventures in Cake Decorating #11 - Lego Block Cake

0 comments

It's time for another cake flashback. (I keep telling you, the pandemic has got me baking less.) 

We're looking back, oh my gosh, almost five years on this fun and colorful, albeit hastily built, Lego cake.

We were baking and assembling this thing the morning of my nephew's birthday party, so the icing didn't have time to crust enough between maneuvers. Result: No matter how gently you touch it, the icing sticks to you and smears -- smooth, neat surfaces are but a dream. Oh well. The cakes still look like Lego bricks.

Did you know a regular loaf pan and Oreo cookies are just the right proportions to each other for a Lego cake? 

We baked the cakes in loaf pans and did a little sculpting for straight, flat edges. Two cake recipes gave us three full loaves and a fourth we sliced in half. 

The studs of the bricks are Oreo cookies, hastily covered with buttercream. To make the cakes look like stacked Legos, we stacked them (obviously), and placed stud cookies on only the exposed topsides. There are not Oreos hidden under the stacks.

The other fun decorations were the gelatin Lego pieces and figures. I don't remember how I came across the silicone candy mold for these -- probably a friend from the train showed it to me one day, and I bought it. The kit came with one mold for candies shaped like Lego guys, and another mold for a few different-sized bricks. The brick mold included a lid-like piece to make reverse stud impressions on the bottoms of the bricks, so -- yes! -- you can connect the candies just like regular Lego bricks. 

We used a gummy recipe using flavored gelatin, so the candies tasted like Jello, which was OK. Next time, I would try to intensify the flavor, maybe go for sours.

Also next time, I would give myself more time to build the cake, so the icing work could look a little more polished, but really, the cake tastes just as good either way. Only Pinterest cares how smooth your icing is.

.

Thursday, December 16, 2021

Adventures in Cake Decorating #10 - Pineapple Cupcakes x 2

0 comments

And another cake flashback. Why? Because I haven't been baking as much fun stuff during the pandemic. Over the last two years, I think the Raphael Ninja Turtle cake was the last full-sized cake I made (early March 2020), and since then there have been just a couple of outdoor birthday parties, for which I made the Paw Patrol and Fireman Sam cupcakes. I had designs on making a very small wedding cake for a few of us to share as we virtually attended a relative's wedding, but neither the Zoom nuptials (and therefore) nor the cake materialized.

Last time we flashed back, it was to remember Teddy Graham sunbathers on beach cupcakes. Let's stick with that warm, sunny theme and look back at the two different cupcakes I once made for a luau at church.

Pineapple Upside-down Cupcakes

These came from a Betty Crocker recipe, and you can always trust Betty for a delicious time. Between the pineapple juice in the batter and the sugary syrup on the bottom (which becomes the top), these cupcakes are soaking in goodness. Don't let the photo mislead you -- these do not bake in cupcake wrappers. After flipping over the muffin tin to release these pineapple delights, I moved each into its own paper wrapper for easier individual servings at the luau party.

Pineapple Coconut Cupcakes

I'm disappointed in the trendy cupcake shops that decorate their baked goods so cutely but fail to deliver any oomph in flavor. A so-called salted caramel cupcake that has a stylized drizzle and tiny cookie atop its frosting but otherwise is a plain vanilla cake underneath -- not worth the hype (or money). Even Hostess cupcakes have a creamy filling! A so-called gourmet cupcake should at least have a caramel-flavored sponge if not also ooze liquid caramel once you bite into it. So, of course, I'm proud of these fully flavored cupcakes with a sweet surprise in the middle.

Any cupcake with a filling deserves bonus points, and this filling is so easy to execute... if you follow my tip here and not the original recipe. This recipe from The Little Epicurean is almost everything I want it to be -- coconut milk both in the batter and in the frosting, yes! But, with a fruit filling like pineapple, there is no need to find a 1-inch cookie cutter (who has that?) to punch the center out of each cupcake after they're baked. This isn't a custard or buttercream filling that can't go in until the cupcakes are cooled. 

Instead, I say, you just plop a spoonful of crushed pineapple into the center of the batter in each muffin cup. It will sink just a little bit, and then as the cupcakes bake, the batter will rise up and over it, hiding the pineapple filling for you. Voila!

.

Thursday, July 29, 2021

Adventures in Cake Decorating #9 - Beach Cupcakes

0 comments

Another cake flashback. Memorial Day 2018. A nephew's first birthday. A beach-themed backyard party.

The more I look back at these beach cupcakes, the more I think they are among the cutest I've made, and I think I'd like an excuse to make them again. 

Bonus points for the decorations made entirely of edible things (uh, paper cocktail umbrellas notwithstanding) -- blue frosting for the ocean of course, and graham cracker crumbs as the beach sand, plus Teddy Grahams as the sunbathers, Lifesavers Gummies as their rafts, and Fruit by the Foot as their beach towels. 

Although a cupcake would have served the purpose, there was also a separate, special "smash cake" for the 1-year-old birthday boy, per current trend -- see the slightly larger, more cake-shaped one on the left that incorporates all of the decorative topping elements, whereas each individual cupcake only had one or two. You can see we set up a few different scenes. 

There's the floating teddy on his raft, surrounded by water. There's the all-sand cupcake, with the sunbathing teddy. My favorite vignette is probably the half-beach, half-ocean, with teddy floating in the waves, his toes poking up out of the water. (Just break off the legs of the Teddy Graham.)

I see now, I enjoyed making these so much because the decorating process was really just playing with food. 

If I find that excuse to make them again, I'll up the ante by making the cupcakes tropical flavors -- no simple vanilla or chocolate, but instead maybe coconut with pineapple goo in the middle. Or lime. Oh, now wait. Coconut and pineapple, the cocktail umbrellas... the cupcakes should be tropical drink flavored. 

.

Thursday, July 8, 2021

Adventures in Cake Decorating #8 - Bowling Cake

0 comments

This is the cake that started it all. 

Or, maybe the cake that continued it all? It was before any of the niblings were born, so I didn't have regular birthday cake "clientele" yet, but I had already made baby block cakes for a friend (so many things I have learned to do better since then!). Even before that, I'd had ambitions on making our wedding cake myself -- ambitions left unrealized, as getting a great deal at a traditional bakery coincided with starting a brand new, soul-sucking job less than a month before the wedding. 


It's definitely the cake that ignited my enthusiasm for using cookies as a part of the decoration. (See later the Word World cake and cookies, the Cookie monster cupcakes with ABC and 123 cookies, a dinosaur cake I haven't told you about yet, and some sort of woodland creature cake and cookie combo I'd like to make, inspired by an autumn issue of Woman's Day magazine.)


This bowling cake was early enough in my cake decorating hobby-career that I can see now what I could have done better. Nevertheless, I still think it was awesome.

It was a large sheet cake; i.e., two 13x9 cakes set next to each other.

The bowling bowl was a smaller cake baked in a bowl. Tip: Use as round a bowl as possible (you know, some have a flat bottom inside), but then sculpt and/or patch with cake scraps and frosting.

The wood grain of the bowling lane was watered down brown food coloring, painted onto the crusted buttercream base. (Crusted = the buttercream has been allowed to sit exposed to the air, so it sets (or dries or hardens) enough that you can touch it lightly without it sticking to you.)

I thought I was so clever, illustrating that it was a 30th birthday by piping on a score sheet with the beginnings of a perfect game. Three strikes in a row = 30 points for the first frame!

Then, of course, sugar cookie bowling pins. I didn't have a bowling pin cookie cutter but rather cut these by hand using a paper template -- easy enough to do when the cookie is large and symmetrical.

And, that's a look back at one of my first three-dimensional birthday cakes.

.

Thursday, June 24, 2021

Scrapcooking

0 comments

Just a few months ago, I posted about cooking with kitchen scraps, but the overarching theme had more to do with making the most of your leftovers than using actual scraps (stems, peels, cores) -- although James P. DeWan's column did touch on that. Well, I've just learned that IKEA came out with The ScrapsBook earlier this year. It's a cookbook based on using typically discarded parts of food and features other tips for reducing your food waste at home, including uses for inedible scraps like eggshells (besides simply composting them).

Skeptical as you may be about putting banana peels in a cake and apple pulp in a burger, you might be comforted to find within the cookbook some more familiar "waste not" tricks you already have up your sleeve -- or is it just me? Things like freestyle vegetable soup to clear random things out of the fridge, a stash of chicken bones in the freezer for making broth later, cheese rinds to enrich a sauce, and watermelon rind preserves.

Another thing the cookbook has going for it -- photos. You know you're more inclined to try a recipe when it comes with a beautiful picture of the finished product. Each recipe also has a real professional chef's name behind it, imbuing the incredible with some credibility.

And another thing. The e-book is free to download. No risk to flip through. Yes, IKEA products are identified throughout the book, but they're unobtrusive.

But, wait! There's more!

A few days later, I (coincidentally?) read a newspaper article titled "Think outside the banana" that featured two recipes using -- you guessed it -- banana peels. Apparently, these slippery characters have made news before:

  • Food personality Nigella Lawson made headlines when she prepared a cauliflower and banana peel dish on TV.
  • Nadiya Hussain (a Great British Bake Off winner who suddenly had a cooking show of her own) made whole-banana bread and also brought to light a savory way to prepare banana peels common in Bengali cuisine -- think pulled pork but with sliced banana peels -- which is essentially how vegans have been using banana peels for a while now, like a shredded meat substitute.
  • And, there's an earlier cookbook: Cooking With Scraps by food writer Linsday-Jean Hard.

I guess the thing most foreign to me that I am also most likely (maybe?) to try in the near future will be one of several banana peel recipes out there, as we just so happen to have a plethora of ripening bananas at the moment. I'll keep you posted if I do... 

.

Thursday, June 17, 2021

Adventures in Cake Decorating #7 - Flame Cupcakes for Fireman Sam

0 comments

Another nephew's birthday party, another cartoon character–inspired birthday cake. Cupcakes of course, in this era of serving food with as little touching as possible.


These Fireman Sam cupcakes were a simple job of using store-bought decorations -- see the toothpick toppers and edible wafers -- so the creative part was choosing icing colors. 

I did yellow and blue icing to sort of match the main character's hat and jacket. And then, the most fun part, flame icing!

I learned a new trick from another blogger's post, How to Make Multi-Colored Swirled Cupcakes, which you can read for more details, but here's a quick overview of what I did to make the tri-colored flames atop the Fireman Sam cupcakes:

  1. Make three colors of buttercream. I made red, orange, and yellow.
  2. Glob each colored icing onto its own sheet of wax paper and chill for a short while in the fridge, until you can touch the icing without it sticking to your fingers.
  3. Use the wax paper to help you gently roll each color of icing into a thin log.
  4. Now put all three logs together and slide them into an icing bag. Let the icing warm back up to room temperature, so it's again easily squeezable.
  5. Have fun piping a tri-colored swirl!

Notes:

  • Keeping your three icing colors individually wrapped inside the piping bag, as instructed in the aforementioned Beki Cook's Cake Blog, will help keep each color more defined. Skipping the individual wraps and just letting the three colored logs of icing touch inside the bag works fine, especially if your colors are analogous (like red, orange, and yellow), but toward the end, because you've been squeezing, the colors will start to blend together. My last flame cupcake, as I used up the rest of the icing in the bag, was not multi-colored but rather a solid red-orange. That worked fine for the Fireman Sam theme, but it may not be OK if your colors are opposites, like blue and orange, which mix together to make gross-colored icing.
  • Edible pre-printed wafers are an easy way to decorate with precision -- no trying to draw the cartoon character yourself. The wafers taste like nothing, really. The kids may or may not believe you that they can actually eat them.

.

Thursday, March 4, 2021

Adventures in Cake Decorating #6 - Construction Site Cake

0 comments

Cakes have several things going for them at the moment.

  1. It's been a deep winter, cold, wet, and gray. We were buried in snow here, and even Texas had frozen over. Who doesn't feel like eating sugar and fat? (New Year's resolutions, shmoo schmear shmezoshmooshuns.)

  2. My coworkers had a secret-Santa gift exchange. My secret Santa sent me some great cake-decorating tools and an idea book. I've had cakes on my mind.

  3. A daily Pinterest notification reminds me of this cool construction site cake I made for a nephew's third birthday. (It must be my most photogenic cake, despite being served on a baking sheet.)


So, let's talk about it.

It's chocolate cake with chocolate frosting, all the better to represent the earth beneath our feet. A little extra cake baked in a bread pan made a partial tier on one end for a three-dimensional, excavation look. 

The edible decorations are candy: Whoppers as boulders and various Hershey minis for a brick or cinder-block wall. Crushed Oreos are the loose soil. I repeated my grass tufts from the Cars-inspired cakes, again using Wilton tip #233 and a little chocolate icing dropped into the piping bag with the green for the occasional streak of multicolor multidimension.

My sister-in-law found the fun orange traffic-cone candles. And, I did indeed use the toy bulldozer to bulldoze the "3" into the layer of Oreo dirt to reveal the chocolate icing mud beneath it.

Using toys as cake decorations always makes me think of a dinosaur cake I saw in the grocery store bakery, oh, ages ago, back when I wanted such a dinosaur cake for my birthday. (Let's be honest, I still think dinosaurs are pretty cool.) I remember it was a sheet cake with a small volcano (maybe made of cake and frosting, maybe made of plastic) and a river painted onto the frosting in deft shades and swirls to look like it was flowing. There were small plastic dinosaurs and plastic palm trees to complete the scene. It's been a long time since I've seen a cake in that style in a bakery case. 

Part of me wants to place nothing on a cake that isn't edible. Another part of me remembers that old dinosaur cake and realizes how fun (and handy) it can be to use toys as decorations. 

I never had that dinosaur cake for my birthday. This is not a lament. I had many awesome homemade birthday cakes as a kid -- one shaped like a flying saucer, a giant Rice Krispies treat in the shape of a jack'o'lantern, a stacked brownie-strawberry-and-whipped-cream thing. More than once I asked for apple pie as my birthday "cake" because I loved my mom's apple pies. But, the grocery store dino cake has stuck with me for some reason. It was one of those imprints that just never leaves your brain.

I wonder if any of the cakes I've made for my niblings will be among their Polaroids of life left out on top their mind-desk, easily rediscovered with a random sifting of the surface, or if they will blur into a kaleidoscope of birthday extravagance, where everything is so big and amazing that no one thing can stand out. Maybe they'll remember instead a super-delicious but plain-looking cake on a random Sunday afternoon, or a cake that toppled when the dog tore through the kitchen (it'll happen), or some other cake in a bakery window that they saw but never had.

.

Thursday, January 14, 2021

Adventures in Cake Decorating #5 - TV and Movie Cakes, Part 3

0 comments

Did you know? Little kids are into cartoon characters. So, I am again continuing the collection of TV- and movie-themed cakes I've created in recent history... (Parts 1 and 2 here and here, respectively.)

Paw Patrol Cupcakes

We've experienced a variety of birthday celebrations (and non-celebrations) during the pandemic, including this "walk by," front-yard party in May. Everyone got their own individually packaged Paw Patrol cupcake.


The adventure here was more in finding the packaging than it was making the cupcakes. Cake mix, white icing, and two Paw Patrol cupcake decorating kits, (bone-shaped sprinkles!) and... an online order of cupcake boxes that disappeared.

Other searches online brought up containers that didn't seem the right size, or seemed awfully expensive for just a single clamshell, or wouldn't arrive in time, or came in a pack of, like, a thousand.

Ultimately, we went to GFS and bought plastic cups with lids. A little on the tall side, but otherwise perfect cupcake packages. 


Important consideration: Use the lid as the "plate" for the cupcake, and the cup itself as a lid. So, it's upside down, got it? Otherwise, if you drop the cupcake into the cup and use the lid as a lid, the cupcake recipient will have to reach their fingers way down into the cup to pull out the cupcake or otherwise dump it out into their hand frosting-first. 

Another Ninja Turtle Cake

This one was a simple round cake with the face of the birthday boy's favorite turtle, Raphael.


Nothing to it!

Superman-Secret-Batman Cake

You've seen the Batman-Spider-Man cake. This was a Superman cake, with a hidden secret Batman symbol inside!


For the Superman icing, I piped a simple outline and then filled everything in using a star tip.

The secret Batman on the inside required much more work behind the scenes. Here's a rundown:


First, bake a chocolate, single-layer sheet cake. I added black food coloring to the chocolate to make it even darker. When the chocolate cake is cool, use a bat cookie cutter to cut out a whole bunch of bats. 

A note: Check the size of your cookie cutter against the pan for the outer cake. For this particular cake, you're going to stand the bats up inside of a round cake pan, so they need to be shorter than sides of the pan, or else you'll have bat ears--if not entire bat heads--sticking up out of the top of your yellow cake.

And, a lesson learned: I mistakenly thought a super-moist chocolate cake would be important for this step, because this chocolate cake will be baked again, and I didn't want it to dry out. However, the moisture that makes a decadent chocolate cake also makes the cake fall apart--not ideal for trying to hold an intricate shape. I had a rough time cutting out the bats and then keeping their bat-shape. A genoise sponge might work better. And, it won't dry out during the second bake, because it's surrounded by more cake batter.

Next, make a "wreath" of bat cut-outs in a circular cake pan. Stand each bat upright, standing on his wingtips, place another one next to him, and so on, making a line of bats that circles back on itself. 

Note: I then did a little extra cutting and smushing to fill in gaps, because, unless your cut-outs are already wedge-shaped so you can put the skinny side toward the center of the circle, there will be a space between each bat around the outer edge of your circle. Gaps are not the end of the world, but the luck of your cake-cutting may reveal a small break in the bat pattern.

Last, pour the yellow cake batter over and around the wreath of bats to fill in the rest of the cake pan. Bake slightly less time then the directions for the size of the pan you're using, because about half of the actual volume of the pan is already baked.

And then, you'll just have to wait until your start cutting it open at the party to see how the secret bats inside turned out!

Another Frozen (movie) Cake

While an ice-cream cake would have rounded out the theme in the best way, this is just an ordinary round cake sitting on top of an ordinary square cake. There were two fun new (to me) cake decorations, though.

We found pre-printed sugar sheets at a party store (the image of the movie characters as well as the snowflakes on the bottom tier). It's a lot like prepared fondant. Smooth some buttercream on your cake and place the sugar sheet on top. Fold, wrap, smooth, trim it however you need. It's an excellent shortcut to mimic the cake-printing a bakery can do for you.

And, sugar glass. Rock candy in sheet form. You can find many recipes and instructions out there, and they typically involve white sugar plus corn syrup, water, cream of tartar, and, of course, food coloring if you want. We made some blue and some clear.

After boiling your ingredients, pour the molten sugar into a lightly greased sheet pan and let it cool and harden. Then, pick up the pan and drop it on the counter to shatter. Fun.

Note: Humidity is the enemy of your sugar glass. A hot and humid kitchen will cause the candy to sweat. If you're sticking the shards of sugar glass into the cake like we did in reference to Elsa's castle, do it as near to presentation/serving time as you can, because the moisture from the cake itself will begin to soften the glass. 

Multi-Hero Cake

Six superheroes are represented on this rectangular cake, thanks to some card-stock stencils my sister made on her Cricut.


Maybe you don't need stencils. Maybe you can draw these superhero icons freehand. I didn't trust my own precision. If I remember right, I piped only the spiderweb and the lightning bolt freehand.

We applied the icing as though we were screen-printing, one layer of color at a time, letting it "dry" before applying the next layer so the colors wouldn't bleed together. First, we made the six solid-color squares and then chilled the cake in the fridge for a few minutes or more, however long needed so the buttercream "crusted," or solidified a bit. Do a touch test. Can you gently poke a dent in the buttercream without it sticking to your finger?

Using Iron Man as an example, we lay the stencil of Iron Man's helmet on the yellow square and gently dabbed and spread in the red portions. Then, we carefully lifted the stencil straight up off of the cake and put the cake back in the fridge so the red icing can harden. The next step was laying the stencil back on, lining it up with the red sections already in place, and then dabbing and spreading in the white piece. Ta-da! 

We did something to each square each time the cake came out of the fridge. It was not necessarily the same color being applied to every square, but rather working in whatever layers made sense for that particular image. Example: At the same stage we stenciled in Iron Man's red outline, we made the outer red ring of Captain America's shield and the red portions of Superman's S. But, we also made the yellow oval for Batman's symbol, the white circle for the Flash, and the black spiderweb for Spider-Man.

Then, to finish and cover up the borders between each square, I piped a flat gray ribbon and added rivets for a cool, welded metal thing.

Oh! I almost forgot. And a red fruit roll-up cascading off the corner for Superman's cape. Now, ta-da!

.


Wednesday, November 25, 2020

Friand, you're my friend... and actually a tart

0 comments


 Imagine my best (worst?) Forrest Gump impression: "I ate some."


I had blackberries and a few plums that were about to go bad. Recipe-hunting led me to this blackberry-plum friand. After further research, I'm not sure this technically qualifies as a friand. 

There are friand tins for making these little almond teacakes. If you don't have the real friand molds, a muffin pan is the appropriate substitute. This recipe, however, results in one large product rather than individual servings. The difference is muffin vs. bread. Same ingredients, different baking dish. Friand-inspired, perhaps? Friand-flavored? I'll call it a...

Blackberry-Plum Friand Tart
3 plums, pitted and sliced
1 cup blackberries
3 Tbsp sugar
Juice of half a lime
a shake of cinnamon
3/4 cup powdered sugar
1/2 cup almond flour
3 Tbsp all-purpose flour
1/8 tsp salt
2 egg whites
1/3 cup butter, melted

Preheat the oven to 400 F. In a small bowl, stir the plums and blackberries with the sugar, lime juice, and cinnamon. Set aside.

In a medium bowl, whisk together the powdered sugar, both flours, and salt. Whisk the egg whites until frothy. Add the egg whites and melted butter to the dry ingredients and stir just until blended.

Pour batter into a greased, 8- or 9-inch pie plate or other baking dish. Top with the fruit and its juices. Bake for 30 minutes, then cover with foil and bake another 10 minutes, until the cake is deep golden and the fruit is bubbling. 

Serves—honestly?—4, max.
.

Friday, February 16, 2018

Adventures in Cake Decorating #5 - TV and Movie Cakes, Part 2

0 comments
Continuing the collection of TV- and movie-themed cakes I've created in recent history... (Part 1 here; look ahead to Part 3 here.)


Cars Cakes
I enjoyed designing this birthday cake with my sister. The race track is crushed Oreos, and the road signs and cones are foam stickers on toothpicks. We created the ramp/bridge by cutting two cupcakes into wedges and laying a small piece of cardboard across. I tried to give the grass tufts more dimension by striping a little brown icing in the piping bag with the green.


I repeated the idea soon after for a dinner at church kicking off REV Wednesdays. "REV" at the time stood for "Raising Every Voice," but because it also had a "rev your engines" energy, there had been a race car theme.

This time I did a round two-tier cake, with an Oreo track spiraling up the tiers and paper decorations on toothpicks.

Frozen Cake
It's too bad this wasn't an ice cream cake, because that would have completed the "Frozen" theme, but this was another one baked and assembled pretty quickly in the short hours before the party.

On the bottom tier, there are swirls in three shades of blue, growing lighter from bottom to top, the color and technique both skills I was still improving upon as I went. Then the middle tier a periwinkle purple with white snowflakes piped on, while strategically dripping white icing forms a sort of snow cliff on top.

Olaf's head as the topper is made of two cupcakes cut and sculpted a bit and stacked together top-to-top (the top one is upside down) to get his sort of bulbous, tapered head shape. If we had done more planning ahead, I'm sure we could have found some candy to use as his stick arms, but in a pinch, we made them out of twisted paper.

Cookie Monster Cupcakes
I can't take any credit for this cupcake idea, copied right off the internet. I can tell you it was the easiest decorating job ever, and turned out very cute—as you can see. The little chocolate chip cookies are Famous Amos bite-size; we broke them in half before sticking them into the frosting. You can find the candy eyeballs in the baking aisle of a grocery or craft store.


The ABC and 123 cookies we made in similar fashion as the WordWorld character cookies, just placing them with edges touching on the cookie sheet so each set baked together as one cookie. But, do you want to know a secret? I don't have number cookie cutters.

So, the number 1 is the letter I, the 2 is a Z that I mushed into shape, and the 3 is a backwards E, also mushed a little. Ta-da!

Trolls Cake
My sister and I seriously considered making spun-sugar troll hair for this cake, which would have elevated the cake to a new level of awesome... maybe another time.

Instead we went the easier route and stuck with buttercream. Simple round cake and rainbow colors, topped with three cupcakes mounded with icing to represent a few troll heads. If you can't tell, the pink one with the blue bow is Princess Poppy.


And that sums up our adventures in TV and movie themes. So far.


Thursday, February 8, 2018

Adventures in Cake Decorating #5 - TV and Movie Cakes, Part 1

0 comments
Has it really been a year and a half since I last posted a cake adventure? So many nibling birthdays since then!

Forget chronological order; this one will be a collage of the TV- and movie-themed cakes my niece and nephews have requested thus far.

Batman-Spider-Man Cake
Actually, the first was probably not even for a nibling's birthday, but for a friend's son. We threw this together only a couple of hours before the actual birthday party, and boy, did that red icing look pink! But I used all—all!—of my red food coloring. And, the black icing looked purply-gray. Oh, we were worried.


Icing color does darken over time, but with only two hours... These colors weren't promising. However, in the light of day, without any true reds nearby to compare it to, and with people's brains sort of auto-correcting for them as they know inherently that Spider-Man is red and black, not dark pink and grease-gray, it turned out just fine!

Lessons: I will never again use red as the main color—it's much easier to get a nice red in small batches. For black icing, start with a chocolate base.


WorldWorld Cake
The cookies were my favorite part of this next one, but the cake was fun, too. (Notice the sparing use of red here.) The icing got a little melty in the warm kitchen,\ and had to be repaired and re-chilled, or else the letters of "CAKE" might have had more definition, but whatever. It's cute.

"WordWorld" is a kids' show about phonetics, if you didn't know. The characters are animals whose bodies are shaped out of actual words.

We cut out alphabet sugar cookies to spell the words "SHEEP," "DUCK," "DOG," and "FROG" and lay the letters with edges touching on the cookie sheet, curving or stretching the word a bit to shape into an animal. Pieces of dough scraps formed the animals' extremities, like feet, ears, eyeballs and wings.

Bake, cool, paint with icing. Fun!

WordWorld™
I should have skipped the ants marching up the side of the cake. I wrote "ant" as their bodies and added legs and antennae, but they just turned out sloppy, and now it just looks like the red letters were bleeding (look at the R on the far right side of the cake).

Ninja Turtle Cake

This was a layered round cake with upside-down cupcakes to form the turtles' heads. I mean, just look at a Ninja Turtle's head. It's shaped like an upside-down cupcake!


Trim the dome off the top of each cupcake so it has a flat surface when it's upside-down. After they're iced and topped off with a manhole cover, the muffin-tin shape is no longer obvious. The sewer lid was a cardboard circle, covered in foil and iced. Sorry, not 100 percent edible.

Mickey Mouse Cake
Remember how I vowed never again to use red as the main icing color?


When I watch cake-decorating videos, the people seem to be using twice as much icing as I normally do, which I think gives them more flexibility to smooth it all out. (And yet, their recipes don't seem to result in such large amounts...? It's a conspiracy. "Here's the amount of icing you'll need to cover the cake, unless you want it to look professional, and then you should secretly double it.")

In my effort to mimic their techniques and smooth the icing more easily, of course I overcompensated and made twice as much red icing as I needed to. Sure, I plopped plenty on the cake and wielded my spatula with great ease, but what I consider to be a large volume was leftover and wasted.

Maybe if I'd used the same amount of food coloring (i.e., all of it) with half the amount of sugar and butter, we would have seen better results. But then I bet you I'd have run out of icing and been spreading it thin. Also, even though my food coloring was the "no-taste" red, in large quantities, you can taste it.

Nevertheless, it did look red (red enough?) to the party guests, even with a red tablecloth right underneath it. I would call it a light red, but it wasn't pink as I'd originally feared when I left the colors to deepen overnight.

If I did it again, I would swap the tiers and use the white with little stars and Mickey heads for the large cake, and the red with white trouser buttons as the little smash cake on top.

And, I think four cakes are enough for one post. Parts 2 and 3 of my character-driven baking are here and here, respectively.


Tuesday, May 31, 2016

Adventures in Cake Decorating #4 - Monster Cakes

0 comments
The exploits in icing—and more importantly, the lessons learned from them—have been piling up these last few years thanks to The Birthdays. These would be primarily my niece and nephews' birthdays, but there are others I hope to document here as we get caught up.

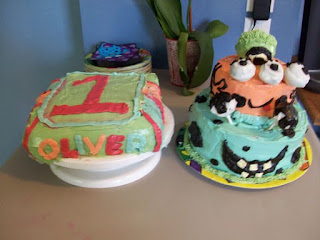
We're way out of date—the first birthday cake I'm about to show you (that would be the first cake for a first birthday) was for a nephew who just this year turned four, so... yeah. But, begin at the beginning, right?

The Monster Cake

This was a fun cake. It was a ton of work, but I'd actually love to do it again because I have learned so much since then. First of all, I would make it less droopy.

This cake overcame such baking obstacles as:
  • The cake won't keep its structure.
  • The cake won't bear the weight of stacking.
  • The cake pops are falling apart when we dip them.
  • The dogs ate half the cake.
It's hard to say what was the biggest or most important lesson I learned while making the monster cake, but there were more than a few important lessons.

You're Probably Thinking Too Big
Sketch of the Grand Idea
I remember describing the initial concept of the cake to my sister as a "grand idea," but we could have executed it on a less grand scale. Or, she should have invited more people. This first birthday was a big party, so we used three boxes of cake mix—well, four, because of the dogs, but there was the equivalent of a whole cake leftover, maybe more. 

Now I'm more realistic in basing the cake size on number of servings. Search for a cake serving chart, and you'll see that an ordinary two-layer round cake can serve up to 20 people depending on how you slice it. (Although I know a certain family member who would just as well slice any round dessert into eight humongous servings and call it day). And, know your crowd. Often you can count on a small percentage who aren't going to eat any cake.

Freeze the Cake Balls and Shorten the Candy CoatingNot pictured except in my "grand idea" sketch were the cake pops we also made to complement the monster cake. We decorated a few of them to look like eyeballs and various little monsters until things got frustrating (cake balls falling apart, Candy Melts getting clumpy) and we were running out of time, and then we simply dipped them in clumpy white Candy Melts. Ta-da!

Cake balls or cake pops (just add a stick and now it's a fad!) can be easy if you follow some basic rules. They can be a picturesque fail if you don't. Form the balls, stick the sticks and then freeze them before you start dipping them in the melted candy coating.

Overheat the Candy Melts and they get clumpy. So microwave them gently and stir, stir, stir. If there are still some solid pieces, stir some more until they melt. It is OK to reheat them several times as needed, but for only 20 seconds at a time on a low power. The melted Melts are still rather thick and not an ideal dipping medium. Add a spoonful of melted shortening (vegetable oil also works) to slightly thin out the coating, and now dipping those cake pops is a cinch. Yeah, I said it.

Moisture and Structure are (Somewhat) Mutually Exclusive
Almost all cake mix boxes are labeled "super moist deluxe" or some such thing, but they're really just ordinary cake, aren't they? Plain old ordinary cake is what you want for a sturdy structure. The cakes that are truly super moist, like the ones with pudding in the mix or your chocolate cake recipe that calls for mayonnaise, are delicious for an ordinary-sized single or double-layer cake with no fancy stacking or shaping. But the extra delicious moisture provides no solid foundation and will not reliably support multiple tiers. The dowels are wont to tilt in that squishy loam of deliciousness.

We originally planned for a four-tier monster of a monster cake: A square on the bottom with fun stripes and birthday boy's name, then a round tier decorated as a blue and black polka-dotted monster with a toothy grin and googly cake ball eyes, topped with an orange monster with more cake ball eyes plus a tail that wrapped round the back, and a green hairy one-eyed cupcake-sized monster on top as the baby's personal "smash cake." The weight of the tiers was too much for the moist delicious cakes to hold, so the bottom tier became its own separate cake. We simply frosted over the mess on its surface caused by all the attempted stacking and piped on a giant number 1. In case anyone wasn't sure which birthday this was.

Icing Covers All Flaws
With the exception of deteriorating structural integrity, icing can mask just about any mistake on the cake, as mentioned just a few lines ago. Crooked line? Wipe it of and ice a new line over it. A misshapen edge? Just add more icing and smooth it out. Dogs ate half the cake? Bake more cake for a replacement section and use icing to glue it all back together.

"Remember this is the side the dogs bit off of, and we just won't serve any pieces cut from this side, OK?"