This recipe was born of a very, very, very cold day and the impetus to use things up from the fridge and freezer.
 |
| French onion soup bowls under the broiler. |
I typically approach with skepticism recipes for the pressure cooker and even slow cooker for foods traditionally made low and slow in the oven or on the stovetop. I still do approach them, however, because I am appreciative of convenience and speed, and I'll give these recipes a chance to prove themselves. This time, it was French onion soup, and I'd be conducting two experiments with this recipe.
Experiment #1 was using the Instant Pot for this soup I've only ever made on the stove. Experiment #2 was swapping the baguette slices that traditionally top this soup for some failed meat bread I'd made for Christmas (but still wrapped and stored in the freezer because the failure didn't make it inedible or unsafe, so I wasn't about to just trash it).
I started with this Instant Pot French Onion Soup Recipe from Simply Recipes, mainly because it was one of the first that came up in my search, and it lived up to the website's name, seeming simpler than the other recipes at the top of the list.
Below is my adapted version, the point of which is to encourage you, too, to wing it. But first, some answers.
What on earth is failed meat bread? Meat bread, when it is not a failure, is the name I know for a loaf of white bread with forcemeat (a seasoned, slow-cooked mixture of meat -- you might also call it a pâté) rolled up inside like a jelly roll. It requires a blog post all its own, and so let me just jot that on my to-do list. For now, a quick summary: Meat bread is a family tradition, and this year, I made two batches, because my first batch failed. The loaves did not rise. I hypothesize that I either killed the yeast with water too hot, or the meat mixture was too soggy and weighed down the dough, or both. But, I didn't throw out the failed meat bread! I was not going to waste good meat or the six or so cups of flour that went into it. It was edible. The meat part still tasted great. The bread part was just... stodgy, like a very heavy dumpling.
 |
| Meat bread should not be this squat. |
Why did I use both apple cider vinegar and brandy instead of sherry? Common substitutes for sherry in a French onion soup are dry wine or vinegar. My stovetop recipe uses port. If you use wine, the addition of brandy approximates the fortified nature of sherry. I had no sherry or port or good dry wines at home, but I had brandy and cider vinegar. I didn't want to use an entire quarter-cup of the brandy just for soup! At the same time, I didn't want the vinegar alone to give the soup too much tang. So, I split the difference.
All other substitutions can be explained by this: That's what I had on hand, and it was certainly close enough. Also, the original recipe says it makes 6 servings -- I'd call it a solid 4 servings. It's so good, you don't want just a small bowl.
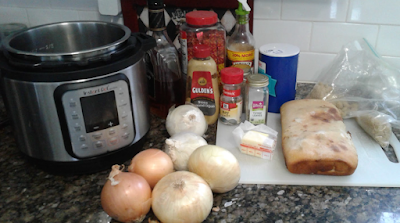 |
| Ready to make Instant Pot French onion soup. |
Ingredients- 1/4 cup unsalted butter
- 5-6 medium onions of any kind (but preferably some sweet variety included), halved, peeled, and sliced 1/4-inch thick
- 1 tablespoon brown sugar
- 1 1/2 teaspoons salt
- 2 tablespoons cider vinegar
- 2 tablespoons brandy
- 4 cups beef broth (I used 4 beef bouillon cubes and 4 c. water)
- 1 teaspoon Worcestershire sauce
- 1/4 teaspoon ground black pepper
- 1/4 teaspoon dried thyme leaves
- 1 bay leaf
- 4 1-inch thick slices of hearty white bread (like French bread or a failed homemade white loaf with meat rolled in, like mine)
- 1 1/4 teaspoons Dijon mustard
- 4 slices Swiss cheese, any variety.
Directions
- Select the high sauté setting on your pressure cooker, which may default to a cooking time of 30 minutes. You will need at least 30 minutes to sauté the onions. (See my note in Step #3.)
Add the butter to the pressure cooker. Once it has melted, add the onions, sugar, and salt and stir with a wooden spoon, separating the onion layers and coating them with the butter. - Cover the pot (but keep lid unlocked or at least vented) and let the onions cook, without stirring, for 10 minutes.
- Uncover the pot. The onions will be softened but not brown yet. While wearing an oven mitt, hold the rim of the inner pot in place, and stir the onions vigorously. Continue to stir the onions every 2 minutes, making sure to scrape up any brown bits from the bottom of the pot, which will begin to develop more and more as time passes. Do this until the onions are caramelized and golden brown, around the time your pot's 30-minute sauté cooking program has ended and the pot turns off automatically.
Note: I needed to hit the sauté button again and continue cooking and occasionally stirring for another 15 minutes or so, perhaps because my Instant Pot is a smaller one and so my onions were piled higher. - While the pot is off but still hot, and the onions are sizzling, add the cider and brandy. Use the wooden spoon to thoroughly scrape any remaining brown bits from the pot bottom. Then stir in the broth, Worcestershire, thyme, bay leaf, and pepper.
- Secure the pressure cooker lid in its sealing position, select pressure cook, and set the time for 5 minutes at high pressure.
- When the cooking program ends, let the pressure release naturally for at least 15 minutes, then vent any remaining steam. Discard the bay leaf.
- To make the toasts: Preheat the broiler on your oven. Place your sliced bread (meat or French) on a baking sheet and toast, a couple of minutes on each side, depending on your broiler and your preferences -- just watch the bread closely and flip when it's as toasty as you like.
- To finish the soup and serve, place broiler-safe serving bowls on the baking sheet, ladle soup into the bowls, almost filling them. Spread the toast slices very sparingly with Dijon mustard (1/4 teaspoon per slice) and place them on top of the bowls of soup. Lay a slice of cheese onto each baguette slice. Broil the soups for 3-5 minutes, or until the cheese is bubbly and beginning to brown.
The verdict: Delicious.
Experiment #1: The soup itself tasted fabulous. The Instant Pot recipe didn't skip the time you need to caramelize the onions, but it sped up the second half of the recipe where a long, low simmer would typically infuse the broth with flavor. I think my selection of 3 different onion types contributed to the complexity of the broth, and also, the combination of brandy and cider added the right amount of flavor depth and tang. Yes, I would make this Instant Pot French onion soup recipe again.
Experiment #2: The savory blend of pork and beef in the meat bread matched the flavor profile of the soup so well, you almost didn't notice it was in there... which arguably is a reason not to use meat bread as your toasts -- you're losing the star of the bread into the soup. However, it was an excellent way to use the failed meat bread slices, which, eaten alone, offered only the meat as a redeeming quality. Here, the bread soaks up the soup and holds the cheese like a good crouton should -- you'd almost never know it was a failed bread. Almost. I'll give myself a pat on the back for judicious use of a near-useless food item, but I would not make meat bread my first choice in French onion soup crouton, because: Why hide the meat bread (unless it was a failed loaf)?
.


