
I don't go on hiatus on purpose; it just happens. But I am breaking the hiatus (and then I'll get right back to it, I promise you), to spread word of a magnificent invention: the invisible bicycle helmet.
I read this article on Yahoo! and watched the video that came with it and am in awe. Spoiler alert: It's technology that already exists but never in such a personal form. Think airbags and self-inflating life rafts. Brilliant!
The video tells a brief story of how two Swedish women, Anna Haupt and Terese Alstin, brought their idea to life and brings to my mind the adjectives revolutionary, inspiring, visionary. And, probably awesome, too. My favorite quote in video comes from Alstin: "Cars are so yesterday. Bikes are the future."
Wednesday, November 13, 2013
Friday, April 26, 2013
Arbor Day - Did you know?
Did you plant a tree today? Me neither. No space. I suppose I could have a bonsai in my cubicle...
Actually, I almost forgot about Arbor Day until earlier this week I noticed colorful tags hanging from the skinny trees that line the streets of downtown Chicago. Morton Arboretum was advertising the benefits of trees with a bunch of "Did you know" tags that told us why every tree matters. I thought it was neat even though I already did know most of their facts:
1. Trees clean the air we breathe. Well, duh.
2. Trees keep us cooler. Yep, made in the shade.
3. Trees increase our homes' value. I can see how.
4. Trees help us relax. You're kidding.
5. Trees make our streets quieter. Noise buffers. Makes sense.
But one was new to me and led me to "learn more at mortonarb.org..."
6. Trees make our cities safer. What?
According to the arboretum's website, in areas near trees and natural landscapes, there is less domestic violence and fewer crimes, and people drive slower. Hm. Probably because everyone is so relaxed.
On Morton Arboretum's website (already linked above) you can read more details about all six of those tidbits as well as a few more, so check them out. And, if you can't actually plant a tree to celebrate Arbor Day today, at least go spend some time appreciating trees. Walk past one, admire it, hug it, climb it, talk to it, whatever.
Actually, I almost forgot about Arbor Day until earlier this week I noticed colorful tags hanging from the skinny trees that line the streets of downtown Chicago. Morton Arboretum was advertising the benefits of trees with a bunch of "Did you know" tags that told us why every tree matters. I thought it was neat even though I already did know most of their facts:
1. Trees clean the air we breathe. Well, duh.
2. Trees keep us cooler. Yep, made in the shade.
3. Trees increase our homes' value. I can see how.
4. Trees help us relax. You're kidding.
5. Trees make our streets quieter. Noise buffers. Makes sense.
But one was new to me and led me to "learn more at mortonarb.org..."
6. Trees make our cities safer. What?
 |
| http://www.mortonarb.org/arborday/every-tree-matters.html |
On Morton Arboretum's website (already linked above) you can read more details about all six of those tidbits as well as a few more, so check them out. And, if you can't actually plant a tree to celebrate Arbor Day today, at least go spend some time appreciating trees. Walk past one, admire it, hug it, climb it, talk to it, whatever.
Monday, April 22, 2013
Socks into Arm Warmers
In celebration of Earth Day, let's re-purpose something.
How about those great knee-high argyle socks that have holes in the toes and heels? The important part of the sock is worn thin and pretty much useless now, but the section that goes from ankle to knee never wears out. It would be a shame to waste all that colorful fabric.

And so the socks become arm warmers! This morning, I made it a 30-second project by just snipping across the toes. If you want to finish them off and ensure no unravelling, you'll probably want to sew the edge.
You might wonder what is the point of arm warmers when you could just wear a long-sleeve shirt. See, while I'm biking in cooler weather, my core heats up from the exertion while my extremities remain frozen in the wind. Layering a jacket over two shirts only makes my armpits sweat more. Get the drift? I need more layers around my arms than I do around my chest.
Brightly colored argyle does just the trick. Maybe it will also make me noticeable to drivers.
Shared at Inspire Me Monday, How To Tuesday, Frugal Days, Sustainable Ways
Wednesday, April 17, 2013
...and why is there glass all over the sidewalk?
The missing first half of that question, in case it's not obvious in your part of the world, is Where is the warm weather??? But it's April in Chicago. What do I expect? That's why the second half of my guttural yell to the skies—and the title of this post—is the more pertinent question.
Every spring, I wonder this. While I prefer to ride on the generally smoother asphalt of the street, there are some not-so-bicycle-friendly stretches of my suburban commute where I'm better off following the sidewalk, which is generally free of pedestrians anyway. It is there that I always encounter an obstacle course of broken glass, especially early in the cycling season.
People! How hard is it to hold on to your empty bottles until you get to the nearest recycling bin? Even a trash can would be better than the sidewalk! Who taught you it was OK just to throw your trash wherever?
Oh, but I see. You and your buddies were simply enjoying a nice bottle of Jim Beam during your night out cruising and needed to ditch the tangible evidence... By tossing it out of your car window.
Well, you might have avoided an "open container" violation, but now you owe me five bucks for a new rear inner tube. And then I'm going to report you for littering. Oh, and also a DUI.

P.S. Earth Day is Monday. Why don't you go to Practically Green and see if you can complete at least ten actions by the end of the month to earn the limited edition Earth Day MVP badge?
Every spring, I wonder this. While I prefer to ride on the generally smoother asphalt of the street, there are some not-so-bicycle-friendly stretches of my suburban commute where I'm better off following the sidewalk, which is generally free of pedestrians anyway. It is there that I always encounter an obstacle course of broken glass, especially early in the cycling season.
People! How hard is it to hold on to your empty bottles until you get to the nearest recycling bin? Even a trash can would be better than the sidewalk! Who taught you it was OK just to throw your trash wherever?
Oh, but I see. You and your buddies were simply enjoying a nice bottle of Jim Beam during your night out cruising and needed to ditch the tangible evidence... By tossing it out of your car window.
Well, you might have avoided an "open container" violation, but now you owe me five bucks for a new rear inner tube. And then I'm going to report you for littering. Oh, and also a DUI.
P.S. Earth Day is Monday. Why don't you go to Practically Green and see if you can complete at least ten actions by the end of the month to earn the limited edition Earth Day MVP badge?
Thursday, March 28, 2013
Adventurously Green
Almost exactly a year ago, I signed up on Practically Green to compare our habits against a list of environmentally responsible ideals, to set goals that would improve our greenness and to in turn earn badges that would, well, be just for fun.
I had lamented that the "Healthy Green Lunch" badge was rather unattainable for us because our grocery budget just isn't suited to include so many organic items, but I was going to work on a few improvements in this area anyway, like using glass containers in the microwave instead of plastic and making reusable sandwich bags. ...Still working on those. We have taken salad or soup in mason jars for lunch a few times, but we regularly use those ubiquitous cheap plastic lunch containers, the safety of which always seems to be under review.
 There are other goals I have made and completed, though, like recycling our old running shoes (the Nike store at a nearby outlet mall had a drop-off), cancelling our yellow pages delivery via yellowpagesoptout.com, and recycling a stockpile of plastic grocery bags at our grocery store's drop-off. And badges I've earned: Conscious Consumer, Eco-Commuter, Frugalista, Grow Your Own and DIY. These have earned me enough points to go up a level from "Solidly Green" to "Adventurously Green." I like the title. Maybe I shouldn't add anymore green actions so as to keep it...
No, actually I do have some new goals to complete over the summer, and even then, I don't think they'll add up to the amount of points required to move up another level. Regardless, it's not about badges and levels (though that makes it more fun, doesn't it?). Here are a few of my goals:
Switch to reusable sandwich bags. For real this time!
Switch to a reusable coffee filter.
Join a community-supported fishery. If there is such a thing in my community.
Donate clothes to charity. You know that pile has been sitting there for months.
Plant a rain garden.
Install rain barrels. Dare I pester the homeowners' association?
Earth Day's coming up. The perfect time for such verdant goals. What are yours?
I had lamented that the "Healthy Green Lunch" badge was rather unattainable for us because our grocery budget just isn't suited to include so many organic items, but I was going to work on a few improvements in this area anyway, like using glass containers in the microwave instead of plastic and making reusable sandwich bags. ...Still working on those. We have taken salad or soup in mason jars for lunch a few times, but we regularly use those ubiquitous cheap plastic lunch containers, the safety of which always seems to be under review.
There are other goals I have made and completed, though, like recycling our old running shoes (the Nike store at a nearby outlet mall had a drop-off), cancelling our yellow pages delivery via yellowpagesoptout.com, and recycling a stockpile of plastic grocery bags at our grocery store's drop-off. And badges I've earned: Conscious Consumer, Eco-Commuter, Frugalista, Grow Your Own and DIY. These have earned me enough points to go up a level from "Solidly Green" to "Adventurously Green." I like the title. Maybe I shouldn't add anymore green actions so as to keep it...No, actually I do have some new goals to complete over the summer, and even then, I don't think they'll add up to the amount of points required to move up another level. Regardless, it's not about badges and levels (though that makes it more fun, doesn't it?). Here are a few of my goals:
Switch to reusable sandwich bags. For real this time!
Switch to a reusable coffee filter.
Join a community-supported fishery. If there is such a thing in my community.
Donate clothes to charity. You know that pile has been sitting there for months.
Plant a rain garden.
Install rain barrels. Dare I pester the homeowners' association?
Earth Day's coming up. The perfect time for such verdant goals. What are yours?
Wednesday, March 20, 2013
Guinness Pie, a St. Patty's treat
Every year for St. Patrick's Day, as many Americans do, I make corned beef and cabbage while Len makes Irish soda bread. We love the meal, we love the leftovers. Then just a couple of weeks before St. Patty's Day 2013, I stumbled upon a recipe for Guinness stew pot pies.
Some traditions must be overturned.

It does make me wonder, though, just how much beef and potatoes we could stand to eat in a short time, because for future St. Patrick's days, I'm not sure how I'll decide between traditional corned beef and cabbage and traditional Guinness pie.
You'll have to go to Green Eggs & Spam's website for the recipe I used. (Must give credit where credit is due.) But here I will share my Guinness pie experience in photos.
My friend Robin often posts some great "here are your ingredients" images on her blog, so I thought I'd give an ingredients shot a shot... And yes, my garlic cloves are sprouting greens.

I've made this recipe twice now (immediately upon discovery and then again for St. Pat's), and I found it quite helpful to have my veggies chopped and broth measured before I started doing any cooking. You know, mise en place.

You might notice peeking out of the top right corner something else I always find handy to have "en place"—a receptacle for collecting compost. So it's chop, chop, chop, peel, peel, chop, chop, and then all the carrot peels and onion skins and bad spots on the potatoes are quickly swept away, leaving my cutting board and counter top clean and roomy and making for a quick and easy dump into the compost bin out back.

The first step, once the ingredients are all ready to go, so nice and organized like I'm on a cooking show or something, was flouring and browning the beef.
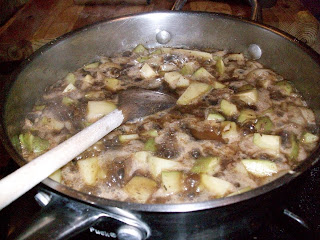
Then, simmering the potatoes, onion, and garlic in the beer.
Then adding the carrots and broth and simmering some more, before it all gets piled into a big dish with the beef to go into the oven for a couple of hours.

Our house smelled so good.
Crescent roll dough and four single-serve pie dishes, 30 minutes more in the oven...

Super delicious. I could have made six individual pies out of the stew, but we only have four of these cute pie dishes, so what remained was eaten later as simply stew.
That was my first time, when I tried the recipe out before committing to the new tradition. When I made it again two weeks later, I put a shepherd's pie twist on it, adding peas and decreasing the amount of potatoes in the stew itself and using fluffy mashed potatoes as the "crust."

Also pretty yummy.
On review, I prefer the original recipe's crescent roll crust. But, I liked the leftovers of the second version better -- stew mixed with mashed potatoes. Oh, baby.
Some traditions must be overturned.

It does make me wonder, though, just how much beef and potatoes we could stand to eat in a short time, because for future St. Patrick's days, I'm not sure how I'll decide between traditional corned beef and cabbage and traditional Guinness pie.
You'll have to go to Green Eggs & Spam's website for the recipe I used. (Must give credit where credit is due.) But here I will share my Guinness pie experience in photos.
My friend Robin often posts some great "here are your ingredients" images on her blog, so I thought I'd give an ingredients shot a shot... And yes, my garlic cloves are sprouting greens.

I've made this recipe twice now (immediately upon discovery and then again for St. Pat's), and I found it quite helpful to have my veggies chopped and broth measured before I started doing any cooking. You know, mise en place.

You might notice peeking out of the top right corner something else I always find handy to have "en place"—a receptacle for collecting compost. So it's chop, chop, chop, peel, peel, chop, chop, and then all the carrot peels and onion skins and bad spots on the potatoes are quickly swept away, leaving my cutting board and counter top clean and roomy and making for a quick and easy dump into the compost bin out back.

The first step, once the ingredients are all ready to go, so nice and organized like I'm on a cooking show or something, was flouring and browning the beef.
Then, simmering the potatoes, onion, and garlic in the beer.

Then adding the carrots and broth and simmering some more, before it all gets piled into a big dish with the beef to go into the oven for a couple of hours.

Our house smelled so good.
Crescent roll dough and four single-serve pie dishes, 30 minutes more in the oven...

Super delicious. I could have made six individual pies out of the stew, but we only have four of these cute pie dishes, so what remained was eaten later as simply stew.
That was my first time, when I tried the recipe out before committing to the new tradition. When I made it again two weeks later, I put a shepherd's pie twist on it, adding peas and decreasing the amount of potatoes in the stew itself and using fluffy mashed potatoes as the "crust."

Also pretty yummy.
On review, I prefer the original recipe's crescent roll crust. But, I liked the leftovers of the second version better -- stew mixed with mashed potatoes. Oh, baby.
Wednesday, March 13, 2013
Earth Hour 2013 - Join me!
Get ready to flip the switch. We're counting down to Earth Hour!
In case you haven't noticed the clock and logo in my sidebar, Earth Hour 2013 is Saturday, March 23, 8:30 p.m. your local time. And for those of you joining us for the first time, Earth Hour is a worldwide awareness event during which participants unplug all nonessential appliances and turn off all the lights for one hour. It is cool, it is fun, and yes, it is real. In fact, it has become huge.
The team of people behind this wonderfully dark demonstration have been posting some interesting news and ideas on their Earth Hour Blog. Here's just a glimpse of the topics:
What do I love about Earth Hour?
It's so visual. When you can see your city's landmarks go dim, suddenly the night sky is clearer, and so is the message.
It's impactful. If one hour of lights out can make a measurable difference, just imagine the difference we could all make by being just a little more mindful of what we could unplug every day.
But most of all, it's so easy! Just turn off all of your lights and—I feel like I have to throw this in every year—unplug your dang phone charger!
I will if you will. And I will, so...
In case you haven't noticed the clock and logo in my sidebar, Earth Hour 2013 is Saturday, March 23, 8:30 p.m. your local time. And for those of you joining us for the first time, Earth Hour is a worldwide awareness event during which participants unplug all nonessential appliances and turn off all the lights for one hour. It is cool, it is fun, and yes, it is real. In fact, it has become huge.
The team of people behind this wonderfully dark demonstration have been posting some interesting news and ideas on their Earth Hour Blog. Here's just a glimpse of the topics:
- Did you know that some hotels and casinos have been taking Earth Hour beyond the hour by extinguishing some of their lights for one hour every month? While it's primarily a symbolic gesture, it does have the practical application of a slight reduction in energy usage, and even a tiny decrease is better than an increase. I mean, you've seen how well-lit casinos are.
- Meanwhile, chefs all over the world are making an all-around green event out of Earth Hour. Restaurant patrons can dine on sustainable food items during the candlelit meal, while home cooks can try out some Earth Hour recipes created by their favorite celebrity chefs.
- Kids tend to latch onto an idea and become some of the most passionate activists, don't they? Some youngsters are doing some pretty cool things, extending Earth Hour into broader environmental campaigns.
What do I love about Earth Hour?
It's so visual. When you can see your city's landmarks go dim, suddenly the night sky is clearer, and so is the message.
It's impactful. If one hour of lights out can make a measurable difference, just imagine the difference we could all make by being just a little more mindful of what we could unplug every day.
But most of all, it's so easy! Just turn off all of your lights and—I feel like I have to throw this in every year—unplug your dang phone charger!
I will if you will. And I will, so...
Monday, March 4, 2013
A Time to Prune
The snow, like moth-eaten fleece, wears thin over the loamy bed that is now solid and unforgiving but slowly warming, bracing for the first impact of spade. Not long now.
Spring is looming and much is about to happen in the garden. Meanwhile, the dead of winter requires little of casual gardeners like us aside from reflecting, dreaming, planning.
There was pruning, though. In mid-January we pruned our apple trees for the first time, guided by instructions and illustrations we found online, like this helpful article from Weekend Gardener. The basic idea with these young saplings is to start planning the shape of the tree and to think ahead about how branches will grow, keeping them out of each other's way, preventing a bramble of twigs from clogging up the middle of the tree. It's a good bet we should have pruned even more aggressively than we did, but it's a little scary just to hack away at a living thing. I suppose that's why you do it in the middle of winter. The tree is well dormant, storing all of its life deep below the soil in its roots. It will simply awaken in the spring thinking, Hm. I feel lighter. I mean, if trees think. There's next winter, anyway, for additional pruning once we see how this summer's growth turns out.
The grape vines also need pruning this time of year, and I finally took care of that this weekend. Just in time, I think. Again, online articles were helpful in guiding my shears. The main idea with grape vines is to get rid of the newest growth.
We already cut back the raspberry bushes in the fall, when it's obvious which canes have just produced fruit and/or which canes are dead—both need to be removed. The blueberry bushes were too small for us to bother with pruning them (the rabbits did a lot of that anyway!), and actually, they might be dead. We'll soon see. I just purchased two more blueberry bushes. I may have to take soil amendment more seriously this time around.
This week is also the week we can reserve our spot at the community garden! ...And then wait a month and a half to get in there.
Friday, March 1, 2013
Chipotle Stuffed Sweet Potatoes
Did you ever try out a recipe thinking it looked pretty good and then it actually turned out fantastic? Like, "kick-you-in-the-crotch, spit-on-your-neck, fantastic?" (Thanks, Friends.) And so it was with these sweet potatoes. So delicious I surprised myself.
I was so inspired by these chipotle chicken sweet potato skins that I wanted to make them that very night, but I didn't feel like getting meat out of the freezer or going to the grocery store, so as I often do, I was going to substitute ingredients to avoid a trip to the grocery store (for example, I had peppers to use up in my fridge rather than spinach). Also, I didn't feel like saving the insides of the potato for something else.
So mine ended up more like twice-baked potatoes, and became a delicious and substantial vegetarian meal on their own.
Chipotle Stuffed Sweet Potatoes
Makes six stuffed potatoes, number of servings depends on how hungry you are.
3 medium sweet potatoes
2 tablespoons olive oil
2 tablespoons apple cider vinegar
2 cloves garlic, minced
2 jalapeño peppers, chopped and seeded (I used red jalapeños)
1 poblano pepper, chopped and seeded
2 teaspoons chipotle chili powder
1 teaspoon oregano
1 teaspoon cumin
salt and pepper
1 can black beans, drained and rinsed
shredded cheese
Preheat oven to 350 degrees. Wash the sweet potatoes and stab them a few times to make some steam holes. Bake in the oven about an hour, until fork tender. (You may want to position a pan on the rack below the potatoes to catch the sugary juice that seeps out of those steam holes—it's sticky and burns on the bottom of your oven.)
Meanwhile, combine in a large bowl the oil, vinegar, garlic, peppers, and spices. Set aside.
When the potatoes are done baking, remove them from the oven and crank the oven up to 400 degrees. Slice the potatoes in half lengthwise and, when they've cooled for a few minutes so you can handle them, scoop out the flesh. Put the skins on a baking sheet and brush their insides with just a little of the oil/vinegar mixture. Put them back in the oven for 5-10 minutes, just to help the skin crisp a little more.
Put the sweet potato flesh and the beans in the bowl with the oil/vinegar mixture and mash until there are no more solid chunks of potato and the seasonings are well blended with the potatoes and beans. It doesn't matter how many beans get mashed or stay whole.
Pull the potato skins back out of the oven. Stuff them with mounds of the potato/bean filling and top each with some shredded cheese. Put them back in the oven for another 10 minutes or so, until the cheese is nice and melty and everything is heated through. Serve hot.
Linked up at Friday Favorites, How To Tuesday
Wednesday, February 27, 2013
Quietly kicking off the 2013 garden
We've made it through February again, and I feel like my garden planning is behind schedule. But maybe not. We still have a good six weeks or so before we'll be able to get into our community garden plot, so as long as we get the indoor seeds going now...
Let's just glance at what's different this year.
First of all, I'm trying a new garden tracking website. Last year I joined Sprout Robot, which gave me a calendar of when things are supposed to happen, but seemed limited and didn't send me reminder emails as promised. I have since discovered myfolia.com, a "social garden tracker & organiser" that seems more comprehensive. So far, I've only signed up and named my garden, so stay tuned for a report on how the inputting of seed information goes and how the garden calendar shakes out.
So long, squash! We're only going into our fourth season in the garden plot, but we're already sick of battling squash bugs and powdery mildew. Our first time out, we grew almost nothing but squash simply because the space could be filled with viny things; we never ate so much butternut squash and pumpkin in our lives! The second year, we tried growing a much wider variety of gourds among other things; some failed miserably, others, a modest yield. Last year, even though we told ourselves we were giving up growing squash, I just couldn't stand to see the seeds go unused, and we planted a few kinds anyway. Pff! I was only reminded that it wasn't worth the effort. So this year, no squash! Forget it. Well, maybe I'll still try the cucumbers and maybe zucchini—no! None of those things. Don't let me do it!
Also, no beans. Like the squash, it's an issue of the yield not justifying the effort or use of space.
Instead, we're increasing the veggies that seem to do well no matter the uncooperative weather or our sporadically lackadaisical approach. More beets! More carrots! Okra, tomatoes, kale, and onions.
And then, even though it hasn't gone so well in the past, I still want to try a decent herb garden in our little front yard space. I even bought brand new seeds. Speaking of the front yard, we've been saving plastic two-liter bottles to use as mini greenhouses here. Perhaps to get some herbs or lettuce in earlier than usual; I haven't quite planned it out yet. At any rate, the snow needs to melt first.
Lastly, we've tried to put in a little more effort to preparing the soil. Even though the community garden was technically closed for the season, we stopped by our plot to make a late autumn deposit of compost and horse manure (collected from a guy down the road). The idea is that it will sit on top of the soil and "season" all these winter months and then be tilled into the soil as a wonderful, nutrient-rich amendment when the park district people come out in early April to give the ground a rough chop.
So anyway, it's another kick-off to big garden aspirations. I hope for everything, of course, but I promise nothing.
Monday, February 18, 2013
Adventures in Cake Decorating #3 - Book Cake
How do you celebrate the start of a new career as an English teacher? With a book cake!
The Complete Works of William Cakespeare, to be exact.
 This was a fun cake to make—and fairly simple. Also, the timing of other things in life required that the cake be made in advance, giving me the perfect opportunity to try properly freezing a fully prepared cake (as opposed to leftovers). I looked at several online articles and forums to research cake-freezing, and many of them claimed that the cake tasted even better after having been frozen and thawed. Who knew? I guess lots of people, actually, because that's the way most professional bakeries do it. You think they baked, frosted and assembled your five-tier wedding cake that very morning? Please.
This book cake was just a 13x9 rectangular cake cut in half and stacked to make a smaller rectangular two-layer cake. The rounded edges of the pan even helped it look more like an old book, but I still did a little bit of trimming for a flatter top and even sides, and those scraps plus a little leftover icing became a handful of cake balls. Yum. (This was a much more low-maintenance trimming job than the wedding cake I did in March 2012.)
Once again I used a boxed cake mix (Funfetti. It was a celebration!) and canned icing (chocolate and vanilla) for the simplicity of it all. When the cake had cooled, I cut it in half and placed the first half on a rectangle of cardboard cut just a little larger than the cake itself. I loaded the top of that half with vanilla icing, except for the edge that would be the binding of the book. I spread a thick layer of chocolate in that area, so I didn't have to worry when I started frosting the sides later whether icing of different colors would mix and ruin the look. Then I put the second half on top and adjusted the icing as necessary to make a nice level surface.
For frosting the top and sides of the cake, I put the vanilla frosting on first. It was just around three sides to be the pages of the book. I did it first because the chocolate would be sticking out past the edges a bit (as the book's cover), and chocolate can more easily cover vanilla mistakes than the other way around. I very carefully spread chocolate icing all over the top and along the one remaining long edge of the rectangle, and I let it go past the edges just a touch for a more realistic book cover look. Using my typical method of keeping the spatula clean and moist by continually dipping it in a cup of hot water, I smoothed the chocolate icing as best I could.

Finishing touches
I mixed a little food coloring into some vanilla icing to create the gold text and embellishments. Before piping out the text of the book's title, I practiced it first on a piece of paper and then lined the paper up with the cake to better judge the placement.
For the crease of the binding, I just drew a line in the icing with the tip of the spatula.
To create the look of pages, I trailed a fork through the vanilla icing around those three sides of the cake. I tried my best to keep even rows. It got the point across anyway.

Freezing the cake
First and most important in order not to mess up the beautiful frosting-work: Put the cake (still on its little rectangle of cardboard) in a box small enough to fit in your freezer but large enough so that the sides and top will not touch the cake. Put the boxed cake in the freezer until the icing has frozen solid. Touch it lightly, and if doesn't come off on your finger, give it a few more taps of the fingertips to make sure it is solid all over. Only then is it safe to proceed with wrapping.

Wrapping the frozen cake is important to protect it from freezer burn. So you freeze the cake solid first, and then take it back out of the freezer and wrap it with plastic wrap. I did two layers of plastic wrap. And then I wrapped the whole thing in foil. And then I put it back in the box and back in the freezer, and there it stayed for one week.
Until party day. The morning of the party, I took it out of the freezer and unwrapped it immediately. The icing was still perfectly intact. Not a smudge! The cake went into the fridge for a few hours to thaw slowly, and then as the party drew nearer, I put it out on the table. A little condensation appeared on the icing, which made me nervous, but it soaked back in or something, and nothing bad happened to the cake. All's well that ends well.
And the cake was delicious. Really, really moist. Must have been the freezing/thawing.
Shared on: Make the Scene Monday, Inspire Me Monday, Marvelous Monday, Creative Bloggers' Party & Hop, Sweet Sharing Monday, Friday Favorites, How To Tuesday
The Complete Works of William Cakespeare, to be exact.

This book cake was just a 13x9 rectangular cake cut in half and stacked to make a smaller rectangular two-layer cake. The rounded edges of the pan even helped it look more like an old book, but I still did a little bit of trimming for a flatter top and even sides, and those scraps plus a little leftover icing became a handful of cake balls. Yum. (This was a much more low-maintenance trimming job than the wedding cake I did in March 2012.)
Once again I used a boxed cake mix (Funfetti. It was a celebration!) and canned icing (chocolate and vanilla) for the simplicity of it all. When the cake had cooled, I cut it in half and placed the first half on a rectangle of cardboard cut just a little larger than the cake itself. I loaded the top of that half with vanilla icing, except for the edge that would be the binding of the book. I spread a thick layer of chocolate in that area, so I didn't have to worry when I started frosting the sides later whether icing of different colors would mix and ruin the look. Then I put the second half on top and adjusted the icing as necessary to make a nice level surface.
For frosting the top and sides of the cake, I put the vanilla frosting on first. It was just around three sides to be the pages of the book. I did it first because the chocolate would be sticking out past the edges a bit (as the book's cover), and chocolate can more easily cover vanilla mistakes than the other way around. I very carefully spread chocolate icing all over the top and along the one remaining long edge of the rectangle, and I let it go past the edges just a touch for a more realistic book cover look. Using my typical method of keeping the spatula clean and moist by continually dipping it in a cup of hot water, I smoothed the chocolate icing as best I could.

Finishing touches
I mixed a little food coloring into some vanilla icing to create the gold text and embellishments. Before piping out the text of the book's title, I practiced it first on a piece of paper and then lined the paper up with the cake to better judge the placement.
For the crease of the binding, I just drew a line in the icing with the tip of the spatula.
To create the look of pages, I trailed a fork through the vanilla icing around those three sides of the cake. I tried my best to keep even rows. It got the point across anyway.

Freezing the cake
First and most important in order not to mess up the beautiful frosting-work: Put the cake (still on its little rectangle of cardboard) in a box small enough to fit in your freezer but large enough so that the sides and top will not touch the cake. Put the boxed cake in the freezer until the icing has frozen solid. Touch it lightly, and if doesn't come off on your finger, give it a few more taps of the fingertips to make sure it is solid all over. Only then is it safe to proceed with wrapping.

Wrapping the frozen cake is important to protect it from freezer burn. So you freeze the cake solid first, and then take it back out of the freezer and wrap it with plastic wrap. I did two layers of plastic wrap. And then I wrapped the whole thing in foil. And then I put it back in the box and back in the freezer, and there it stayed for one week.
Until party day. The morning of the party, I took it out of the freezer and unwrapped it immediately. The icing was still perfectly intact. Not a smudge! The cake went into the fridge for a few hours to thaw slowly, and then as the party drew nearer, I put it out on the table. A little condensation appeared on the icing, which made me nervous, but it soaked back in or something, and nothing bad happened to the cake. All's well that ends well.
And the cake was delicious. Really, really moist. Must have been the freezing/thawing.
Shared on: Make the Scene Monday, Inspire Me Monday, Marvelous Monday, Creative Bloggers' Party & Hop, Sweet Sharing Monday, Friday Favorites, How To Tuesday
Wednesday, February 13, 2013
The science of Valentine candy
The thing about making candy at home is that it is really, really sticky. Impossibly sticky. And lava-hot at the same time—dangerous combo. But, the mess (and occasional finger burn) is so worth it. For easily less than five dollars, thanks to inexpensive everyday ingredients, you can cover your kitchen counter in more delectable tempered chocolate than fifty bucks'll get you at Godiva.
Oh, the other thing about making candy at home: specifics matter, especially temperatures. It's not an art; it's a science. You can't rush. Except when you have to.
 As usual, I wanted to try something new and special for a Valentine's Day dessert. (See failed 2010 Valentine dessert here and successful 2012 dessert here.) Mostly, I followed the Chocolate and Peanut Butter Nougat Squares recipe from Saveur, but with a few changes: First, I halved it. Second, I used bittersweet chocolate chips instead of semisweet. Third, I didn't sprinkle any salt whatsoever over the finished squares. And fourth, my confections were not squares.
My version of the recipe is below, following these words of encouragement: At first glance, this recipe is ambitious, but really, these candies can be made in one evening if you have at least two and a half hours to spare. Some of that time is waiting time, and the remaining intensive hands-on time is well worth it in the end. You may also be happy to know that the nougat, while impossibly sticky and stretchy, washes right out of your mixer bowl (or hair) with warm water, easy.
Chocolate-Covered Peanut Butter Nougat
Makes 50 or so candies
1 cup sugar
1/2 cup plus 2 tablespoons light corn syrup
1/4 cup molasses
1/4 cup plus 2 tablespoons water
1 1/2 teaspoons vanilla extract
1 small egg white (or about half to three-quarters of a large one)
1/2 cup peanut butter
1/4 cup plus 2 tablespoons dry powdered milk
1/4 cup powdered sugar
1/2 pound bittersweet chocolate chips
1 tablespoon vegetable shortening
Spray a 9x9-inch square baking pan with cooking spray; set aside. In a 3-quart saucepan, combine the sugar, 1/2 corn syrup, molasses, and water and heat over medium-high. Clip a candy thermometer to the pan and cook the mixture, without stirring. NOTE: At this stage, the pot will seem far too large for the amount of ingredients, but just wait. You will be glad for all three quarts of it once this stuff starts boiling.

The first important temperature on your candy thermometer is 235 degrees, so keep an eye on that 3-quart pot while you tackle these next steps. (It takes a little while for the temperature to reach 235, but when it does, you have to move fast!)
While the mixture is heating, put the remaining 2 tablespoons of corn syrup, the vanilla, and the egg white into the bowl of a stand mixer fitted with a whisk. Don't turn the mixer on yet. Then, in a separate bowl, combine the peanut butter, powdered milk, and powdered sugar and mix those three ingredients until smooth. Just get your hands in there and knead it like dough, then set it aside.
When the syrup in your 3-quart pot reaches 235 degrees, switch on the stand mixer and let it whip the egg white, corn syrup, and vanilla on high speed.

Now run back over to the stove because that syrup that had been so slowly creeping up to 235 degrees is now rocketing toward 250! When it reaches 250 degrees, remove the pan from the heat and just let it sit for 1 minute. (Mine continued to boil and get even hotter on its own, but either that is supposed to happen or it just luckily didn't adversely affect the nougat's outcome. OK, so not always an exact science.)
Your kitchen will smell like burnt molasses by now.
When 1 minute is up, reduce your mixer speed to medium and ever so carefully pour the hot syrup into the egg whites in a slow, steady stream. Scrape the last of the syrup out with a rubber spatula to get it all in there. Then, increase the mixer speed to medium-high and let it go for 4 minutes. It will become a creamy light brown and extremely sticky. Marshmallowy.
At the end of 4 minutes, remove the bowl from the mixer (forget scraping the whisk clean—time is too precious at this stage—just take a quick swipe at it to get what you can and lick the rest later!) and quickly but gently fold the peanut butter mixture into the egg white mixture until well combined. Scrape it all out into the sprayed 9x9 pan and smooth it out with a rubber spatula. I used a spatula in combination with a butter knife because otherwise I'd try to spread the nougat into the corner of the pan and only lift it all away again as it was stuck to the spatula!

Now, just let that sit and cool to room temperature. It doesn't take particularly long, which is why you had to work so quickly to get it mixed and in the pan.
If you taste the nougat now, the molasses nearly overpowers the peanut butter. I was disappointed by that taste. It wasn't bad, but it wasn't what I'd hoped for. However, I can now assure you that the strong molasses flavor fades by the time this whole process is finished, becoming a nutty undertone instead. Your sweetheart will never guess that molasses is in there.
When the nougat is cooled, transfer it to a cutting board. How? Hold the pan upside down over the cutting board. With a little encouragement from the rubber spatula around the edges of the pan, the whole square of nougat should just peel away and dump itself out.
It's still incredibly marshmallowy but not impossible to work with. Slice it up into a grid of approximately 1-inch pieces. In theory, that would be 9 columns and 9 rows, based on the size of the pan, but I cut roughly 11 columns and 7 rows. (I say, "roughly," because my columns were crooked and resulted in a corner of extra pieces.)

Using the knife and your fingers, pull the pieces away from one another, more or less preserving their rectangular shape.

Now, to melt the chocolate. Fit a pot of simmering water with a heat-safe bowl, and put the chocolate and shortening in the bowl. Heat, stirring often until the chocolate melts and the mixture is smooth. Remove the bowl from the pot and set it aside until the chocolate cools to 89 degrees.
The original recipe says that when the chocolate reaches 89 degrees, you can start dipping the pieces of nougat, and if the chocolate cools below 86 degrees, you should heat it back up to 89 to continue dipping. Well, we do not own an instant-read thermometer. So, I used the candy thermometer to keep watch on the chocolate's progress until it got down to 100 degrees, the lowest the candy thermometer goes. Then, I switched to... um... a digital oral thermometer. Yes, the kind you stick under your tongue to see if you have a fever. Yes, I cleaned it first! Even that thermometer only goes down to about 91 before it declares its subject dead, so I had to estimate when the chocolate was really ready, and I have no idea whether it cooled below 86 degrees during the dipping. But once again, my inexact science did not seem to be a problem in the end. (We have since gained another thermometer from a cheese-making kit, and it reads all the way down to zero. Science can resume.)
The chocolate takes forever to cool. Way longer than the nougat does. At last, around 89 degrees, the chocolate's good for dipping. With a couple of toothpicks or tiny forks, stab your nougat rectangles and dip them in the melted chocolate. It's OK if the rectangles become blobs. Shake off the excess coating, and then place each candy on a sheet of wax paper. Let them sit out at room temperature.
In about an hour, the chocolate will have set, or will at least be solid enough to handle. By the next morning for sure, you'll be able to put the chocolate-covered nougats into a heart-shaped box or whatever you like! You see I simply piled them into a bowl.

Try not to eat all of these fluffy little nuggets in one sitting.
This post shared on: Real Food Wednesdays, Frugal Crafty Home, Eat Make Grow, Frugal Days, Sustainable Ways
Oh, the other thing about making candy at home: specifics matter, especially temperatures. It's not an art; it's a science. You can't rush. Except when you have to.
 As usual, I wanted to try something new and special for a Valentine's Day dessert. (See failed 2010 Valentine dessert here and successful 2012 dessert here.) Mostly, I followed the Chocolate and Peanut Butter Nougat Squares recipe from Saveur, but with a few changes: First, I halved it. Second, I used bittersweet chocolate chips instead of semisweet. Third, I didn't sprinkle any salt whatsoever over the finished squares. And fourth, my confections were not squares.
My version of the recipe is below, following these words of encouragement: At first glance, this recipe is ambitious, but really, these candies can be made in one evening if you have at least two and a half hours to spare. Some of that time is waiting time, and the remaining intensive hands-on time is well worth it in the end. You may also be happy to know that the nougat, while impossibly sticky and stretchy, washes right out of your mixer bowl (or hair) with warm water, easy.
Chocolate-Covered Peanut Butter Nougat
Makes 50 or so candies
1 cup sugar
1/2 cup plus 2 tablespoons light corn syrup
1/4 cup molasses
1/4 cup plus 2 tablespoons water
1 1/2 teaspoons vanilla extract
1 small egg white (or about half to three-quarters of a large one)
1/2 cup peanut butter
1/4 cup plus 2 tablespoons dry powdered milk
1/4 cup powdered sugar
1/2 pound bittersweet chocolate chips
1 tablespoon vegetable shortening
Spray a 9x9-inch square baking pan with cooking spray; set aside. In a 3-quart saucepan, combine the sugar, 1/2 corn syrup, molasses, and water and heat over medium-high. Clip a candy thermometer to the pan and cook the mixture, without stirring. NOTE: At this stage, the pot will seem far too large for the amount of ingredients, but just wait. You will be glad for all three quarts of it once this stuff starts boiling.

The first important temperature on your candy thermometer is 235 degrees, so keep an eye on that 3-quart pot while you tackle these next steps. (It takes a little while for the temperature to reach 235, but when it does, you have to move fast!)
While the mixture is heating, put the remaining 2 tablespoons of corn syrup, the vanilla, and the egg white into the bowl of a stand mixer fitted with a whisk. Don't turn the mixer on yet. Then, in a separate bowl, combine the peanut butter, powdered milk, and powdered sugar and mix those three ingredients until smooth. Just get your hands in there and knead it like dough, then set it aside.
When the syrup in your 3-quart pot reaches 235 degrees, switch on the stand mixer and let it whip the egg white, corn syrup, and vanilla on high speed.

Now run back over to the stove because that syrup that had been so slowly creeping up to 235 degrees is now rocketing toward 250! When it reaches 250 degrees, remove the pan from the heat and just let it sit for 1 minute. (Mine continued to boil and get even hotter on its own, but either that is supposed to happen or it just luckily didn't adversely affect the nougat's outcome. OK, so not always an exact science.)
Your kitchen will smell like burnt molasses by now.
When 1 minute is up, reduce your mixer speed to medium and ever so carefully pour the hot syrup into the egg whites in a slow, steady stream. Scrape the last of the syrup out with a rubber spatula to get it all in there. Then, increase the mixer speed to medium-high and let it go for 4 minutes. It will become a creamy light brown and extremely sticky. Marshmallowy.
At the end of 4 minutes, remove the bowl from the mixer (forget scraping the whisk clean—time is too precious at this stage—just take a quick swipe at it to get what you can and lick the rest later!) and quickly but gently fold the peanut butter mixture into the egg white mixture until well combined. Scrape it all out into the sprayed 9x9 pan and smooth it out with a rubber spatula. I used a spatula in combination with a butter knife because otherwise I'd try to spread the nougat into the corner of the pan and only lift it all away again as it was stuck to the spatula!

Now, just let that sit and cool to room temperature. It doesn't take particularly long, which is why you had to work so quickly to get it mixed and in the pan.
If you taste the nougat now, the molasses nearly overpowers the peanut butter. I was disappointed by that taste. It wasn't bad, but it wasn't what I'd hoped for. However, I can now assure you that the strong molasses flavor fades by the time this whole process is finished, becoming a nutty undertone instead. Your sweetheart will never guess that molasses is in there.
When the nougat is cooled, transfer it to a cutting board. How? Hold the pan upside down over the cutting board. With a little encouragement from the rubber spatula around the edges of the pan, the whole square of nougat should just peel away and dump itself out.
It's still incredibly marshmallowy but not impossible to work with. Slice it up into a grid of approximately 1-inch pieces. In theory, that would be 9 columns and 9 rows, based on the size of the pan, but I cut roughly 11 columns and 7 rows. (I say, "roughly," because my columns were crooked and resulted in a corner of extra pieces.)

Using the knife and your fingers, pull the pieces away from one another, more or less preserving their rectangular shape.

Now, to melt the chocolate. Fit a pot of simmering water with a heat-safe bowl, and put the chocolate and shortening in the bowl. Heat, stirring often until the chocolate melts and the mixture is smooth. Remove the bowl from the pot and set it aside until the chocolate cools to 89 degrees.
The original recipe says that when the chocolate reaches 89 degrees, you can start dipping the pieces of nougat, and if the chocolate cools below 86 degrees, you should heat it back up to 89 to continue dipping. Well, we do not own an instant-read thermometer. So, I used the candy thermometer to keep watch on the chocolate's progress until it got down to 100 degrees, the lowest the candy thermometer goes. Then, I switched to... um... a digital oral thermometer. Yes, the kind you stick under your tongue to see if you have a fever. Yes, I cleaned it first! Even that thermometer only goes down to about 91 before it declares its subject dead, so I had to estimate when the chocolate was really ready, and I have no idea whether it cooled below 86 degrees during the dipping. But once again, my inexact science did not seem to be a problem in the end. (We have since gained another thermometer from a cheese-making kit, and it reads all the way down to zero. Science can resume.)
The chocolate takes forever to cool. Way longer than the nougat does. At last, around 89 degrees, the chocolate's good for dipping. With a couple of toothpicks or tiny forks, stab your nougat rectangles and dip them in the melted chocolate. It's OK if the rectangles become blobs. Shake off the excess coating, and then place each candy on a sheet of wax paper. Let them sit out at room temperature.
In about an hour, the chocolate will have set, or will at least be solid enough to handle. By the next morning for sure, you'll be able to put the chocolate-covered nougats into a heart-shaped box or whatever you like! You see I simply piled them into a bowl.
Try not to eat all of these fluffy little nuggets in one sitting.
Tuesday, January 29, 2013
Breaking records, changing climate
A refreshing walk 'round the block on this blustery, 60-degree morning has me itching to garden. But... it's January. It is supposed to be the dead of winter. It is the dead of winter, in fact. Two days from now, the temperatures will be back in the teens.
This happened last January, too—an unseasonably warm day in between some very seasonably cold days. I biked to the train. (I considered biking today, but chickened out; we're expecting some wild weather later.) So, the occasional, drastic temperature fluctuation is not all that unusual and won't by itself send me screaming, "Global warming!" There are plenty of other weather extremes that point to climate change.
This season, Chicago broke a couple of old records regarding snowfall, or more accurately, regarding the amount of time without snowfall, while also reaching some of the coldest temperatures of recent history. I ask you, what fun is the cold without any snow? (Your answer: Why, no fun at all!)
It doesn't matter whether you're looking at snowfall or rainfall, 2012 was one of the driest years on the books, with precipitation levels hanging awfully close to those of the driest year (1962, according to climatestations.com). Only four years ago we reached the opposite extreme—2008 was a record wet year for Chicagoland.
Here and everywhere else in the world, we're bouncing back and forth from drought to flooding to drought... And if you think the rainiest years will balance out the driest years, you're forgetting something. When the heavy rain happens all at once, the ground can't hold it. The water doesn't stick around to be saved for later—it runs off! Washing out crops and sweeping away towns as it goes. So, when it's a wet year, things get destroyed, while the dry years negatively impact the navigability of important rivers, in turn affecting important things like the transportation of grain in the Midwest.
Now, I mentioned that this winter had some of the coldest temperatures. And yet, almost every summer, we hear reports that it's the hottest year on record. What's the deal? I told you, weather extremes. As with precipitation, we're reaching the lowest lows and the highest highs, but overall, the years are warmer. Look at this graph. The green line is 2012, and you can see the cold temperatures of January and February spiking down toward the blue, long-term-average line (but not quite getting there!), while the rest of the year pretty much follows—and sometimes even exceeds—the temperatures of the previous record-warm year.
It's all bad news, folks. Something's gotta change, and that something is us.
I know that it's difficult in the dead of winter (even a warm winter) to be green. Even I want long, hot showers and the heat cranked up. I hate wearing layers! But really, the quick showers and the giant pile of blankets on the couch need to be the norm, rather than the occasional small sacrifice. And that nice hot soak in the tub needs to be a rare treat, not a weekly indulgence.
You get the picture.
This happened last January, too—an unseasonably warm day in between some very seasonably cold days. I biked to the train. (I considered biking today, but chickened out; we're expecting some wild weather later.) So, the occasional, drastic temperature fluctuation is not all that unusual and won't by itself send me screaming, "Global warming!" There are plenty of other weather extremes that point to climate change.
This season, Chicago broke a couple of old records regarding snowfall, or more accurately, regarding the amount of time without snowfall, while also reaching some of the coldest temperatures of recent history. I ask you, what fun is the cold without any snow? (Your answer: Why, no fun at all!)
It doesn't matter whether you're looking at snowfall or rainfall, 2012 was one of the driest years on the books, with precipitation levels hanging awfully close to those of the driest year (1962, according to climatestations.com). Only four years ago we reached the opposite extreme—2008 was a record wet year for Chicagoland.
Here and everywhere else in the world, we're bouncing back and forth from drought to flooding to drought... And if you think the rainiest years will balance out the driest years, you're forgetting something. When the heavy rain happens all at once, the ground can't hold it. The water doesn't stick around to be saved for later—it runs off! Washing out crops and sweeping away towns as it goes. So, when it's a wet year, things get destroyed, while the dry years negatively impact the navigability of important rivers, in turn affecting important things like the transportation of grain in the Midwest.
Now, I mentioned that this winter had some of the coldest temperatures. And yet, almost every summer, we hear reports that it's the hottest year on record. What's the deal? I told you, weather extremes. As with precipitation, we're reaching the lowest lows and the highest highs, but overall, the years are warmer. Look at this graph. The green line is 2012, and you can see the cold temperatures of January and February spiking down toward the blue, long-term-average line (but not quite getting there!), while the rest of the year pretty much follows—and sometimes even exceeds—the temperatures of the previous record-warm year.
 |
| Chicago 2012 mean temperature vs. record warm and average, climatestations.com |
It's all bad news, folks. Something's gotta change, and that something is us.
I know that it's difficult in the dead of winter (even a warm winter) to be green. Even I want long, hot showers and the heat cranked up. I hate wearing layers! But really, the quick showers and the giant pile of blankets on the couch need to be the norm, rather than the occasional small sacrifice. And that nice hot soak in the tub needs to be a rare treat, not a weekly indulgence.
You get the picture.
Thursday, January 17, 2013
Cooking in your coffee mug
This was another of those early departure mornings. Have some coffee, walk the dog, lay on the couch for a little bit before the dog wants out again, get lunches ready, get dinner going in the crock pot, and hurry-up-get-dressed-it's-time-to-go! So breakfast must go with me. (If you think I'm going to skip breakfast, you're nuts. I'd be digging into my lunch by nine o'clock.)
Now, I could take two minutes on the way to work to stop for fast food. Or, with some quick packing at home, I can take two minutes to make breakfast when I arrive at work.
One easy breakfast for the office and quick to pack at home: Handful of oatmeal and raisins, dash of cinnamon, and spoon of brown sugar all in a mason jar. At the office, add some water, stir or shake, microwave until oats are cooked.
Another easy breakfast I had never tried before today. Scrambled eggs in a coffee mug. Yes. I was skeptical, but this is for real.
It's another quick-pack: Two eggs, a piece of cheese, a pat or two of butter. At work: crack the eggs into a coffee mug. Throw in the butter. Add two tablespoons of milk or water. Scramble! Microwave for 30-45 seconds. Stir well, break up clumps. Microwave for another 30-45 seconds. Top with cheese, which will melt in about a minute while you wait for the eggs to cool off enough to eat. And, oh my gosh, it worked! And it tasted good! Like real scrambled eggs! I'll probably do this at home for a quick breakfast now.
Notes: I used water because milk is not readily available in the office, even though I feared water would be gross in the eggs, but it didn't even affect the flavor. What the water does do is help the eggs turn out fluffy. Also, I added salt, pepper, and hot sauce to the eggs, because those three things were available in the office kitchenette. Quite delicious.
Did you know microwaving uses a fraction of the energy of any other cooking method? (Besides solar ovens or other really cool alternative green methods. I'm talking about in your average kitchen, OK?) So these eggs in a mug are a green and frugal choice. And they took so little time! And dirtied only two dishes! (Mug and fork.) Perfect when you're cooking for just one or two.
So, what else can we cook in the microwave in a coffee mug?
There's the one-minute brownie, which doesn't have the chewiness of an oven-baked brownie but is more like a dense, puddingy chocolate cake. No, it's a combination of brownie and chocolate souffle. Yes, that describes it pretty well. I have made it a few times, and it is pretty good and makes for a nice treat during the afternoon slump. Making this at the office does require advance preparation, unless you always have cocoa powder and flour and things in your desk drawer. I do not, but maybe I should. Hm. Anyway, here's the recipe:
2 tablespoons each of: cocoa powder, water, and vegetable oil. 4 tablespoons each of sugar and flour. Plus a pinch of salt. 1/4 teaspoon vanilla extract, optional. Mix it all well in your coffee mug and microwave 60 to 90 seconds. The center of the "brownie" should be slightly molten. Allow to cool a little bit, then eat with a spoon. I found that more or less oil in the recipe will make the texture more fudgy or more cakey, respectively.
So now I'm on a coffee mug cooking adventure. What else can we make? There's the obvious hot cereal or soup. But that's hardly exciting. This April 2012 article from the Chicago Tribune has a few microwave-coffee-mug recipes: coffee cake, upside-down cake, quiche, and chilaquiles, none of which I have tried yet, but all of which sound worthy of trying. I think the chilaquiles will be next on my list. Len will love it! (If it turns out well, that is.)
Share with me! What have you microwaved in your coffee mug? (Besides coffee!)
(Linked with Frugal Days, Sustainable Ways #62)
Friday, January 11, 2013
A few greenies I admire
The bicycle commuters still going strong in January.
Kudos to the cyclists still darting 'round the city of Chicago in this dark, cold half of the calendar—and to the few of you I see out in the 'burbs still biking to the train, though I suspect your commutes must be shorter than mine. Or at least I'm convincing myself of that so I don't feel so bad about covering my own 11 miles (round trip) by car half the year.
Environmental activists.
But not the shouting, bomb-threatening types. That's just counterproductive. Rather, the ones who chain themselves to trees in the path of loggers, the ones who go to the site of an oil spill to scrub the poor little waterfowl with Dawn soap, and the ones who defend pandas in court (thanks, Modern Family, for that joke)—you have passion and ambition that I have never quite mustered.
Vegans.
I could never be you. While I like to eat meat, I could live without it—if I had to. And I could live without some dairy products, because I genuinely like the taste of soy milk and almond milk. But, oh, the taste of real whipped cream. And our homemade whole-milk yogurt. (I need to write about that!) And cheese. Like a really sharp cheddar. Or baked brie wrapped in a buttery crescent-roll crust. (Or even Wensleydale, Gromit!) Plus, eggs are always a staple in our house.
The people who eat only organic, free-range, grass-fed anything.
I just bought boneless, skinless breasts for less than two dollars a pound and only paid 11 cents per egg by buying the value pack . . . but at what cost to the chickens?? Seriously though, I'll occasionally shell out the big bucks for a delicious, sustainably provided gourmet meal, but it's hard to justify going broke by choice over groceries. For widespread change
The people who raise their own organic, free-range, grass-fed whatevers.
I can barely keep up with a vegetable garden, while I have an acquaintance who essentially snuck a small farm into her backyard. I am envious.
The people who go off the grid.
First of all, I'm jealous of your resources. Of the wealth, know-how, creativity, and/or free time that enabled you to install you solar panels and gray-water system, to plot out and work that piece of land suitable for sustainable agriculture, to build a greenhouse out of recycled materials, to make the best use of your harvests, to trade your raw honey for your neighbor's grain mill, and so on. Must be nice. But secondly, and more importantly, I admire your great effort. It ain't easy being 100% green.
Wednesday, January 9, 2013
Adventures in Cake Decorating #2 - Sugared Grape Wedding Cake
I've come a long way since I posted my first adventure in cake decorating here (which wasn't my first ever adventure in cake decorating by far—I can recall Funfetti icing that turned gray by mistake— but was my first since maintaining a blog, and I suppose my first at trying something out of the ordinary). Since then, I made a bowling-themed cake for Len's 30th birthday, and it involved bowling pin cookies and a three-dimensional bowling ball. Really fun to make and pretty cool looking, if I do say so, but definitely room for improvement. Then I was the designated baker for a friend's very small wedding reception, and I was much more pleased with that finished product than I was when I made those baby block cakes for a friend's baby shower. And then I created a cake that looked like a book to celebrate Len's earning his teaching certificate, and I was really excited about that outcome. Oh, and so many ideas I want to try!
First let's flash back to March 2012, the small, casual wedding reception, because those are the photos I have handy at the moment. We'll get to the other cakes in the near future.

As is often my MO when I want to focus all of my energy on the look of the cake, I started with boxed cake mix. I enjoy baking from scratch, but the box just saves me some time and creative energy. You can get the mix on sale for a buck, you already know that it's going to taste good (better than a store-bought sheet cake), and you can trust that it will come out looking and feeling like a cake should. I even went with canned frosting this time, too. Again, it's frequently on sale, it tastes all right, it's easy to work with, it saves me some dishes, yada yada yada.
For the wedding cake, I chose Devil's food chocolate cake and vanilla buttercream frosting. And, I started the night before the event.
Friday night, I baked one 13x9 and two 9x9 one-layer cakes and let them cool. The two 9x9s would be the two-layer bottom tier. Out of the rectangular cake, I cut four squares—two medium and two small—to make the top two two-layer tiers. Using a bread knife (useful for trimming cakes because it's long, flat, and serrated) I trimmed the tops and sides of all six squares to make them flat and even all around. (The cake scraps and any leftover icing would become a small batch of improvised cake balls.)
Then I piled on the icing—but just for between the layers at this point! When I had three separate two-layer cakes (bald except for icing in the middle), I did the crumb coat. I thinned out some icing just a little bit with some milk and spread a thin layer around every exposed edge of the cakes and let them dry out until morning.
While the cakes were baking, I rinsed bunches of green and purple grapes and then rolled them around in sugar. Some methods for sugaring grapes call for egg whites, but I found that just the water from rinsing them was enough to hold the sugar on. It will, however, give you an uneven coat that sprinkles off anytime you touch the grapes, but if you're just going for the simplest method possible... Anyway, I let the grapes dry overnight as well.
Late Saturday morning: Learning my lesson from the baby blocks, I used a lot of icing. The crumb coat helped a little bit with keeping the chocolate crumbs from mixing into the cream-colored icing, but either I'm still not doing something right or I'm expecting the crumb coat to harden more as it dries than it actually does, because crumbs still came loose unless I gave myself a really thick icing buffer. I frosted the bottom layer first and when it was totally covered, I dipped the spatula in hot water between swipes to smooth out the icing around the sides, giving the cake a cleaner look like a sheet of fondant would.
Using cardboard squares cut to the size of the each tier and covered with foil and little wooden dowels cut just barely higher than each tier, I first stacked and then frosted and smoothed the middle tier and then the cute little top tier. Then I piped a dotted border, just to hide imperfections and give the cake a cleaner more finished look. Then I carefully placed the grapes.
I transported the whole thing in a giant box and drove so carefully! One bunch of grapes fell off in transit, smearing some icing. So I just rearranged some of the other grapes once the cake was in place on the restaurant table, and no one was the wiser. Mostly.

Subscribe to:
Comments (Atom)
