
Driving to visit relatives this Christmas? Try hypermiling: getting the most possible miles per gallon out of your car.
Streamline the car: Windows up, tires inflated to the manufacturer's recommendations or slightly higher, unused trunk or roof racks removed, excess cargo removed. Like, do you really need to haul your golf clubs in your trunk all the time?
On the highway, find your car's natural cruising speed and stick to it; likely it's around the highway speed limit, 55-60 MPH. Pay attention to your RPMs at different speeds, and you'll see where the engine seems to settle in. If you have a newer car with an actual MPG readout, it's even easier to see at what speed your car runs most efficiently. True, it will now take more time to get from A to B than if you were driving 75, but you will have used noticeably less gas. I can attest to that after our many road trips between Chicago and St. Louis.
Also on the highway, you can reduce the air resistance on your car by drafting behind a large truck. It's not a safe technique, because you have to follow the truck closely, and the truck drivers don't like it—probably for that reason—but we've done it. Again, if you have a car with an instant MPG readout, you could try it and see the difference. But beware: it is unsafe, you will have no way to see what's coming ahead, and it's probably illegal. I'm just saying it works.
Conserve momentum #1: Keep plenty of space between you and the vehicle in front of you, even more than the recommended one car length for every 10 miles per hour. The extra space will allow you to coast a bit before braking—if you even have to brake at all—as the flow of traffic changes. Give yourself enough space in slow-moving traffic, and you may be able to simply roll along the whole time without ever hitting the accelerator.
Conserve momentum #2: Coast to stop signs and red lights. For some reason this annoys other drivers, like they're in a real hurry to get to that red light. So what? It uses far less fuel than keeping your foot on the gas until the moment you have to slam on the brakes while also preventing fender benders caused by people having to slam on their brakes at stop lights. If the light turns green while you're coasting toward it, even better; you won't have to accelerate as much to get back up to cruising speed. At stop signs, if you can continue rolling until the car before you departs the stop sign, then you're right there to stop for a moment and go, avoiding the stop, roll, stop, roll, stop.
Shut your engine off at any stop more than 20 seconds. Unless you really have to worry about whether your car will start again, there aren't many good reasons to keep the engine running when you're not actually driving. Deny it all you want, prolonged idling does indeed use more fuel than turning the car back on, and by "prolonged" I mean about 20 seconds or more. This is such an easy, no-effort, no-brainer way to conserve fuel at railroad crossings, stop lights with an obvious rotation, drive-up ATMs and slow-moving drive-throughs, not to mention the times you're waiting in the car while your buddy runs into the store. And when you're about to leave a parking space, wait to turn the engine on until you are actually ready to move.
Advanced technique: Engine-Off Coasting. In other words, consider coasting to be another form of idling. Yes, I am suggesting you take your foot of the gas, put your car in neutral, and kill the engine. You do this by turning your key just enough to shut the engine off and then turning it back to the "run" position. You know, the key position just before you'd click it over to turn the engine back on. And just roll. We are mimicking the engine-off coasting of a hybrid vehicle.
BUT: For goodness sake, don't turn the car all the way off—you'll lock up the steering! Also, while we frequently employ this method in our automatic-transmission, power-steering car, you should understand that it is really best suited to vehicles with manual steering and a manual transmission. You can lose power steering when the engine is off, making it very tough (but not impossible) to turn the wheel, and the jumping between drive and neutral and back while the car is in motion may damage automatic transmissions.
On a hill, gravity will take you. On a flat or uphill
surface approaching a stop, the friction will gradually slow you down. When it's time to hit the accelerator again, first turn the engine back on, then pop the car in drive and go. Obviously, traffic conditions must help you determine if engine-off coasting is appropriate, but in general, according to an ecomodder.com forum, the hierarchy of slowing/braking techniques from best to worst is:
1) coasting in neutral, engine off (i.e., roll to a stop);
2) coasting in neutral, engine idling;
3) regenerative coasting (hybrid vehicles)
4) regenerative braking (hybrid vehicles)
5) coasting in "deceleration fuel cut-off" mode (in gear, above a certain engine RPM)
6) conventional friction braking (non-hybrid or hybrid)
There are quite a number of other hypermiling tactics that you can find with an online search. Determine what's compatible with your vehicle and your route (e.g., city-driving methods vs. highway driving methods) and try it.
Make it game! Track your fuel efficiency—either by watching your car's MPG readout, or by the old-fashioned way of writing down your odometer's reading and the number of gallons you put in every time you fill up and then doing the math—and see if, with every trip, you can't get your miles per gallon higher and higher and higher...
Shared at the Preparedness Fair
Thursday, December 20, 2012
Thursday, December 13, 2012
The Best of Homemade Holidays
-->
You know we’re big on DIY. Because often, doing it yourself
saves you money. It makes use of the scraps and surplus—recycling, upcycling,
reusing, repurposing. And, it’s personal. And that personal touch makes things
extra special—whether it’s the perfect little storage unit for specialty teas,
a piece of art your house guests can admire while you fiddle with the TV
reception, or a thoughtful gift that brings a little bit of your world into
someone else’s, it’s something that is uniquely yours.
Like, I’m making a toy for my baby nephew (no spoilers!). Is
it something I could have bought? Yes. And would he have loved the store-bought
version? Absolutely. But this homemade toy will be extra special (to his
parents at least, until he’s old enough to understand), because someone
custom-made it just for him. I’m also planning to make something I saw on
Martha Stewart’s website. Just a cute and
practical stocking stuffer for the women in my life, an inexpensive but thoughtful
way to add value to the gifts I’m already giving them.
Before we go any further, let me concede that plenty of
homemade items turn out to be useless, pointless, tacky and, when given as a
gift, rightfully unappreciated. You know, the hand-print ashtrays, the tea
cozies, the patchwork sweater vests… I’m not endorsing that kind of DIY here. If,
upon finishing any of my current projects, I realize they’re actually not so
great, I’m running out to the store. And it might be Christmas Eve.
But we have indeed given and received many well-thought-out
and thus treasured homemade gifts. It’s all about knowing your audience and
producing quality goods. Perhaps this “Best Of” list will inspire you. These
are a few of my favorites among the gifts that we have made and those that
someone made for us. (It should come as no surprise that a lot of them are
food.)
Apple butter
Other fruit preserves
Spice blends
Cake balls
Fudge
Cream caramel
Oreo cookie bark
Cranberry white chocolate biscotti
Salsa
Bread of the month
Family recipes
Christmas tree ornaments
Blankets
Cutting board
Recorded family memories
Customized picture frame w/ photo
Scarf
And this is going way back, a Barbie house.
Thursday, December 6, 2012
Easy Green Christmas
This is not even close to an original idea. It’s not even a
one-dimensional idea—the phrase “green Christmas” on its own just means it’s
not a white Christmas, i.e. an absence of snowfall leaves a wintry backdrop of
the green (and the brown) of the earth. The 1950s comedy single “GreenChristmas” by Stan Freburg is about making money off of the holiday. The song by the Bare Naked Ladies has to do with envy.
And then there’s our bailiwick, the environmentally friendly
shade. Oodles of print and online articles exist with titles like “How to Have
a Green Christmas” and “Tips for an Eco-Friendly Holiday.” So, among the
plethora of green holiday tips out there, what could this one little blog bring
to the table?
I’ll tell you.
I’ve sifted through those oodles of articles, filtering out
the pointless, the “well duh,” and the positively unattainable for the average
person, to give you my favorite easy yet impactful choices for this holiday season.
If you’re buying new strings of lights, spring for the LEDs. At the very least, put your decorative lights on timers so you can’t forget to
shut them off at night. Oh, and maybe go
smaller this year. No reason to duplicate the Griswalds’light display, and do you really need four inflatable santas on your lawn?
Streamline your
shopping errands. This sounds like an idea that should have been on the
“well duh” list, but I know too many people who do too much driving back and
forth and home and out and round and round again and—whoops! we ran out of gas
on our fifth trip back to Walmart.
Yeah. So, plan the most direct, no-backtracking, round-trip route. Just do some
research online first and organize your shopping list by store, for Pete’s
sake!
Embrace regifting.
Seriously. When it’s appropriate. But don’t force it. And be considerate.
Shop local and
give your friends and family a taste of your hometown. Some personal examples?
Local microbrews and organic dog treats from a
local small business.
Give battery-free
gifts. It’s a win-win-win.
Rethink wrapping
paper. Experts say we Americans are throwing out an extra million tons of
garbage weekly between Thanksgiving
and New Year’s day, and you know the cause. “…The ribbons! The wrappings! The
tags! And the tinsel! The trimmings! The trappings!” (Dr. Seuss’s How The Grinch Stole Christmas) But
trying to reuse wrapping paper is ridiculous. It wrinkles and tears and just
doesn’t look good the second time around because it’s so flimsy (well, the cheap
stuff we have is too flimsy; I don’t know about yours). And you can’t recycle a
lot of it for the same reason: too low quality to make it through the process. But,
gift bags can survive many reuses, and the tissue paper to fill them is
supposed to be all crumpled up anyway!
Another wrapping idea:
Swaddle your gifts in cloth. You can reuse something old (say, a colorful
fabric remnant or Christmas sweater) or you can make it part of the gift (a
handmade scarf or a new kitchen towel—great for wrapping food gifts). Or,
there’s the old standby, the Sunday comics—read, reuse, then recycle!
Got a real pine tree in your living room? Recycle it. Your community
might use old Christmas trees for mulch, for erosion prevention, for wildlife
habitat restoration… lots of things! Earth 911
has some tips and a link to find your local “treecycling” resources.
Lastly, the Sierra Club has
a somewhat fun holiday survival guide with DIY gifts, fresh recipes and even facts
to back you up when the dinner table
conversation turns to “you greenies,” whether you’re educating your
“skeptical of green stuff” brother or just “preaching to the choir” to your
progressive nephew.
(Link back to Frugally Sustainable's Blog Hop!)
(Link back to Frugally Sustainable's Blog Hop!)
Sunday, August 12, 2012
Two Great Pizzas
The trouble with loading up on fresh veggies at the farmer's market is that we bring them home to our own sporadic harvest and suddenly have more veggies than we know what to do with. Stir fries, pasta sauces, etc., etc. Or better yet, pizza!
We made two (about two ago, of course), but only one is truly a garden pizza. We started with our bread machine's 2-lb. pizza dough recipe, substituting wheat flour for half white flour. Our garden pizza would be loaded with toppings, so we used a larger portion of the dough to make a thick crust for that one; and the other pizza, more like an appetizer pizza, got the remaining dough for a thin, crispy crust.


We made two (about two ago, of course), but only one is truly a garden pizza. We started with our bread machine's 2-lb. pizza dough recipe, substituting wheat flour for half white flour. Our garden pizza would be loaded with toppings, so we used a larger portion of the dough to make a thick crust for that one; and the other pizza, more like an appetizer pizza, got the remaining dough for a thin, crispy crust.
Garden Fresh Pizza

Thick crust:
2/3 of a 2-lb. wheat pizza dough
Hand-toss or roll out the dough out into a circle and place on a hot pizza stone.
Ranch sauce:
1/4 to 1/2 cup mayonnaise, depending on much sauce you want
1/2 packet ranch dressing mix
2-3 cloves of garlic, minced
Mix the three ingredients together and spread onto the rolled-out dough, already on the hot pizza stone.
Toppings:
Grated Parmesan cheese
Turnip greens
Kohlrabi, chopped
Asparagus, chopped
Broccoli stem and florets, chopped
Shredded mozzarella cheese
Tomato, sliced
Load the toppings onto the pizza, preferably in the order listed, and in whatever amounts you like. Really, almost any garden veggie will do. In fact, because this was two weeks ago, I might be forgetting one of the toppings we used. Keep in mind that some veggies, like kohlrabi and broccoli, need to be chopped up into smaller pieces so they can cook through somewhat during the pizza-baking time, otherwise they'll still be too raw and crunchy (a little crunch isn't bad) while the rest of the pizza is already done.
Bake the pizza in a hot oven for at least 10 minutes, until the crust is baked through. (425 degrees is good to give the thick layer of veggies time to get tender without cooking the crust too fast. Higher temperatures work well if you have fewer toppings and want the crust a little crunchy.)
Bacon-Onion-Goat Cheese Thin-Crust Pizza

Crust:
1/3 of a 2-lb. wheat pizza dough
Roll out into a thin rectangle or oval on a baking sheet. There is no sauce for this pizza; just spread a little olive oil over the crust. Using a fork, poke holes all over the crust to help prevent air bubbles from forming during the baking. Bake the crust in a hot oven (we did 425 because the other pizza was going at the same time) for a few minutes so it starts to bake through and will be crispy by the time your pizza's done later (the toppings won't need much bake time).
Toppings:
Three slices of bacon
Half a large sweet onion
4 oz. goat cheese
Balsamic vinegar
Cook the bacon almost to your desired crispiness (it will crisp up a little more during pizza-baking). Set it aside so it can cool enough to be handled. Meanwhile, slice the onion into thin rings and cook it in the bacon grease until soft, brown and nearly caramelized. Now, put the cooked onion on the pizza crust. Crumble, break, or chop the cooked and cooled bacon into small bite-size pieces and sprinkle it all over the pizza. Lastly, crumble the goat cheese (or pinch off pieces if it's really soft) into bite-size (or smaller) chunks and distribute it evenly over the pizza. Bake for another 8 minutes or so, until the crust is baked to your desired crispiness and the cheese is melty. Before cutting and serving, drizzle a little balsamic vinegar over the pizza. So good.
NOTE: We put almost all of our pizzas under the broiler for a minute or so after they're baked through but before serving. This browns the cheese just a little bit, which looks and tastes extra delicious.
Saturday, July 28, 2012
Beets, Radishes, and Their Greens
I'm two weeks behind again with the garden photos, but anyway. We pulled up our beets and turnips because it was time, and because they didn't seem to be growing anymore. The harvest was a little disappointing.

I'd expected larger produce based on how healthy the leaves had looked above ground. But even though we amend the soil with compost and peat moss and coffee grounds, the community garden soil is still not great. So we got small, not-very-round beets; some of the turnips fared better, but many of them were small as well.
You see, rather than haul in tons of really nice garden soil right off the bat (and spend lost of money doing it), we're hoping our yearly tilling and composting are gradually improving the soil of our plot while we deal with a so-so harvest the first few seasons. (In the past, okra, squash, and beans have done pretty well—it's these other veggies that aren't as forgiving.)

After pulling up the beets and turnips, we prepared them for refrigerator storage. Chop off the tops, separating the greens from the roots and composting any shriveled leaves. The roots will keep for awhile in the fridge (it's been two weeks now and I'll be using them soon).
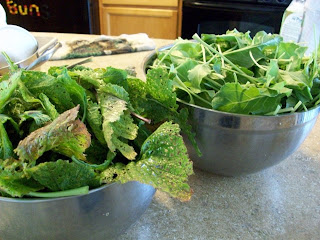
The greens get triple-washed and then dried in the salad spinner (gotta store 'em dry or they'll get slimy faster). They would start to wilt in a few days, so we started cooking them up to use like spinach with almost every meal—in tacos, in omelets, in a veggie lasagna, and on a great garden pizza that I'll post next.
Sunday, July 8, 2012
Quick, Belated Garden Update
There is so much more to do with our summers than sit in front of the computer updating a blog. I do feel guilty, though. I had a goal, after all. And much of what busies me is indeed relevant to this blog. So many post ideas... I'll give you some garden photos instead.
All of these, except for this first one of the garlic, are about two weeks old. The garden has changed since then, and I will try to post another update in a timelier fashion.

Here's our first head of garlic, pulled a little early as you can see by the still-green leaves resting on the porch railing below and thus, small. Our garlic plants are just starting to brown at the bottoms, so yesterday I dug up this one just to see. It's a head! It has cloves! Grown from just one clove! I'll leave its siblings in the ground until their leaves completely brown out. Perhaps the extra time will make those remaining heads of garlic bigger.

These are from our, um, extended garden. It's called urban gleaning, OK? And we've talked about it before. We had a surprise apricot season here. Suffice to say the tree we thought was dying for the last two years is actually just on a three-year cycle or something and produced like crazy this year. By mere chance, I biked past the tree and saw the fruits ripening a whole month earlier than our 2009 super apricot harvest. Must be the heat. Pardon the strange lighting; this was taken indoors, against sheer white curtains on a bright, sunny day.

At left, a tiny bunch of tiny grapes that may or may not make it to autumn ripeness thanks to 100-degree days and hordes of Japanese beetles. The skeletonized leaves in the photo on the right were our first evidence the beetles had reached crop-decimating adulthood. We try to keep them at bay by regularly spritzing the leaves with soapy water (because then the leaves don't taste so good!). It somewhat works.

A bloomin' onion. Those pretty white flowers have since closed up into little seed pods. Soon they'll be dry, ready for saving, and I'll pull the onions themselves out of the ground.

The potato patch. Or should I say potato pile? As the plants grow taller, we keep heaping on the mulch, soil and used coffee grounds. The spuds seem to like it.

The beans, shortly after sprouting.

And their friendly neighbors, the carrots.

And Len, sprinkling some spent coffee grounds over them both, enriching the topsoil a bit. We've been collecting coffee grounds from a Caribou coffee shop near us. We drop off a five-gallon bucket (with a lid) and they dump their used grounds into that instead of the trash. About once a week, Len trades them an empty bucket for the partially full one, and we haul the grounds out to the garden or dump them in our compost bin. No coffee grounds for the front yard garden bed, though. That soil was already too acidic from the evergreen bushes that used to be there.
I suppose that's plenty of garden updates for now. As you can see, not much harvesting going on yet, just a lot of watering, weeding, soil amending, and pest control. So I'll leave you with one last pair of photos.

The cat, enjoying some homegrown catnip. What a life.
Monday, June 11, 2012
Berries
The lovely little flowers on our blueberry bush have turned the color of blueberries. But they are small and shriveled, and they look like small, shriveled, bell-shaped flowers, not really like berries at all. So, I don't know. I suspect a fungal infection and will have to keep an eye on the plant to make sure the whole bush doesn't die.
Across the yard, though, our raspberries our ripening—by the hour, it seems! And they are delicious.
The grapes have passed their flowering stage and are slowly filling out, some bunches better than others. The grape flowers didn't look like much—just a tiny green ball with pistil and stamen coming out of it, no petals to speak of. Probably thanks to the cold snap, many of those flowers were not pollinated, so I think we're going to have some random-looking grape bunches in the end (if we can protect them from the birds as they ripen!), but hopefully they'll still turn out better than our last so-called harvest in 2009:
 |
| Our first grapes, 2009. |
Friday, June 1, 2012
Let it Mellow
Let's talk about water. I don't have much to report about the garden -- it's the time of year when all we do is water mostly bare spots of earth, pull weeds, and wait. The weeds grow so fast. The vegetable seedlings grow so slow. Oh, and the temperature just went from 95 to 45 in less than a week. But, at least it's raining, so we don't have to carry water out to the garden for a couple of days, although I'm sure Jack-and-the-Beanstalk-size weeds are now crowding out our poor tomato plants (which, by the way, are not enjoying the erratic spring weather).
But, water plays a big role in the garden's life, even at this seemingly stagnant stage. So let's talk about it. Specifically, let's talk about conserving it.
 Have you heard about Rip the Drip? He's a sort of spokesperson for water conservation on the Wasting Water is Weird website. You may have seen him in some odd TV commercials (my favorite is the empty dishwasher one). Anyway, there is tons of conservation advice out there and hundreds of ways to reduce your water usage. The following tidbits are just a few most relevant to my life.
I should note that conserving water isn't about the money savings for us (though it could be for you). Our water bill happens to be included in our homeowners' association dues, so we pay the same amount every month regardless of how much or how little water we use. We could take the all-you-can-eat-buffet approach and use gallons and gallons of water with no financial consequences, but this is all about saving the planet -- while potable water may seem a constant to us Midwesterners, it is scarce in many parts of the world. And guess what? All of us earthlings essentially share the same water supply -- the amount of water on this planet is fixed, while the number of people drinking it increases. Better to conserve water where it is an abundant natural resource, so that our "excess" can be given to the citizens of dryer places. But I digress.
When it comes to conserving water in the garden, the most obvious action is to install a rain barrel beneath your downspout. This is something we'd like to do; our obstacles are getting approval from our homeowners' association (may or may not be a problem) and the cost of rain barrels. The lowest price we've seen for rain barrels is $75, which isn't bad I guess, but we'd like to find them just a little bit cheaper. See, we'd like to install at least one under each of our four downspouts, maybe two (to handle overflow) under the downspout that collects the rainwater from the largest section of our roof.
Another great way to conserve a little water and still give your plants the drinks they need? Collect your shower water while you wait for it to heat up. Our shower, which is on the second floor, can sometimes take full minute to bring hot water up from the water heater, which is on the first floor. Maybe a minute doesn't sound like much time to you, but let me tell you, there's a lot of cold water doing nothing but running down the drain during that minute -- a lot of cold water wasted. The solution? Stand in the shower (yes, naked and ready to go) with a large bucket and collect the running water until it has reached the temperature you desire. Then, set the bucket aside and go on with your shower. Whether you use the bucket of water straightaway on your house plants or collect it over the course of several showers before hauling it out to the vegetable garden, it's a more efficient use of your tap water than simply wasting the shower water in the moment and later having to run your garden hose. Friends of ours told us about the bucket thing. They do it. I'm going to try to remember to do it.
 Another shower-related, water-conservation tip: Take shorter showers. Duh. There's the extreme version, the navy-style shower, in which you quickly get wet (just a few seconds of running water), then soap up without the water running, and then rinse off, using less than 30 seconds' worth of water. Or, for those of us who enjoy spending a little more time in a nice, hot shower, there is simply a shorter shower. We got a handy shower timer for free at a green fest a couple of years ago, but you can find a variety of shower timers online for a variety of low prices. Ours is a five-minute hourglass timer that suctions to the shower wall. A cheap and easy way to reduce your water usage, as long as you remember to keep your eye on the sand!
Stepping out of the shower and toward the toilet... Perhaps you've heard this little rhyme regarding conserving toilet water: "If it's yellow, let it mellow. If it's brown, flush it down." Need I explain? Let me instead tell you to get over the ick-factor and, I'm just gonna say it, know that it really is OK to let a few rounds of pee sit in the toilet. We're not talking about public toilets here. Your own family's urine, just hanging out in the toilet bowl for a few hours, will not hurt you. It will not stink up your house. (OK, maybe if you all just ate asparagus or a lot of onions, you'll want to flush after each turn only for your noses' sake, but other than that...) Save yourself several flushes a day at home. People do this. I won't say who.
But, water plays a big role in the garden's life, even at this seemingly stagnant stage. So let's talk about it. Specifically, let's talk about conserving it.

I should note that conserving water isn't about the money savings for us (though it could be for you). Our water bill happens to be included in our homeowners' association dues, so we pay the same amount every month regardless of how much or how little water we use. We could take the all-you-can-eat-buffet approach and use gallons and gallons of water with no financial consequences, but this is all about saving the planet -- while potable water may seem a constant to us Midwesterners, it is scarce in many parts of the world. And guess what? All of us earthlings essentially share the same water supply -- the amount of water on this planet is fixed, while the number of people drinking it increases. Better to conserve water where it is an abundant natural resource, so that our "excess" can be given to the citizens of dryer places. But I digress.
When it comes to conserving water in the garden, the most obvious action is to install a rain barrel beneath your downspout. This is something we'd like to do; our obstacles are getting approval from our homeowners' association (may or may not be a problem) and the cost of rain barrels. The lowest price we've seen for rain barrels is $75, which isn't bad I guess, but we'd like to find them just a little bit cheaper. See, we'd like to install at least one under each of our four downspouts, maybe two (to handle overflow) under the downspout that collects the rainwater from the largest section of our roof.
Another great way to conserve a little water and still give your plants the drinks they need? Collect your shower water while you wait for it to heat up. Our shower, which is on the second floor, can sometimes take full minute to bring hot water up from the water heater, which is on the first floor. Maybe a minute doesn't sound like much time to you, but let me tell you, there's a lot of cold water doing nothing but running down the drain during that minute -- a lot of cold water wasted. The solution? Stand in the shower (yes, naked and ready to go) with a large bucket and collect the running water until it has reached the temperature you desire. Then, set the bucket aside and go on with your shower. Whether you use the bucket of water straightaway on your house plants or collect it over the course of several showers before hauling it out to the vegetable garden, it's a more efficient use of your tap water than simply wasting the shower water in the moment and later having to run your garden hose. Friends of ours told us about the bucket thing. They do it. I'm going to try to remember to do it.

Stepping out of the shower and toward the toilet... Perhaps you've heard this little rhyme regarding conserving toilet water: "If it's yellow, let it mellow. If it's brown, flush it down." Need I explain? Let me instead tell you to get over the ick-factor and, I'm just gonna say it, know that it really is OK to let a few rounds of pee sit in the toilet. We're not talking about public toilets here. Your own family's urine, just hanging out in the toilet bowl for a few hours, will not hurt you. It will not stink up your house. (OK, maybe if you all just ate asparagus or a lot of onions, you'll want to flush after each turn only for your noses' sake, but other than that...) Save yourself several flushes a day at home. People do this. I won't say who.
Sunday, May 13, 2012
A Permanent Addition
 Do you remember these little babies?
Those are our apple trees when they were just sprouts. This photo is probably from early winter 2008 (there's snow out the window in the background), and the seedlings barely had their first true leaves. Links to our previous posts about the apples are at the end of this post, but I'll recap:
In the fall of 2008, we got a gigantic apple from Len's Wisconsin cousins, and we saved its seeds to plant. We later found out from the cousins that it was a Wolf River apple, and we did get to see the "mother tree" on their farm last September. (Will our trees produce apples similar to their parent variety? Hopefully, time will tell.)
 Our research showed we should refrigerate the seeds in a damp paper towel to germinate them. After weeks in the fridge, our seeds looked the same as ever, so we just put them into some soil in a six-inch pot. The photo above is what happened soon after. Six of the seeds had sprouted. Whether the refrigeration helped that along or not, we just don't know. They seemed to grow rather slowly over the next several weeks, but then we separated them, and after that, they grew a little faster. By April 2009, the tallest of the six was eight inches high.
 We kept them in the house until late spring or early summer and then put the pots outside to enjoy direct sunlight, summer heat, and fresh air. Sometime over the summer, or just before, we lost one of the six trees. The other five continued to grow, and we re-potted them—the smallest two into only slightly large pots (10-inch, probably), and the other three into much larger containers. And they continued to grow. For the winter of 2009, they would all stay outside but would be protected in some way: In November, as the young trees began to shed their leaves, we buried the smaller two (in their pots, most of the stems/trunks still exposed) in the mulch in our front garden bed, and we brought the larger three into the garage, where we wrapped their pots in layers of newspaper and blankets—to insulate the roots against freezing through.
 All five trees made it through the winter! In March 2010, the trees were waking up from their winter nap, so we brought the large trees out from the garage back to the sunny (but still snowy) front yard. We kept the small ones buried a while longer since their roots were more vulnerable in those small containers to the unpredictable nighttime temperatures of early spring. Rabbits had nibbled down the stems of those two buried outside, but they bounced back and sprouted as many leaves as their stubby little stems could hold.
I believe it was in the summer of 2010 that we gave our smallest two trees to Len's aunt, and they are steadily growing in her backyard. Then we re-potted our three remaining trees one more time into even larger containers (but containers still small enough to carry into the garage for the winter again).
 Once again, when the winter temperatures led the trees to dormancy, we moved them into the garage and wrapped them in newspaper and blankets. Once again, the trees overwintered successfully, and we moved them in their giant pots out to the front porch again in the spring. We knew they couldn't stay in their pots forever, and that even in the pots they would eventually become too large to keep moving back and forth, but what were we supposed to do?
 Our small and shady backyard already had a tree. Could we get away with digging it out and replacing it with one of these apple saplings? Not likely. Not very practical, either. Our front yard was even smaller than the back, but it did have enough space for planting small trees. In fact, each of our next-door neighbors had a tree in their front yard. Those trees were part of our neighborhood's very tidy pattern for trees in the front yard—every other house. Would our homeowners' association let us break the pattern with our apple trees? Also not likely, but it was our best shot.
 Late in the summer of 2011, Len submitted the paperwork, and against all odds, the association approved our request! Next hurdle: call the utility hotline to see where we could safely dig. Eesh, it was tight. And maybe that's what the association was counting on; maybe they approved our request to seem accommodating, figuring we'd discover there was no place to plant the trees anyway. Ha! We squeezed two trees in, one at each corner of our big front porch. I should say, Len squeezed the two trees in. He did all of the digging to plant those suckers—holes nearly twice as big as the large pots they were in—and that is no easy feat when the earth here is mostly heavy clay and chock full of rocks.
  Now only one tree remains in a pot, and it spent its third winter in the garage. It is back on the front porch now, enjoying the southern exposure with its siblings. Those two spent the winter outside in their new, permanent locations. They are looking healthily bushy this spring, so I think we'll do our first pruning in the fall. And, now we wait to see if the trees will flower in the springs to come.
In the meantime, we need to find a home for that last potted tree.
Our apple tree history:
April 21, 2009 (seedlings)
November 3, 2009 (winterizing)
March 20, 2010 (after winterizing)
March 4, 2012 (pruning)
Shared at Eat Make Grow
Tuesday, May 8, 2012
What's New in the Garden
Here's a bird's-eye view of the community garden only a a couple of weeks after it officially opened. By late summer, it will no longer be a picturesque patchwork of neat garden plots but instead a tangled jungle of vegetables and prairie weeds. Let's zoom in on our plot.
Last year we planted a lot of winter squash. Some varieties didn't make it, but if I remember correctly, we harvested several small pumpkins, a few calabaza (downside: it was a humongous plant for a little produce; upside: it seemed the most resistant to powdery mildew and pests), I think seven sweet dumplings, only one delicata, and three butternuts. Not the yield we'd hoped for, but not too bad. Yet after battling powdery mildew and squash bugs almost all season (for the second year in a row), we decided that 2012 would not be a squash year.
I may do the sweet dumpling squash again, because they are light enough to grow on a simple vertical frame, they're small, and they were delicious. But otherwise, we have a lot of space open without those gourds in our 20x30-foot plot. Some new crops will take their place.
 The potato patch. Last year we produced a handful of small potatoes—it was a casual experiment. This year, we bought a 5-lb. bag of red seed potatoes and planted them all! This photo was taken after we had cut the seed potatoes into sections (one or two eyes per piece) and were letting them sit out and callus for a few days, following the instructions on the bag. Yes, that is a pizza box they're sitting on. Reuse, right?
Carrots. We were lucky enough to get another gardener's extra carrots last year, and it inspired us to plant three rows of our own.
More beets! I thought I could plant the beets in stages for a longer harvest period. It got too hot too quickly and only my first round of 2011 beets did really well. This time, I'm just planting them all at once in a bigger area, and we'll just eat a lot of beets while we can. And hopefully pickles some, too. Then maybe I'll plant a fall crop in the bed in our front yard (no time for late plantings in the community garden before it closes for the season).
Trying harder at the tomatoes, peppers and eggplant. Because I failed at those last year. So far, our tomato seedlings did great under the grow light, and we just transplanted them outside this weekend. But the peppers didn't even sprout. Is it too cold in our house? Our my seeds old? I think we'll have to buy pepper plants instead of growing them from seed. And I have two very tiny eggplant seedlings. I guess it's not too late to plant a few more seeds and hope the warmer weather induces faster sprouting and growth, because I gotta get those babies outside soon!
The other new stuff in our garden isn't over at the community plot, it's here in our yard. We dug out one more evergreen bush from our front yard and expanded the garden bed. It's now about 10x4 feet. I realized too late last year that the soil there was too acidic for most veggies, probably due to all those evergreen needles composting there. Not much would grow. Len and I have added a lot of our own compost as well as some composted manure we bought, as well as peat moss, to hopefully balance out the soil pH. Just this weekend, I planted a bunch of herbs and lettuce and stuff, so we'll see if the seedlings come out better this time.

 Also in our front bed is this mammoth brussels sprout plant, which my parents gave us from their garden. Their climate was a little too warm for the sprouts to develop properly, but ours might be perfect. I know the plant looks mangled and droopy, but it's just too big for itself. It is in fact growing little brussels sprouts right now near the top of each stalk. Here's the thing, though: I think brussels sprouts are supposed to be a late fall crop; I hear they taste best if you wait until after a frost to harvest them. So, will these take all summer to grow? Or, are they developing too early because this was already a mature plant (two or three years old, in fact)? Also, can I keep them cabbage moths and caterpillars from destroying them? (Last year, they ravaged our kale.)
Off to the side of the front-yard garden, grapes! Dozens of grape babies—just like this little bunch pictured below—have formed on our vine, and I am so excited! Perhaps our vine has finally matured—I think it's four years old now, possibly five. It has produced grapes only one other time, and that was two very small bunches of very small grapes. Japanese beetles feasted on the grape leaves last summer, so we'll have to watch for signs of them and kill on sight. I wonder if the bird feeder hanging by the grape vine will attract birds who will then go after the beetles? Or, will the birds just eat our grapes instead?

In our backyard, blueberries! Last fall I planted a nice-sized Liberty blueberry bush. Apparently, optimal fruit production comes from having more than one variety of blueberry nearby. So this spring, I planted next to it a small Pink Lemonade blueberry bush. Then rabbits nibbled on it and made it even smaller. Rgh. I've since wrapped some fencing around both blueberry bushes to protect them from critters, but I don't think I'll see any awesome dark pink berries from that one this season. The liberty, however, has a few clusters of lovely flowers.

We're now growing four kinds of fruit in our yard: blueberries, grapes, raspberries, and strawberries. It's actually six kinds of fruit if you count two varieties of raspberries, two varieties of blueberries, and the future apples (more on that in another post).
Lastly, from the garden, "Hello" from Mr. Toad.

 |
| Garden plots on left and right, parking lot in center. |
I may do the sweet dumpling squash again, because they are light enough to grow on a simple vertical frame, they're small, and they were delicious. But otherwise, we have a lot of space open without those gourds in our 20x30-foot plot. Some new crops will take their place.
 The potato patch. Last year we produced a handful of small potatoes—it was a casual experiment. This year, we bought a 5-lb. bag of red seed potatoes and planted them all! This photo was taken after we had cut the seed potatoes into sections (one or two eyes per piece) and were letting them sit out and callus for a few days, following the instructions on the bag. Yes, that is a pizza box they're sitting on. Reuse, right?
Carrots. We were lucky enough to get another gardener's extra carrots last year, and it inspired us to plant three rows of our own.
More beets! I thought I could plant the beets in stages for a longer harvest period. It got too hot too quickly and only my first round of 2011 beets did really well. This time, I'm just planting them all at once in a bigger area, and we'll just eat a lot of beets while we can. And hopefully pickles some, too. Then maybe I'll plant a fall crop in the bed in our front yard (no time for late plantings in the community garden before it closes for the season).
Trying harder at the tomatoes, peppers and eggplant. Because I failed at those last year. So far, our tomato seedlings did great under the grow light, and we just transplanted them outside this weekend. But the peppers didn't even sprout. Is it too cold in our house? Our my seeds old? I think we'll have to buy pepper plants instead of growing them from seed. And I have two very tiny eggplant seedlings. I guess it's not too late to plant a few more seeds and hope the warmer weather induces faster sprouting and growth, because I gotta get those babies outside soon!
The other new stuff in our garden isn't over at the community plot, it's here in our yard. We dug out one more evergreen bush from our front yard and expanded the garden bed. It's now about 10x4 feet. I realized too late last year that the soil there was too acidic for most veggies, probably due to all those evergreen needles composting there. Not much would grow. Len and I have added a lot of our own compost as well as some composted manure we bought, as well as peat moss, to hopefully balance out the soil pH. Just this weekend, I planted a bunch of herbs and lettuce and stuff, so we'll see if the seedlings come out better this time.

 Also in our front bed is this mammoth brussels sprout plant, which my parents gave us from their garden. Their climate was a little too warm for the sprouts to develop properly, but ours might be perfect. I know the plant looks mangled and droopy, but it's just too big for itself. It is in fact growing little brussels sprouts right now near the top of each stalk. Here's the thing, though: I think brussels sprouts are supposed to be a late fall crop; I hear they taste best if you wait until after a frost to harvest them. So, will these take all summer to grow? Or, are they developing too early because this was already a mature plant (two or three years old, in fact)? Also, can I keep them cabbage moths and caterpillars from destroying them? (Last year, they ravaged our kale.)
Off to the side of the front-yard garden, grapes! Dozens of grape babies—just like this little bunch pictured below—have formed on our vine, and I am so excited! Perhaps our vine has finally matured—I think it's four years old now, possibly five. It has produced grapes only one other time, and that was two very small bunches of very small grapes. Japanese beetles feasted on the grape leaves last summer, so we'll have to watch for signs of them and kill on sight. I wonder if the bird feeder hanging by the grape vine will attract birds who will then go after the beetles? Or, will the birds just eat our grapes instead?

In our backyard, blueberries! Last fall I planted a nice-sized Liberty blueberry bush. Apparently, optimal fruit production comes from having more than one variety of blueberry nearby. So this spring, I planted next to it a small Pink Lemonade blueberry bush. Then rabbits nibbled on it and made it even smaller. Rgh. I've since wrapped some fencing around both blueberry bushes to protect them from critters, but I don't think I'll see any awesome dark pink berries from that one this season. The liberty, however, has a few clusters of lovely flowers.

We're now growing four kinds of fruit in our yard: blueberries, grapes, raspberries, and strawberries. It's actually six kinds of fruit if you count two varieties of raspberries, two varieties of blueberries, and the future apples (more on that in another post).
Lastly, from the garden, "Hello" from Mr. Toad.

Sunday, May 6, 2012
Tamales, by gollies!
Corny title, yes. But tamales are a corny food. The main ingredient is masa harina (a sort of corn flour that is usually white and is much finer ground than corn meal), and then you wrap them up in corn husks.
Anyway, for Cinco de Mayo, I attempted homemade tamales for the first time. Here's a pictorial account.
First, the ingredients list:
Tamale Filling
1 1/4 lbs. pork shoulder
half a large onion, chopped
2 cloves of garlic, minced
a generous sprinkling of your favorite taco seasoning (I used Penzey's Arizona Dreaming)
Water to cover
Tamale Dough
2 cups masa harina
1 teaspoon baking powder
1/2 teaspoon salt
2 cups water or broth
2/3 cup shortening
And...
about 16 corn husks (I ended up with only 13 tamales but did occasionally double-wrap when the husk wasn't very wide)
Here's the pork shoulder, onion, garlic, and seasoning after cooking all day in the crock pot. Oh yeah.

I shredded the tender pork into smaller pieces and transferred that and all its juices into a little frying pan over medium-high heat so I could boil away most of the water, thickening up the savory liquid and almost caramelizing the meat. In other words, this:

Became this:

While the meat was bubbling away, the corn husks were soaking in warm water. Here, I weighed them down with a plate to keep them submerged, a trick I learned from watching Rick Bayless.

And while the corn husks were soaking while the pork was bubbling, I prepared the tamale dough. First, mix together the masa, baking powder, and salt. By the way, thanks to the large Mexican population of our area, our grocery store carries ingredients such as masa and corn husks in quantities that are not, let's say, novelty size. I have plenty of masa leftover to practice making tamales for a while.

The next step is adding the water to the dry mixture. Use your hands.

Find any little clumps and squish them with your fingers until you have a soft, uniform dough.

In another bowl, beat the shortening until it is fluffy. Then beat in the masa mixture until the dough is spongy. I had the mixer on for less than a minute. I guess the dough seemed spongy.

Drain and rinse the corn husks and lay them out on your work surface. You'll see they naturally curl into little boats. So drop some dough into each boat and spread it about a half-inch thick. I think I had about the right amount of dough in each husk—maybe a little too much in some—but mostly I should have spread it a little wider rather than so thick and right down the center.

Arrange a tablespoon or so of meat down the center of each tamale.

Then roll them up, folding the ends toward the center. I only folded up the bottom (the skinny end of the husk), because I saw on a cooking show that you could steam the tamales with one end open—the top end. And actually, I felt this was easier, because you don't have to worry about finding a way to keep the top edge folded down.
You steam tamales in a tamale steamer, of course. You can use any steamer, really, but we actually have a real tamale steamer. It's the giant pot we use to make our apple butter in the fall. We bought it because it was huge and inexpensive, but it also came with the round, holey insert (appropriately called the steamer insert) you see resting on top of it there. Do you see that indent near the bottom of the pot? Well, that it is where the steamer insert rests inside the pot, and you pour water in to just below that level.
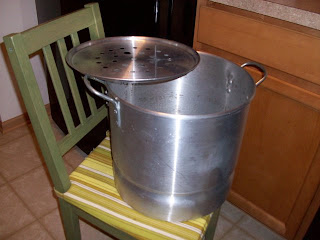
Large as it is, the tamale steamer is meant for the large batches of Christmas or New Year tamales that families often make. My single batch of thirteen tamales didn't even come close to filling all the space in this big pot, but I had to make them stand on end since their tops were open. So I filled the extra space in the pot with something else that can withstand boiling temperature, something we always have around the house.

Now put the pot on the stove, put the lid on the pot and crank up the burner. Steam the tamales for about an hour. To check if they're done, pull one out with tongs and gently unwrap it. If the corn husk pulls easily away from the masa, then the dough is cooked!

Success! As I mentioned earlier, I need to improve my dough-spreading, but the pork I cooked was outstanding (especially the leftover bits Len and I ate right out of the pan while the tamales were steaming), and the tamales held together and turned out pretty tasty. Next time, I might also try the fried chile sauce that traditionally goes with the tamales.

Anyway, for Cinco de Mayo, I attempted homemade tamales for the first time. Here's a pictorial account.
First, the ingredients list:
Tamale Filling
1 1/4 lbs. pork shoulder
half a large onion, chopped
2 cloves of garlic, minced
a generous sprinkling of your favorite taco seasoning (I used Penzey's Arizona Dreaming)
Water to cover
Tamale Dough
2 cups masa harina
1 teaspoon baking powder
1/2 teaspoon salt
2 cups water or broth
2/3 cup shortening
And...
about 16 corn husks (I ended up with only 13 tamales but did occasionally double-wrap when the husk wasn't very wide)
Here's the pork shoulder, onion, garlic, and seasoning after cooking all day in the crock pot. Oh yeah.

I shredded the tender pork into smaller pieces and transferred that and all its juices into a little frying pan over medium-high heat so I could boil away most of the water, thickening up the savory liquid and almost caramelizing the meat. In other words, this:

Became this:

While the meat was bubbling away, the corn husks were soaking in warm water. Here, I weighed them down with a plate to keep them submerged, a trick I learned from watching Rick Bayless.

And while the corn husks were soaking while the pork was bubbling, I prepared the tamale dough. First, mix together the masa, baking powder, and salt. By the way, thanks to the large Mexican population of our area, our grocery store carries ingredients such as masa and corn husks in quantities that are not, let's say, novelty size. I have plenty of masa leftover to practice making tamales for a while.

The next step is adding the water to the dry mixture. Use your hands.

Find any little clumps and squish them with your fingers until you have a soft, uniform dough.

In another bowl, beat the shortening until it is fluffy. Then beat in the masa mixture until the dough is spongy. I had the mixer on for less than a minute. I guess the dough seemed spongy.

Drain and rinse the corn husks and lay them out on your work surface. You'll see they naturally curl into little boats. So drop some dough into each boat and spread it about a half-inch thick. I think I had about the right amount of dough in each husk—maybe a little too much in some—but mostly I should have spread it a little wider rather than so thick and right down the center.

Arrange a tablespoon or so of meat down the center of each tamale.

Then roll them up, folding the ends toward the center. I only folded up the bottom (the skinny end of the husk), because I saw on a cooking show that you could steam the tamales with one end open—the top end. And actually, I felt this was easier, because you don't have to worry about finding a way to keep the top edge folded down.
You steam tamales in a tamale steamer, of course. You can use any steamer, really, but we actually have a real tamale steamer. It's the giant pot we use to make our apple butter in the fall. We bought it because it was huge and inexpensive, but it also came with the round, holey insert (appropriately called the steamer insert) you see resting on top of it there. Do you see that indent near the bottom of the pot? Well, that it is where the steamer insert rests inside the pot, and you pour water in to just below that level.

Large as it is, the tamale steamer is meant for the large batches of Christmas or New Year tamales that families often make. My single batch of thirteen tamales didn't even come close to filling all the space in this big pot, but I had to make them stand on end since their tops were open. So I filled the extra space in the pot with something else that can withstand boiling temperature, something we always have around the house.


Success! As I mentioned earlier, I need to improve my dough-spreading, but the pork I cooked was outstanding (especially the leftover bits Len and I ate right out of the pan while the tamales were steaming), and the tamales held together and turned out pretty tasty. Next time, I might also try the fried chile sauce that traditionally goes with the tamales.

Friday, April 27, 2012
It's Arbor Day
I never knew the billboard industry was so cutthroat. But I read an eye-opening article on MSN yesterday, "A crime by the highway: Poisoning trees to make billboards easier to see," and it, well, opened my eyes to the underbelly of billboard advertising.
To sum up, tall plant growth can block motorists' views of the advertisements, so billboard companies often obtain permits to trim or even remove the trees surrounding their signs. Logical. But permits cost money, and then they have to pay a landscaping professional to properly dispose of the trees, and sometimes they would like to cut down a larger area of trees than the permit allows. Wouldn't it be convenient—and cheaper—if the trees, oh, just happened to die? And you know, a can of strong herbicide in the hands of one of their own employees would cost a lot less than hiring a landscaper...
So some companies have been illegally poisoning the trees to clear the line of sight to their roadside advertisement. The article focuses on one employee who refused to continue these despicable duties (only in his job description unofficially, of course) and was fired.
I understand that the clearing of some woodland is a necessary part of civilization, but the preservation of forests is essential to keeping our atmosphere suitable for human life. And, we all know that spraying toxic chemicals all over the place is never a good idea.
Plus, trees are nice to look at, which brings me to Arbor Day. That's today. The perfect day to offset the illegal removal of our precious natural air filters by planting one of your own. You don't even need a yard; small citrus trees can grow in pots in a sunny room of your home.
If you don't have the space or the means to plant a tree, then I say to you, take a hike! Really. Go outside and walk through the woods and enjoy some trees today.
Friday, April 20, 2012
Lazy Earth Day
This Sunday, celebrate Earth Day the lazy man's way: Just stay in bed!
Start conserving energy the night before by unplugging your alarm clock. Then on Earth Day, you can reduce your carbon footprint without lifting a finger!
You won't burn any fossil fuels driving, because you won't go anywhere.
You won't waste any water, because you won't shower.
You won't waste any electricity, because you won't get on the computer.
If you do haul yourself out of bed to eat during the day, you won't even waste any energy cooking, because you'll just eat whatever leftovers are in the fridge. And you'll eat them cold. Right out of the container (no extra dishes to wash later—saves water).
See? It's easy to lessen your impact on the environment.
But, if you do feel like putting in a little more effort and being extra green this Earth Day, check out our ideas from previous Earth Days:
Beyond the Day (2011)
Earth Day: Easy to Extreme (2010)
Wednesday, April 18, 2012
Farm-Fresh Dinner
I told you about those radish sprouts I discovered on Saturday and about our field trip to Heritage Prairie Farm earlier that morning. Well, one thing led to another, and we had a delicious, farm-fresh dinner on Saturday night, and I just had to share it. Or share a photo of it, anyway.
Here it is.

That's the smoked Gouda bread we bought from the market, and the locally raised pork chop glazed with the pumpkin honey mustard. And there's our radish sprout salad, which included apples from last fall's harvest and a couple of baby shallots from our yard and was served warm with pumpkin seed oil and apple cider vinegar. The roasted potatoes were not actually fresh from the farm. They are grocery-store potatoes that have been in our pantry for a while now.
But whatever. Three quarters of the meal was farm fresh, and it was outstanding. And, it came together pretty quickly, too. The only thing missing was a pie for dessert. If only I'd been thinking ahead!
I can't wait to see what our hard work in the garden can bring to the kitchen table for the rest of the summer.
Monday, April 16, 2012
Garden Bonus
Saturday was our first official day working in our community garden plot, and as I was digging up the spaces where I would plant the first spring crops, I spotted... volunteer radish sprouts!

In a community garden, you don't expect plants to come back year after year, because the whole thing is mowed over in the fall and rough-tilled in the spring. The dirt that was in your garden last season is now mixed with your neighbor's dirt, and any plants you left behind could be chopped up or buried or who knows what. Well, some of my radishes bolted last spring when the weather got too hot too quickly, and they went to flower and then seed, so I just left them there. Out of laziness, I guess. But—surprise, surprise!—the seeds survived the till and germinated on their very own.
The tiny seedlings were concentrated where my radishes had been last summer, but they were also scattered around the general area. I left a patch of them to develop fully, but I picked a whole bunch that became our salad that night. I believe these are what gourmet restaurants call micro-greens. We call them bonus food.
Saturday, April 14, 2012
Field Trip to Heritage Prairie Farm
Have you seen the documentary Food, Inc.? It's meant to educate viewers on where their food comes from. If you're a meat eater, I definitely recommend you watch it, and I'd like to assure you that it is not a grotesque exposé of farm animal cruelty, and it is not meant to turn you vegan. Not even close. If you are a vegetarian or vegan, I might still recommend it to you, because it's not just about where your meat comes from. It's about where all your food comes from.
The documentary came out in 2009, but we just watched it a couple of weeks ago. Not surprisingly, it was a good companion to Fast Food Nation (read the book; the FFN movie just doesn't cover it all), which I read and we watched a few years ago. I'm not going to go on and on about it, because that's not the point of this post, but here's a brief summary so you can understand what the movie has to do with today's field trip.
Most of what we eat is beef, chicken, corn and soybeans. Giant agricultural companies pretty much control the production of these products, and the demand for the products is so high that a factory-line system is the only way to keep production high and prices low. This means the livestock are crowded together and eat a cheap corn diet, and it requires fast-moving slaughter houses where contamination of the meat and crippling injuries to the workers are commonplace. The live animals are pumped with hormones and antibiotics, and the meat is treated with things like ammonia. Meanwhile, smaller farms are being crushed financially by these big companies, and even the farmers working for the big companies aren't being treated all that well. The moral of the story is that it's better to let the animals roam around a little, eat grass like they're meant to do, and grow at a natural pace. And, you should read the labels on all of your other food, because corn is in everything, and soy is in a lot of it, too, and you're supporting the big guys when you buy it. The whole idea is that we should buy food that is healthy for ourselves and fair to the farmers (and, in the case of meats, that was raised healthily and humanely).
So, today we went to the market at Heritage Prairie Farm, a pretty cool place about 35 minutes from our house. We tasted herb-infused honey and medicinal-mushroom–infused green tea, talked to some goats and a donkey, took a peek inside a bee hive and then bought some expensive pork chops, a jar of pumpkin honey mustard, a roll of Wisconsin goat cheese and a small loaf of smoked Gouda bread. Oh, and we had a "cinnamon honey cow latte."
The people were really friendly, and I think we'll go back—gotta try Chuck's Wood-Fired Pizzas!—to check out the seasonal changes in products. But it sure ain't cheap to give up hormone-rich meat and dairy.
I think we'll move slowly in that direction, making meat more of a luxury item, trying to get more out of our own garden. I'll definitely be more hesitant to buy the really big boneless skinless chicken breasts. (Those aren't natural!)
Wednesday, April 4, 2012
The Ants, Naturally
It's that time of year. The insects want in.
I saw a few ants in our first-floor bathroom, apparently coming in from under a baseboard. What could possibly have lured them from outdoors into the bathroom, I can't imagine. It's just a toilet and a sink, a bar of soap. No crumbs of cat food like near our back door, where—big surprise—I found more ants. The back-door ants do not appear to be of the same colony as the bathroom ants, because there we found no ants between the bathroom and the cat dish. So, we have two infiltrations. What to do about it?
Of course, there are multitudes of pesticides, especially for ants, that you can spray around the perimeter of your house to kill the bugs and keep them out. But those aren't particularly green, are they? Here's the natural solution: Borax, sugar, and vinegar.
Borax (a naturally occurring sodium compound), if you don't know, is a laundry booster, but just like baking soda and vinegar, it has so many other household applications. We use it to clean our toilet bowls. It really makes that porcelain shine! It's also a great ant killer.
Note: Just because borax is natural, it's not necessarily environmentally friendly. What I mean is it can be toxic in varying amounts to people, animals, and plants—it does kill insects, after all. So, don't sprinkle it all over your house if you have pets or kids, and don't use it near your food. Instead, make a borax trap, as I'll describe now.
In a small plastic container with a lid, like a yogurt cup or a Cool Whip container, mix three parts sugar with one part borax. Add just enough water to moisten the granules and mix them together. They'll turn syrupy. Poke some holes in the sides of the container near the bottom but above the surface of the borax-sugar bait. Put the lid on the container and then set it outside, out of the way of normal people/animal traffic, near where the ants are marching.
Second step: Indoors, use a vinegar-soaked cloth to wipe down the floor and baseboards or other surfaces where the ants have been. The vinegar is not toxic, so it's safe to use liberally inside.
The sugar disguises the borax and attracts the ants, so they head for the trap instead of for your kitchen, and they eat the borax-laced sweetness and carry it back to their buddies to share. But the borax, when ingested, essentially dehydrates the ants until they're nothing but a crusty ant shell. Meanwhile, the vinegar repels the ants for a brief period. It stops working when it evaporates, so you'll want to keep the vinegar on hand for one or two follow-up wipe-downs, until the ants get the idea that your house smells like vinegar and/or they've all died from eating the bait.
You're probably wondering if any of this actually works. Yes, it does! So far, anyway. Almost two weeks ago, I laid borax traps, one against the exterior wall of the bathroom, and one just outside our patio door. We were ant-free for two or three days, but then I spotted a few in the bathroom again. I checked the traps, and they did have some dead ants in and around them, but a few explorers were still interested in coming in the house. I simply did another quick vinegar application (to remind those ants why they stopped coming inside the first time!), and we haven't seen any more indoor ants since.
Now, the weather has been erratic lately, bouncing around from chilly and damp to warm and humid to cold and windy to mild and sunny, so, I can't rule it out as a contributing factor in the ants' disappearance. We'll see as spring progresses whether the ants stay away, which will mark the true success of the all-natural ant-trapping-repelling business.
Linked to Frugal Days, Sustainable Ways, Eat Make Grow
Subscribe to:
Posts (Atom)
