
Another cool restoration project and electrical update #3 to the new old house. Partially completed ourselves (i.e. by Len, with his lovely assistant), but most definitely also involving a hired electrician.

The life and times of a brass chandelier. This brass chandelier used to hang in my in-laws' foyer. At some point, they replaced it with a brighter, more modern light fixture. Because he dabbled in upcycling, restoration, and nostalgia, Len gained possession of their chandelier some time after that.
Since then, we've just been holding onto it. Its bright new condition is the latest (and final?) stage of its metamorphosis.
 |
| Before: decades of dust, tarnished brass, missing socket covers, missing crystals. |
A couple of years ago, Len cleaned it up a bit and steam-punked it with old Christmas light globe bulbs for the Alley Art Festival in downtown Aurora. It could have been a funky addition to some moody dining room, but now we're glad it had no buyers.
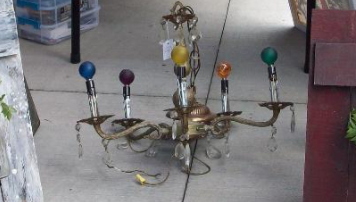 |
| Aurora Alley Art Fest 2018 |
This time around, he more thoroughly cleaned and shined the brass, replaced missing teardrop crystals, and funned it up by hanging decorative skeleton keys where other crystals would have hung. He also made new socket covers (candle tubes) painted cobalt blue.
Electrical Update #3. So, restoring the chandelier was just one part of a larger project. This third electrical update wasn't as big as last year's Electrical Updates #1 and #2, when we updated the circuit breaker box, ran wires to a couple of ceiling fans, added power to the porch and garage, and so on. In fact, we originally thought Len could just do this one himself.
Until we went into the attic.
The plan was simply (ha!) to move a ceiling light fixture from its location at the top of our stairs to a new location -- maybe five feet away -- centered over the stairs' middle landing, where we'd then hang the chandelier. The ceiling and the wires were accessible via the attic, so Len would just extend the wires and poke a new hole in the ceiling...
Well, our house's internal workings are a mishmash of old, new, and in between. The ceiling fixture was still connected by old knob-and-tube wiring. We decided it wasn't safe to try splicing new wires to such old wires ourselves. The knob-and-tube wiring was also buried in the attic insulation, where it is apparently not supposed to be.
Further complicating the issue is that the fixture operates on a three-way switch -- one light switch at the top of the stairs and one at the bottom of the stairs, either of which can turn the light on and off.
We called Mr. Sparky, the electrician we'd hired for Electrical Update #2, and we figured we might as well have him take care of a few more things while he was out. The project became:
- Run wire and add a new box at the new location for the stairwell ceiling light.
- Disconnect the knob-and-tube wiring and refeed the wires to both stairwell light switches.
- Add another fixture box in the upstairs hallway, so we could add a ceiling light where the hall has always been darkest.
- Add a wall switch for the new hall light.
- We decided to save a couple hundred dollars by leaving it to Len to complete the final step, installing the two light fixtures.
Oh, and by the way, from the vantage point of a midway stairwell landing, the second-floor ceiling is very tall.
For the wires: Some Googling taught me to expect -- in general -- the hot wire (black) to have smooth insulation and the neutral wire (white) to be identifiable by a seam or ridges in its insulation. Fingers crossed.
For reaching the high ceiling from the stairwell landing: We used a couple of dining chairs, a solid wood door, some thick planks of wood, and the stairs themselves to build a makeshift scaffold upon which our six-foot ladder could stand. There is no photographic evidence of this creaky engineering "marvel."
Troubleshooting electricity. OK, light fixtures installed, go down to the basement to flip the two second-floor breakers back on. One on, OK. Two—BUZZZZZZ—trip! Oh no. One circuit has a problem and keeps tripping.
We were finally able to flip the breaker on without it tripping by making sure the chandelier was off at its light switches -- trial and error because, with the three-way switch, up or down on either wall switch could mean either on or off. With the breaker on, we could see the newly installed hall light worked fine. When we tried to flip on the chandelier, BUZZZZZZ. Switch it off, quick!
 Len went up and down the ladder to no avail, checking, reconnecting, and re-checking the wiring of both ceiling fixtures before concluding it was the load of the chandelier's light bulbs, not an incorrect installation, that was causing the problem. We'd hoped to use slightly larger and brighter, flame-shaped bulbs, but they were too high a wattage for the old chandelier (and/or the old house?) and were now overloading the circuit. Hence the scary deep buzzing when we tried to give it power.
Back to the smaller 5-watt bulbs. That fixed the buzzing and the breaker tripping.
Oddly, we were getting no power to three second-floor wall sconces and three first-floor ceiling fixtures. The weird thing is these fixtures are on a different circuit than the chandelier and new hall light. They're controlled by the breaker that originally flipped on with no problem.
Did we do something stupid while connecting the light fixtures? Lots of Googling and wondering if a short circuit somewhere along the line had somehow caused a loose wire to jump out of its connection. With our limited inventory of electrical tools, investigation would require opening up and checking the connections of every fixture and light switch on the circuit.
It was very, very late at night.
Just call Mr. Sparky back to solve the mystery. Looking at several of the affected fixtures, Len realized their common denominator was knob-and-tube wiring. He called the electrician to come back when he could -- no emergency, just some lights out, hopefully he can figure out what's wrong. Luckily for us, he came back the next afternoon.
Here's the peculiar way knob-and-tube wiring works. When the house is originally being electrified (a century ago?), the installer of the time takes wire from the wall sconce or whatever fixture, just finds a hot wire running through the center of the house, and ties it into it. All of these lights were at some point tied into the same single hot wire. When we had our electrician of 2021 cut the knob-and-tube wire from the stairwell ceiling fixture and disconnect it at the circuit breaker box in the basement, that one cut actually disconnected all these fixtures.
The good news, I guess, is disconnecting old knob-and-tube is just that: disconnecting. It's less destructive to just leave the wire where it is, a dead line snaking through the guts of the house, rather than ripping it all the way out. So, the electrician just reconnected that one wire in the basement, and now all our lights work.
The house's internal workings remain a mishmash. We have bright new light in our upstairs hallway, so I can see myself in the full-length mirror outside the bathroom. Our stairwell now glows with the soft, romantic light of a rejuvenated vintage chandelier.
Just one last thing to take care of...
 |
| Patch this hole where the stairwell fixture used to be. |
- After looking at the older photographs of the chandelier, we realized a piece had been assembled upside-down. Reversing it required unwiring the chandelier from the box in the ceiling. Upon reassembly and rewiring -- BUZZZZZZ! It couldn't be the bulbs now. It was that one of the wire connections was not as solid as it should be. This thing was touchy.
- We found 5-watt LED bulbs that are as bright as 60-watt but only draw the lower wattage's power. Bulbs in, works great! But, these bulbs stick up a little higher out of the candle tubes. Len made new, longer candle tubes. After installing those and putting the new LED bulbs in -- BUZZZZZZ! Now wait a minute! These bulbs worked a half hour ago.
This time, it was one of the connections at the candle socket. The pulling and pushing of swapping out the candle tube socket covers had ever so slightly loosened a wire-to-screw connection beneath just one of the bulbs. We found which one by screwing in the light bulbs one at a time, and flicking on the light switch. One in, light works. Two in, light works. Three in, you get the idea, until number 4. BUZZZZZZ! OK, check those connections, tighten. Try again. Works! Hooray!

No comments:
Post a Comment