Monday, December 28, 2009
Adventures in Cake Decorating #1 - Baby Blocks
I had the idea to make little baby blocks out of the cake. I baked two rectangular cakes, one yellow, one chocolate, let them cool, iced the top of one and stacked them. Trimming the edges for perfectly flat sides and cutting out cubes was easy enough. (There were a lot of cake scraps leftover, which Len would later use to make a modified version of his mom's trifle for an office party.)
But, I severely underestimated the amount of frosting I would need and had to settle for frosting only three sides of each block—the presentation sides, we'll call them. And, even though I did what pastry chefs would call the crumb coating (a preliminary thin layer of frosting to seal the crumbs to the cake), the chocolate layer of the cake was still so crumby that the white icing ended up looking like cookies 'n' creme icing. Not a huge deal, but not Martha Stewart perfect. (If you search for baby block cakes online, you'll find most use fondant for a perfectly smooth, flat look. I did not want to use fondant and used all soft, butter cream-like icing—way more difficult for handling the individual blocks, but much tastier.)
Before I reveal the finished product, let me just say: If I'd had more frosting and more patience, I would have used more than just three colors for trimming and decorating the blocks. And, if I'd considered beforehand how bad I am at drawing, I would have piped only letters on the blocks, instead of trying to draw things like a cat, a car, a leaf... I know you can't tell what they are. Oh, and the wooden skewers sticking out of the blocks? I made the cake a day in advance and used skewers to hold up the plastic wrap, so I could protect the cake from drying out without smearing the icing. A big enough Tupperware container, if I had the right size/shape, would have been better.
Anyway, here it is, not bad for my first baby shower cake, definitely homemade, and only room to improve:
Friday, December 11, 2009
Global Day of Action on Climate Crisis
November 30 was the Global Day of Action on Climate Crisis. Around the world, activists held peaceful demonstrations against cap and trade, carbon offsets and other solutions to climate change that some consider insufficient.
In Chicago, just a block away from my office building, one of the nine major demonstrations in the U.S. was happening—protesters lay in the middle of the street, arms linked by tubes bearing messages like, "You can't trade away our future," while others crowded around holding signs with similar messages and police on foot and horseback kept watch. In the end, about a dozen protesters were arrested, I assume for lying in the street for too long.
In case you're not clear on these climate change solutions the groups were protesting, here's a quick rundown:
Cap and trade, also known as emissions trading, is when a governing body sets a cap on companies' pollutant emissions. Companies that need to exceed the emissions cap can purchase carbon offsets ("carbon credits"), which represent a reduction in emissions. The company is not actually polluting any less, but it is giving money to companies that are polluting less or to green energy industries, in essence trading for the right to emit the amount of pollutants that these other organizations have ceased emitting.
The idea is that, while individual companies may pollute more or less than the "allowable" amount, overall emissions would average out below the cap. Whether such practices actually reduce the amount of pollutants being pumped into our air and water is yet to be determined. There aren't many statistics yet on the resulting effectiveness or ineffectiveness, and some people—November 30's protesters, for example—stand firm that emissions trading is not the answer to our climate crisis.
Monday, November 30, 2009
Reusable and Disposable Meet Halfway
.
.
.
They're a neat idea for you paper-cup junkies, and they're easier to carry around than a whole thermos. And I got to thinking, you don't even have to buy one: You could just cut a cuff off of a ratty sweatshirt or sweater, and voila! Instant coffee sleeve, if you don't care much about the stylishness. Or maybe the tops of tube socks around coffee cups will be the next fashion trend...
Monday, November 16, 2009
Pie Pumpkins Aren't Just for Pies
Yes, I had the pumpkin latte from Starbucks. We didn’t even wait until Thanksgiving to eat a wonderful pumpkin pie because Len already baked one from scratch. He also made pumpkin bread. And, of course, we carved a jack-o’-lantern for Halloween and toasted its seeds. (And you know we saved some seeds for the garden, but that’s not relevant to food... Yet.) But our first more adventuresome pumpkin dish this fall was a pumpkin and Swiss chard lasagna recipe from delish.com. I was in love after the first bite. More recently, a friend passed a stuffed pumpkin recipe around the office. Len was skeptical when I first showed it to him, but after tasting it, he has added pumpkin to the grocery list so we can make it again.
Stuffed pumpkin is a centuries-old and easy comfort food. You can make the stuffing very simple with bread and butter, or you can jazz it up with garlic, onions, sausage or fruit. We went simple and got a delicious, soul-warming pumpkin dinner. It could also be a side dish, but it’s heavy, so I would suggest a very simple meat entree.
All you need:
- A pie pumpkin or any small orange pumpkin (ours was 4 lbs.)
- A flavorful melting cheese like Gruyere, grated or cut into small chunks (I used a mixture of goat cheese and asiago just because they are what I had in the fridge)
- Some stale bread, cubed (or some toasted cubes of fresh bread)
- Cream or evaporated milk (I used about 1 cup for our 4-lb. pumpkin)
- Seasoning: salt, black pepper, white pepper and nutmeg
Preheat your oven to 375. Cut a lid out of the top of your pumpkin and set it aside. Scrape out the seeds and strings from inside the pumpkin. Lightly season the inside with salt and pepper. Then toss the bread cubes and cheese into the pumpkin in rough layers. Press the layers down a little to really stuff it! In a bowl, gently mix the cream with a little white pepper and nutmeg, then pour it over the bread inside the pumpkin. Set the pumpkin in an oven-safe dish, put its “cap” back on, and bake it for about an hour and a half. The pumpkin will become soft to the touch, and its skin will brown. Take its top off and bake it about 15-20 minutes more, so the cheese inside gets nice and bubbly.
After you remove the pumpkin from the oven, it will keep its heat for awhile, especially if you put its lid back on, so you can serve immediately or let it stand while you finish up any other dishes.
To serve, cut the pumpkin into wedges and serve each wedge scooped with some of the stuffing. The pumpkin’s skin will peel right off. Don’t forget you can eat the cooked flesh on the underside of the lid, too!
Tuesday, November 3, 2009
Winterizing the Apple Trees
UPDATE: We have now planted two and are still annually winterizing one of our apple saplings as of Winter 2012-2013! Click here to read a recap of our apple tree experience.
Wednesday, September 30, 2009
Quick Dinner: Zucchini Tartlets Reprise
All I had to do was open a can of crescent rolls, press the dough into the muffin tin and spoon the pre-made filling into the cups! Throw it in the preheated oven, and we have dinner in half an hour. I did stir the filling well first, in case any ingredients had separated. And, since my filling was still a little icy, I baked the tartlets longer than when preparing them fresh—20 minutes or so. I am pleased to report that they turned out just as good!
Making the filling and freezing it for later might be a great way to preserve your late-summer zucchinis, just when you're getting tired of eating them. Cold weather is on the way, and who knows when you'll have a hankering for that wonderful taste of summer?
Friday, September 25, 2009
Crab Apple Butter
.
.
.
Tuesday, September 22, 2009
Happy Autumn!
- Enjoy what's left of the nice weather while picking the tapering supply of tomatoes and herbs.
- Stir the compost!
- Pull up my remaining shallots and plant the clusters of shallot "heads" for next year.
- Think about the plan for next year's edible garden.
- Possibly build a second compost bin (well, ask Len to build one for me) so we can alternate bins each season, maximizing output and minimizing stirring and sifting.
- Separate what "finished" compost I can and spread it on the permanent garden beds to help get the soil ready for next spring.
- When it starts getting colder for real but before it really frosts, trim back the raspberry bushes and grape vines. (Oh yeah, I got a few small bunches of small grapes, did I tell you that? They looked more like currants. I was pleased, this being their first full season.)
Friday, September 4, 2009
Would you look at that?
All two of them.
These pitiful things, folks, are the result of shallow, heavy, clay earth. And poor sunlight.
I have work to do in this yard before next spring...
Tuesday, August 25, 2009
Eating Green for Our Anniversary
Chef Rick Bayless, the owner of Frontera and its upscale neighbor Topolobampo, is a local-and-recently-national celebrity, and we've been fans of his TV show, "Mexico: One Plate at a Time," and his cuisine for almost as long as we've been married. But there's more: He's also a big advocate for sustainability. Rick's website even says, "Here at Frontera, one of our goals is to live 'sustainability' everyday." In other words, the restaurant is green! Here are some examples of how:
- They use seasonal, locally grown produce, including that from their rooftop salsa garden and from Rick's own backyard.
- They buy responsibly raised meats—free-range chickens and ducks, certified organic lamb, and grass-fed beef—and sustainably harvested seafood.
- The vast wine list includes some biodynamic (a method of organic, holistic farming) and other organic wines.
- They recycle!
- They compost!
- They even give their spent vegetable oil to a farm that uses it for a bio-diesel delivery van.
I'll just conclude by saying that dinner was indeed sumptuous. One pleasant discovery was the Café de Olla, a sweet and fruity spiced dessert coffee that we've since been trying to duplicate at home. And, we did not bring the leftovers home in Styrofoam clamshells, oh no. The restaurant has biodegradable cardboard containers for guests like us, whose eyes are bigger than their stomachs.
Actually, just one more thing: You can read more about Rick Bayless' newest efforts as a sustainability-driven restaurateur in this article from the March/April issue of Natural Home magazine.
Wednesday, August 19, 2009
Zucchini Tartlets
Shared at Eat Make Grow
Saturday, August 15, 2009
Crab Grab
There are still some crab apple trees not quite ready to be picked—you can tell by the lack of fruit on the ground below them. The trees we visited today were at the perfect stage. They had dropped many crab apples on the ground (but not so many that you have to walk through a bee-infested sludge of rotting fruit)—which means the apples are ripe—while plenty of apples remained in the tree—which means they're not overripe yet.
.
Len got on the stepladder and picked from the tree, and I mostly inspected the apples on the ground, bagging the ones that were not smashed, bruised or bug-bitten. Of course, we ate one while we were out—have to taste the product at every stage! These larger crab apples are tart but not bitter, like a Granny Smith but redder, if red can be a flavor.
.
.
And now, it's jam time! Expect a post about the crab apple jam soon.
Sunday, August 9, 2009
Summer's Slow Bounty and Zucchini Pie
We've really gotta break in this soil or switch to raised beds for all summer vegetables. It's August, for crying out loud, and we have harvested a handful of baby tomatoes, one miniature bell pepper and that's it! Maybe I'll pull up the shallots and see if they're big enough.
I have, however, been enjoying the bounty of other people's gardens. My mother-in-law gave us a giant zucchini, half of which I used for fried zucchini strips and the other half to make sumptuous zucchini pie.
This is my mom's recipe for Zucchini Pie:
4 cups thinly sliced zucchini
1 cup sliced onion
1/4 c. butter
2 tablespoons parsley flakes (or 6 tablespoons fresh)
1/2 teaspoon salt
1/2 teaspoon pepper
1/4 teaspoon garlic powder (or 1-2 garlic cloves, minced)
1/4 teaspoon basil (or 1 teaspoon fresh)
1/4 teaspoon oregano (or 1 teaspoon fresh)
2 eggs
8 oz. shredded mozzarella
1-2 tablespoons Dijon mustard
refrigerated crescent roll dough or a pie crust
Preheat oven to 375. In a pan, melt butter and cook zucchini and onion (and garlic if you're using fresh) until tender, about 10 minutes. Stir in parsley, salt, pepper, garlic powder, basil and oregano.
In a mixing bowl, beat the eggs with the shredded cheese. Stir in the zucchini and onion.
Press the crescent roll dough or pie crust into a pie pan or square baking pan. Spread the Dijon mustard all over the crust. Dump in the zucchini mixture.
Bake 18-20 minutes. Let cool a little before cutting and serving.
It makes a great side dish or entree.
Saturday, July 25, 2009
A Quick Note for Our Fashionista Friends
A simple online search for recycled or repurposed leather will lead you to a multitude of fashion and shopping websites, where you can buy purses, wallets, shoes, jewelry—pretty much anything leather—made from old leather jackets and such. And, since I have personally seen, touched, and smelled one of these earth- and fashion-friendly bags, I can promise all you leather lovers that the bag looks good and smells good—just like brand new leather. It does not look like a patchwork quilt, OK?
Now, I do very little fashion shopping myself, so I don't know for sure, but after browsing a little online, I think can safely say most of the items are priced just like new leather, too. But I'm sure the frequent shoppers out there, like my friend, know where to find the good deals.
Some of these handbag designers use leather remnants, like the ones leftover from a purse factory (or whatever they're called), so it's not so much recycling as it is preventing waste—still a great thing. And others are actually out there scouring thrift stores for battered leather goods that they will recycle into other stylish items.
So, I'll end with a reminder that you should always donate to Goodwill (or Salvation Army, etc.) your unwanted clothes and fashion accessories, even if they have holes or other imperfections. A purse designer is out there, searching for those items, eager to cut them to pieces and make something new.
Monday, July 20, 2009
A Fruitful Excursion
Gleaning was originally a rural gig; people gathered stray crops left behind after a farmer harvested his fields. I'm not sure if that counts as stealing or not, but I suppose if the farmer isn't going to use the leftovers... Anyway, gleaning has moved into the cities, and in our case, the suburbs. People are picking fruit from seemingly ignored trees in residential areas. I'm not talking about going into people's yards (but if your neighbor has a fruit tree that is just dropping its bounty to rot on the ground, ask him if you can bring over your ladder and have at it—I bet he'll let you). These are fruit trees that don't belong to anybody and are not being picked clean by squirrels, like the trees surrounding an apartment complex.
A few years ago, Len and I noticed a huge crab apple tree in our neighborhood, on what appeared to be common ground, and under it, a massive mush of rotting crab apples, the edible kind just a little bigger than cherries (as opposed to the smaller, purely ornamental variety). We watched the fruit ripen, fall, and rot for two years in a row and were certain that it belonged to no one and was being used by no one. Last summer, we took advantage of this otherwise wasted harvest and picked a Croozer-full of crab apples, which we turned into sweet, tart, beautiful deep-magenta preserves.
We also found a few apple trees that we think exist by happy accident. They are typically near other crab apple trees, so we think they were meant to be ornamental crab apples, but in fact turned out to be full-fledged apples (perhaps due to the grafting of one type of tree onto another type of mature root stock). However they got there, it's free organic fruit! We're pretty sure there are no pesticides being sprayed on these trees, based on the fruit's rustic look. Of course, we nibbled on an apple, to be sure it wasn't some nasty inedible hybrid, and were delighted to find a couple of different and tasty varieties. We have no idea what kind of apples they are; one's Granny Smith-ish, the other is sweeter and more yellow/pink.
This past weekend, we took a bike ride (on our way to the grocery store—gotta combine those errands when you can!) to check on the varying stages of ripeness of "our" trees, and to look for other apple and crab apple trees. We started collecting for preserves and apple butter toward the end of the trees' peaks last year; we wanted to catch them earlier this time around. I'm happy to report we found lots of crab apple trees (more than we can use), some of which are just about ripe now, and even a few new apple trees.
But the best discovery of all (and one we're marking our calendars for next summer) was the apricot tree. Who knew? We can't believe we'd never noticed it before, all the times we've biked past it. But there it was, a litter of small orange fruits all over the ground and plenty more still in the tree. We stopped right there, hoisted ourselves into the tree (it was a big one, old, with thick branches) and picked to our hearts' content. We made apricot jam that very night, and I had apricots in my oatmeal for breakfast the next morning. Delicious. Delightful.
Tuesday, July 7, 2009
Green Grilling: Gas or Charcoal?
.
.
Thursday, June 25, 2009
Trying Again with the Pumpkins
Friday, June 19, 2009
More Adventures in Edible Gardening
.
Today, I planted some more fun stuff in our yard: jalapeño seeds we cut out of a store-bought pepper, the butternut squash and cucumber seedlings I had started in small containers, and, just to see what happens, an avocado pit and some key lime seeds. We have previously made an avocado pit sprout roots and a scrawny stem in a glass of water, but it died before it really turned into anything. This time I just stuck it in the dirt. As for the key lime seeds, I have no illusions that we can sustain a citrus tree outdoors in this climate. They're just an experiment. If little lime trees happen to spring from the earth, I'll dig them up and pot them and then figure out what to do.
.
A garden really is just an outdoor laboratory, isn't it? I made an interesting discovery in mine a few weeks ago. This plant, and now, another baby one just like it, sprouted on its own in our little garden bed.
.
.
As it grows, it looks—and smells—a lot like a tomato plant. Last fall, I spread some almost fully decomposed compost onto my garden areas. Could it be that seeds from tomato scraps survived the winter and germinated "wild" on their own? We'll find out. I'm letting these two plants grow undisturbed until I discover they're actually a cleverly disguised weed.
.
Another experiment I began today is growing my cucumbers in a window-box-type container hanging on our fence, right under some latticework for easy climbing. But, can cucumbers thrive in shallow soil? There isn't much room for their roots to stretch. We'll see. Just in case, I planted two more seedlings in the ground at the base of the fence. They'll just have to reach a little higher before they can attach themselves to the lattice.
.
Meanwhile, my snow peas aren't doing so great in the hanging baskets. They look pretty, but don't get enough sun under the porch roof and therefore haven't produced a single pea yet.
.
The sweet pepper and tomato plants (the purposely planted ones) are still short but are slowly reaching for the sky. A pepper about half the size of my thumb is already growing, so that's something.
.
The strawberries are still producing like crazy. And we still have our own little salad bar out there with the remaining heads of romaine and buttercrunch lettuce.
.
The grapevine is stretching and has tiny clusters of tiny green balls. I wonder if these become the grapes, or if they become flowers that become the grapes? I've never seen the life cycle of a grape, so I don't know. Again, I say, we'll find out.
.
And, take a look at my bushy raspberry bushes (tied back to grow up against the side of our garage instead of out into the yard), fronted by massive shallots. Those onion shoots are almost waist-high. Their tips have burst into clusters of mini onions, shallot "heads" meant to be planted back in the ground, meaning the onions beneath the dirt are almost ready to be pulled. Could I have ten times as many next spring? Or even as soon as this fall?
.
.
Oh, and that scary-looking Chinese cabbage was definitely not cabbage. It sprouted lanky stalks of tiny yellow flowers. My mom suggested it was a type of wild mustard. She found the same thing growing in her garden 300 miles away. It had to have come from that Chinese cabbage seed packet we shared! Strangely, though, she did get some cabbage in her garden. Whatever it was, I yanked it out last week. Maybe I'll sow my leftover seeds later for a fall harvest and keep my fingers crossed.
.
What's new in your garden, readers?
.
Wednesday, June 10, 2009
Chocolate Cranberry Macaroons
Shared at: Thursday's Treasures, Full Plate Thursday, Whip it Up Wednesday, Friday Favorites
Monday, June 1, 2009
The Garden Eating Begins
Growing along with my lettuce is some scary-looking Chinese cabbage... or something. It looks more like a weed, with fuzzy, spiky leaves. When I look up Chinese cabbage, the pictures look like cabbage and not like the weird stuff growing in my little garden box. Maybe it is just a weed, but it's growing right where I planted those cabbage seeds. Maybe I got some bum seeds. I haven't picked or tasted any of it yet because I don't know what to do with it! It certainly doesn't look like it would be a pleasant texture. I'm sort of waiting to see how it grows out.
My other leafies, the romaine and buttercrunch lettuces, are growing great and taste great. I have been using some of the baby leaves in salads, making room for others to grow into full heads of lettuce. My spinach was good, but not all of the seeds sprouted, so we already ate it all and have to plant more. I think I can get another harvest before it gets too hot.
In the meantime, I'm just waiting for everything else to produce. Oh! Besides lettuce, we also have strawberries ripening now. About four at a time are ready every day or so, and I often just eat them as I pick them instead of saving them up for use as an actual ingredient in something, like strawberry shortcake. Now there's an idea...
So, what's growing in your garden, on your patio or balcony, or in your window sill? Check off your edibles in our poll over there on the right. If you're growing something that isn't listed, just click the "Comments" link at the top of this post and tell us about it!
Saturday, May 30, 2009
Ahh, Laundry
But there is one thing that I do enjoy about laundry, and that is when I have a free Saturday, skies are clear, the breeze is moderate, and I can hang the laundry out to dry. It's the age-old green thing to do, don't you know.
Today was the first time this year we were able to do it, and now I have fresh-smelling clothes and the sun-pinkened nose to show for it. Since permanent clotheslines are not allowed in our subdivision (unfortunately true in many suburban neighborhoods these days), and there isn't much room for one in our yard anyway, we use a handy, waist-high, foldable drying rack from Ikea (pictured left and below).
Len also set up discreet, semi-permanent bases behind my raspberry bushes for inserting taller, removable poles; whenever we need to, we bring out the poles and string some extra line between them and our fence. I had two loads of laundry out there today. Now that's a crowded yard!
Of course, we make green laundry choices even when we can't dry things outside. We have a front-loading washer, which, as you know, uses less water and less detergent than the top-loading kind. It's also supposed to be gentler on your clothes. (Maybe, but the downside is that it twists all my pants legs together into a heavy pants chain that makes it tricky to extract one pair at a time without pulling out the whole ball of wet clothes.) And, of course, we use the high-efficiency ("he") detergent meant for front-loaders, choosing a dye- and perfume-free variety.
Also, we always wash everything in cold water, unless it is absolutely necessary to bleach the whites, which we very seldom do. Some of you hot-water junkies wouldn't dare wash your bed sheets in cold because you need hot water to kill the dust mites, right? I used to do that too, but no more! I'm no expert, but I've heard two different stories about that: a) the heat from your dryer will kill the mites just as effectively as the washer, or b) the hot setting on your washing machine isn't nearly hot enough to kill dust mites anyway. Whichever is true, I figure there's no reason not to keep the washer set on cold.
If you live somewhere that forbids the use of supposedly ugly permanent clothes lines (I don't think clotheslines are eyesores, but it's the only reason I can imagine they'd be banned by home owners' associations), be bold and get a portable clothes line or set of drying racks for your backyard (or your balcony!), even if you do it for just one load every once in a while. No, it's not as convenient as tossing it all in the dryer, but it's good for your clothes (just turn things inside out if you're worried about fading) and good for the earth. Clothes dryers themselves are not enormous energy hogs, but every little bit counts, and you will notice a decrease in your energy bills—always a plus.
Now for my least favorite part, taking all the clothes down and folding them. At least I get to enjoy the fantastic weather while I work.
Wednesday, May 13, 2009
For Realists and Dreamers
I was pleasantly surprised to find that the book is not only for people with five acres and a farmhouse but for anyone, even an apartment dweller, who desires to be more self-sufficient. You could be a full-fledged self-supporter, earning what little money you need by selling your own produce, or you might simply grow your own food and mend your own clothes. Inside the book, you'll find lots of inspiration for any degree of self-sufficiency, with plenty of illustrations to enhance the vast range of interesting topics. To name just a handful:
- Which garden tools are used for which task
- Methods of protecting your garden from pests
- When to plant and harvest each vegetable/fruit and what it's good for
- To-dos for each season to maintain your year-round self-sufficient lifestyle
- How to buy, feed, milk, and slaughter a cow (not to mention pigs, goats, sheep, ducks...)
- Keeping bees
- Making beer, wine, cider, and vinegar
- Composting
- Building your own toilet
- Drying produce in a solar dryer
- Baking bread and preserving produce
- Basketry, pottery, spinning wool
- Building an all-purpose furnace/oven/water heater
- The importance of chatting with other self-supporters in the local pub
- Making the break!
My favorite part of the book, though, is the section on what you can do with however much land you have. These pages describe and even map out what can be done with a five-acre holding (pastures, animals, wheat, an orchard, farm buildings, everything), a one-acre holding (fruit trees, well-organized crops, and, surprisingly, hay and several animals), an allotment in an urban community garden (veggies and berries, making use of poles and strings for vertical growth), or an urban micro-garden (raised beds, more vertical supports—even for apples or plums!—and a beehive). Our yard most closely resembles this micro-garden, and I've taken Seymour's advice to use a combination of ground-level plants, raised beds, and vertically trained plants to maximize the three-dimensional space. Wonder if my neighbors would mind if I added a beehive?
All right, all you dreamers and realists. What kind of self-sufficient things do you dream of? What things do you already do?
Re-posted to linked up with Frugally Sustainable's Blog Hop!
Also shared at Preparedness Fair #3.
Tuesday, May 12, 2009
DIY - Edible Bouquet
It's not hard! My sister's boyfriend is a chef, so he had a handy collection of garnish tools that made it easy to ball the cantaloupe and to give the oranges that sunshine look by scoring the peel before slicing it, but everything else can be done with a paring knife. To make the flower-shaped pieces of cantaloupe, first trace your shape into the melon's flesh by making shallow cuts with the knife. Then cut it out for real. For the orange "blossom" at the bottom of our bouquet, cut a zigzag of wedges around an orange half (you'll see we speared some of the cut-out little wedges on the kabobs).
The strawberries and marshmallows are dipped in a chocolate ganache. Sounds like a fancy word; it's basically chocolate melted with other stuff so it will set when cooled but will remain soft. If you melt some chocolate chips with nothing else mixed in, the chocolate will harden again when cooled, and you'll be crunching through it to get to the fruit. I'd give you the recipe for the ganache we used, but the chef among us just whipped it up, so... I recommend you look up any simple chocolate ganache and start dipping! Or, if you prefer something beyond simple, look for a ganache in white chocolate, chocolate-orange, chocolate-raspberry, almond...
Some tips:
- Stick your skewers of fruit into a half a head of cabbage. It's sturdy, foodsafe (duh) and biodegradable.
- Remember to thread your fruit kabobs backwards, starting with whatever piece you want to be at the top of the skewer and sliding each piece up as you pierce it, leaving the pointy side of the skewer down, to be shoved into the cabbage.
- Dip your chocolate-covered items first and let them set while you work on other pieces.
- Sometimes the fruit will slide down the skewer, but grapes seem to hold their place, so slide a grape underneath pieces that won't stay put.
My next edible bouquet experiment: veggies!
Wednesday, May 6, 2009
Some Good News on the Green Front
First, let's head south to balmy Mississippi, where it's spawning time. My friend's brother is the manger of the North Mississippi Fish Hatchery, which was recently featured on a local news website. He's making the world a better place for fish and fishermen both. To find out how, check out the article and video on the Clarion Ledger's Outdoors page.
Next, we'll visit London for a taste (not literally) of a chocolate-powered car, as reported by Yahoo! Green. This experimental racecar is hoped to be one the fastest biofuel vehicles out there and is even built out of biodegradable parts.
And now, something to mark on your calendar. This weekend is Mother's Day, commonly known in the midwest as the time to begin planting outdoors. The perfect way to start this gardencentric weekend? National Public Gardens Day, of course. Friday, May 8, our nation celebrates and promotes all public gardens, including botanical gardens, arboreta, farm gardens and even zoos. Visit a public garden near you to discover its unique commitment to education, research and environmental stewardship.
Last, but not least, the DIY portion of this news digest. A couple of weeks ago (on Earth Day, as a matter of fact), MSN's Slate posted this great examination of the common question (in our house, anyway): Is it cheaper to buy it or make it? And, in the case of making it, is it worth the trouble? The article does not cover the "duh" items like hamburger buns (make!) or pizza (make!), but instead tested bagels, yogurt, and cream cheese, among other staples. I'll let you read for yourself whether you should be making these things or leaving them to the pros.
Thanks for following along. See? Not all "green news" is about the ice caps melting.
Monday, May 4, 2009
DIY - The Easy Slipcover
Shared on: How To Tuesday
Thursday, April 30, 2009
Oodles of Green...Noodles!
There's my sis spreading the sheets of rolled-out dough:
...
...
The result:
Another great thing about fresh, homemade pasta is that it needs less time to boil than dried pasta. Yes, that benefit is countered by the time it takes to mix, roll and cut the dough, but those steps really are easy and don't take very long (if you make pasta a lot, you could probably do it in the time it takes a large pot of water to boil). Besides—and here's the whole point—it's fun!
Tuesday, April 28, 2009
Adventures in Edible Gardening
This year, I'm embarking on a bigger gardening adventure than usual. It will be interesting to see how we get all this food to grow in our yard; you'll see why a in a little bit. Here's what we have going for Growing Season 2009:
Started from Seed Indoors
Chives (nothing yet; didn't sprout well last year either)
Cilantro (barely sprouted)
Sweet Basil (barely sprouted)
Flat-Leaf Parsley (barely sprouted)
Jalapeños (nothing yet; seeds may be too old)
Marigolds (nothing yet; seeds may be too old)
Green Chilies from New Mexico (nothing yet, etc.)
Green Beans (nothing yet, etc.)
Sowed Directly Outdoors
Snow Peas (in a container; tall seedlings)
Butternut Squash (in starter cups; nothing yet)
Buttercrunch Lettuce (in a container)*
Romaine Lettuce (in a container)*
Chinese Cabbage (in a container)*
Spinach (in a container)*
*Of these four lettuces, I think three types have sprouted, maybe all four. But I can't remember which seeds I put in which section of the rectangular wooden box, and they're all too small to identify right now.
Already Growing Outdoors
Grapes (planted the vine last fall; new leaf buds visible)
Strawberries (also harvested last summer; a few new flowers out)
We are going to cram all of these tasty things into our tiny, north-facing backyard that is approximately 25' x 10'. Or we hope to, anyway. (There may also be the option of a plot in a neighborhood garden, but that's another story.) A few things are going into containers on or near the front porch, which faces north and is sunny all the time. The strawberries and grapevine are pretty unobtrusive in the ground right against the porch, and Len found a pair of wooden barrels that nicely flank our little sidewalk—I'll put the tomatoes in those. And I'm experimenting with hanging baskets on the front porch for the snow peas. Since they like to climb, I will try to train them to drape from one basket to the next. It might look pretty.
But there's hardly room for everything in front (the front yard itself is pretty much a row of bushes and a strip of grass that I'm sure our homeowners association wants to look pristine). In back, only a strip of ground closest to the alley gets sun almost all day in the summer; that is where we have dug out a rectangle in the ground and also placed the rectangular wooden box I mentioned earlier. The rest of the yard only gets full sun for a few hours at midday, and most edible things don't thrive in that much shade. So, we're planning to squeeze things in here and there. For example, the raspberries and shallots are in the sunniest part of the shady part of the yard (does that make sense?) and doing OK so far.
I'm trying to think three dimensionally to make the best use of all the space around us, not just the space on the ground. We'll see how it goes.
At any rate, I'm already tired of nursing these seedlings and can't wait to put them outside for good. At this point, they've experienced some of the nicer days outside on the porch but have to come back inside for the damp, chilly nights.
Wish me luck, and check back later for the next installment of Adventures in Edible Gardening.
Wednesday, April 22, 2009
Eighty Pounds of Tradition: A Sausage-Making Adventure
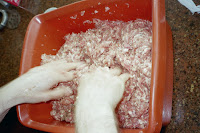
I can't share the recipe,
but maybe you can
figure out the spices in
this picture.
Do the seasonings make
it Polish, or is it the
hands that mix it?
The homemade Polish sausage is a staple of Len's family's Easter dinner, but since we only make it once a year, we make so much more than just a holiday's worth; we make enough to have hearty Polish dinners year round. Eighty pounds to divide among us, this year. Open our deep freezer now, and you'll get a blast of frozen garlic breath. Oops! Just gave away one of the major ingredients. Well, that wasn't a hard one to guess. If there's anything in this sausage, there's garlic. Lots and lots of garlic. And maybe some of my brother-in-law's wrist hair (see photo above). Mmm.
Boil, then brown.
A tasty end result.