Saturday, July 9, 2016

From Seed to Apple in Six Years

0 comments

One of the Wolf River apple seeds we planted around November/December 2008 became a fruit-producing tree for the first time at age 6 last summer (2015)!

By the way, I think these are legitimate heirloom apples because Wolf River is an old variety itself and the apple from which we took the seed was handed to us by a family member who brought the apple back from the old tree on another family member's long-standing farm.

For a full recap of our apple trees up to this point, click here.  Picking up from there, the two trees we planted in our front yard have grown taller than our porch roof, and one of them is now producing apples for the second year in a row following heavy pruning. Here's a snapshot of this year's apples growing amid the brambly branches:


And, there's hope for our two other trees. The other one out front bore its first blossom—just one—this spring. It's too leafy up there for us to see if that blossom became a fruit, but regardless, it's a sign the tree is not sterile. The third tree now has a permanent home in our backyard where there used to be an ash tree. Most of the ash trees in our area have been cut down and removed due to the emerald ash borer infestation, and one day we looked out our window and realized our own ash tree was a stump! Upsetting, but it provided an opening for that last apple tree. It is smaller than the other two, having spent an extra season confined to a pot, but it grows a lot each summer now that it has room to stretch.

As is typical for apple offspring, the apples we got from our tree are not identical to the Wolf River variety that produced the seed that sprouted this tree. They are hefty apples like Wolf Rivers ("one apple, one pie"), though not quite as huge, and they have same the mixed red and green peel, but we thought their texture was a bit mealier and their flavor not quite the same pleasantly sweet-tart flavor of the parent apple.

Then again, it has been nearly seven years since I tasted a Wolf River apple from the cousins' tree in Wisconsin. After reading the following excerpt from Words to Eat By: Five Foods and the Culinary History of the English Language by Ina Lipkowitz (St. Martin's, 2011), which pretty much describes our apples other than the extreme size, I'm thinking they might bear more resemblance than we initially thought.

"By modern commercial standards," writes Edward Behr, "the old varieties often have shortcomings. They may bruise easily, store poorly, be plain-looking or outright ugly... An orchadist who still has some Wolf River trees told me, 'It's probably about the poorest apple I grow.' " And yet Wolf River apples as big as grapefruits or small cantaloupes (they often weigh more than a pound each) with dull red skin, coarsely textured flesh, and a tart flavor, have become so popular that hundred [sic] of Web sites sell seeds and offer such cooking tips as "One apple, one pie." (18)

I believe a parent-offspring apple taste test is in order.

Tuesday, June 28, 2016

Hung Out to Dry

0 comments
Homeowners' associations, eh? Ours sent us a violation notice regarding some laundry hanging in our backyard. This is a common "violation" in backyards according to many homeowners' associations across the country.

Such silly bylaws mean I'm allowed to save energy by not using the air conditioner, for example, because my neighbors don't have to watch me sweating like a pig inside my house, lying naked on the tile floor trying to keep cool, but if I try to save energy by not using a gas dryer on a hot day, someone might spy some clean t-shirts flapping over our patio for a few hours, oh no! "The premises shall be kept free and clear of all rubbish, debris, refuse piles and other unsightly objects... No clothes, sheets, and blankets, or laundry of any kind shall be hung..." Obviously, clean clothes belong in the same category as piles of refuse.

(OK, I admit we strung some extra clothesline out to the post of a "No Parking" sign that borders our tiny backyard, and that's technically not our property, and I accept there may be a rule against that. We were trying to gain some space to be able to hang out a few more items and in doing so, I don't know, detracted from the sign's modern aesthetics. It was not obstructing anyone's view of the sign. The branches of our apple tree do that!)

We do not line-dry every load of our laundry because it's often inconvenient, but we enjoy taking the money-saving opportunity when we can and have been occasional line-dryers for years. I wrote a post about it back in 2009:
Ahh, laundry.

You might see in the picture that the "No Parking" sign wasn't installed back then, and our yard was a lot more visible to neighbors when it wasn't packed with greenery like it is now.

Seven years and many loads of laundry later, it's apparently the first time an association board member (or whoever inspects and reports these things) has coincidentally strolled past our property and felt the need to report the "unsightly" violation. Never mind that by the time the letter was drafted, our laundry was probably folded and put away. Never mind the unsightly dead trees here and there throughout the neighborhood, trees that have been dry and leafless for several seasons now. Never mind the unsightly and fetid gravel pit that is supposed to be a nice water feature in the park but almost every year suffers some pump problem and is nonfunctional well into the summer. Never mind the foreclosed and obviously abandoned houses hiding in plain sight, their windows adorned with those cute yellow "Winterized... do not use the plumbing!" stickers. Yeah, some temporary laundry in a backyard is well worth the association's time, paper and postage.

Our association will send a yearly reminder for people to fix their leaky faucets because leaks waste water and, ah yes, cost the association money because our water usage is included in our monthly dues. They've never sent a newsletter encouraging people to conserve other resources, even though line-drying laundry could potentially save a family hundreds of dollars per year, a savings that might help them, gee whiz, not go into foreclosure.

So we'll try to refrain from using the street sign as a clothesline post (although it is so nice and sturdy), but we're not going to stop hanging our laundry out back. If the association bothers us about it, we'll whip out some newfound legal knowledge and inform the board members that they can't actually forbid us to hang laundry. A few states have laws prohibiting homeowners' associations from banning clotheslines, while several others have laws that association bylaws cannot prevent homeowners from using solar power. Illinois is one of the latter. The use of clotheslines is not specifically mentioned, but it is implicit in the law's definition of solar energy systems. The only thing the association can do is tell us where on our property we may place such a system. They're not going to choose the front porch.

Do you know your state's law? Find it here: https://cmcacorner.com/2013/05/29/hoas-and-clotheslines/. Thanks to the people who pushed back.

In the spirit of spurning silly citations and, instead, celebrating acts that make sense for the good of the environment or the community or both, I'll conclude by introducing you to Ron Finley, an inspiring gardener who made the most of some usable space and, when the city didn't like it, turned a little act of rebellion into a huge horticultural revolution.
.

Saturday, June 25, 2016

Lime Ice

0 comments
.
It's 90 degrees. Time for something cold and refreshing.

Thanks to our Rick Bayless cookbook, Mexican Everyday, and the limes we just happen to need to use soon, and the abundant raspberries and lemon balm growing in our yard, and our ice cream maker, we're making lime ice with berries and mint. (Lemon balm doesn't taste like mint—it kinda tastes like Pledge—but it's in the mint family, so it counts. And it actually does, in small doses, complement berries and citrus very well.)

This very cold, very refreshing, sweet, tart treat is just like the Lemon Chill you can buy at the ballpark, only it's lime. Here is the recipe:

About 6 limes (enough to make 3/4 cup lime juice)
1 cup sugar
1/3 cup corn syrup (not just a sweetener—a texture hero!)
1 3/4 cup cold water
fresh raspberries, as many as you want
sprigs of lemon balm


Grate the zest of 2 limes, and juice the limes until you have 3/4 cup lime juice. Combine the zest, juice, sugar, corn syrup and water in a bowl. Stir until the sugar is dissolved. Pour the mixture into the bowl of your ice cream maker and freeze according to the maker's directions.

The ice has the best texture if you transfer it into a container and put it in your freezer for a few hours. Serve scoops with fresh raspberries and an accent of lemon balm.
.

Tuesday, June 21, 2016

Hiking Around Big Bear Lake, CA

0 comments
Time for another flashback. Last summer we enjoyed a vacation in Big Bear Lake, California, a small, cute tourist town with access to some primo hiking. A year has passed, and I can still recall that fresh pine scent of the forest, better than any tree-shaped cardboard dangling from your rearview mirror. You just step out of your car, breathe deep and... Ahhhhh.

We began our trip with a day in Los Angeles before the breathtaking drive east into the San Bernadino Mountains. Our day included two things that make any vacation complete: a bike ride and a bookstore. We parked our rental car at a very reasonably priced garage in Santa Monica and walked to Santa Monica Beach Bicycle to rent a couple of cruisers.


The rentals came with locks, helmets, and even a basket for me. We rode the beach path from Santa Monica to Venice and back, stopping along the way to play on muscle beach and to check out the famous Venice Beach Boardwalk. It was a beautiful day, so the path, the playground equipment and the boardwalk were crowded but navigable. The huge expanse of beach was awesome and did not feel crowded. Now I understand why a former coworker said you haven't seen a real beach until you've been to a California beach.

Then, we visited The Last Bookstore, and if we're ever in Los Angeles again, we'll visit it again. It is too cool for words.

Yes, traffic in Los Angeles was heavy, and taking the highway out of the city was long and slow, stop and go, but the city has a reputation for awful traffic, so we expected it. And so, it seemed like no big deal. Before long (OK, after long), we were free from most traffic and winding through steep mountains, a thrilling view around every bend.


We did two different hikes at Big Bear Lake. First was the 2.4-mile Cougar Crest Trail, through the woods and up the mountain to connect with the Pacific Crest Trail, which is just like any other trail but with national status. Because it's really, really long. We hiked maybe a mile of the PCT before retracing our steps to be back in time for dinner.


Our next hike was on the other side of the lake, and it was the much shorter but much steeper Castle Rock Trail, named for a large rock outcropping among many other large rock outcroppings. This hike was so much fun we did it again on our way out of town at the end of the trip. It's a brief commitment for an excellent leg-stretch before the three-hour drive back to Los Angeles.


And those were just the quick highlights. Ah, memories.
.

Monday, June 13, 2016

A Day Out and About

0 comments
Yesterday was sunny and 70s—perfect for riding the bikes all over town. Except that it was so windy! Oh well, it was still a great day to be out and about on the bikes, and so we were.

Some major construction was recently finished along Route 59. The main purpose was to widen this very busy thoroughfare, but the finished product also includes a fantastically wide and smooth new sidewalk. Trying to follow 59 under the train tracks on a bike was once a sketchy affair to be avoided except as a last resort, but this new sidewalk has transformed it into one of the more attractive route options. We have taken advantage of it only once or twice since its completion, and yesterday when we considered the best course to travel from the church to the thrift store, there was no question—straight down the wonderful new sidewalk on 59, of course! It's a breeze! But, it was not such a breeze yesterday.

Several sections of the new sidewalk—which appeared finished and ready for use when we last enjoyed cruising it, I don't know, maybe four weeks ago—have been removed, and frequent "sidewalk closed" signs now warn of each abrupt interruption of smooth concrete. What? We had to keep hopping off the bikes to walk over sharp drop-offs and sections of rugged gravel—more difficult for Len since he was towing the Croozer this whole time. Why? Why are sections of a brand-new sidewalk being torn up and replaced? Is their first attempt falling apart, and they now must make repairs? Regardless of the reason, what a tease. I hope the sidewalk gets put back together again soon.

Annoyed but otherwise unscathed, we made it to Savers. We donated a couple of bags of random stuff and then, of course, browsed the store. We hemmed and hawed over an accent table that we considered hauling home in the Croozer but ultimately (and more wisely) chose to pick it up later with the car.

Then we biked-walked back over the fragmented sidewalk twice more—to go from Savers to a friend's house and then from the friend to the grocery store. Even though this was functional biking and not a picnic ride through the forest preserve, it was still time spent rolling along in the sunshine and fresh air, and so it was enjoyable.

Also, did you know if you want people to give you strange looks, you should just walk around a store wearing your bicycle helmet? I'm not sure why it attracts such attention or seems to throw people off so much, but it never fails. Or, maybe they've been giving us weird looks all along and we only notice it when we're wearing our helmets.
.

Tuesday, June 7, 2016

Containing the Garden

0 comments
This comes as no surprise, but gardening is a lot of work. And in the spring, it is the best of times and the worst of times—anticipation,  planning, ogling colorful seed packets, getting your hands in the dirt, the thrill of spotting the first seedlings... then the weeding and watering and waiting, the constant toiling away with no tangible return until the harvest that is weeks if not months away. We knew this. No, the surprise was that we don't particularly like gardening.

We like harvesting our own produce and eating what we've grown, but it turns out we don't like the weeding, weeding, weeding that our community garden plot requires. And hauling the water, and hauling the compost, and meticulously placing the compost around the individual plants because you can't just spread it willy-nilly over 600 square feet. Ugh. There is one family that rents six plots every summer, and they have an amazing garden. It's lush and tidy and productive. But guess what? They are out there all the time. We do not dedicate the time (gardening is just one of our many hobbies) or feel the inclination to put in quite so much effort; no wonder our vegetables are always spindly and choked with weeds. Meanwhile, there are a few plants in our yard that thrive despite getting very little attention from us, and I love them: strawberries, raspberries and onions.

So, in the interest of finding some middle ground between our beloved low-maintenance edible garden at home and our forlorn high-maintenance community plot, we decided not to rent the plot in the community garden this year, and we're trying to maximize what little yard and patio space we have at home.

In the fall, Len ripped out the last remaining juniper bush from our south-facing (i.e. full-sun) front yard and extended the raised garden bed, so we have twice as much space out front as we did before. However, half of it is in the shade for half the day because of trees nearby—including our apple trees, and wow, do I owe you an update on those!—while the sunny half is monopolized (duopolized?) by strawberries and onions.

Strawberries and Egyptian walking onions coexisting happily

I'm hoping cool-weather plants will do well having only morning sun, so we have carrots, beets, broccoli and radishes in that corner. We have zucchini and cucumber in the spot that gets morning sun and dappled afternoon sun. Front and center with the strawberries and onions are also cilantro and parsley, which we've had for a few years now, plus asparagus, which is in its second year. We will need to control the seemingly effortless spread of those first four plants to allow the asparagus room for its own propagation.

Like we did in our community plot, we still have to gingerly hand-pluck baby weeds out from among our baby carrots and beets, but three things make it less of a nuisance at home, besides the fact that it's a smaller garden: It's easy to spend just a few minutes at a time weeding every day when all I have to is step out the front door—at the garden plot, if we didn't have at least 30 minutes, we weren't likely to go weed. It's also easier to spend an hour weeding when a short break in the kitchen or bathroom is just steps away. And, the weeds aren't quite so bad when the garden is not surrounded by a prairie that is continually loosing all manner of prairie seeds into the steadfast wind.

So that's the front bed. The rest of our garden is in containers, most on our back patio, a portion of which enjoys full sun for several hours midday, with a few pots hanging on the front porch. Some plants are proven container stars—tomatoes, peppers—and should do really well, as long as we stay on top of watering (another chore much more convenient at home) and occasionally repositioning the pots for maximum sun exposure (a challenge when our back patio is on the north side of the house and surrounded by tall shadow-casters like other houses and a privacy fence). Other plants in this year's garden are an experiment—like sweet corn grown in strawberry pots. This idea could be a dud, or it could be genius. Come back in late summer to find out.


Next task: planting some mixed lettuce among the carrots and beets so that space is still in use once the carrots and beets have been harvested. But we do need to clear a few more baby weeds out of there first, lest we find ourselves eating a mixed salad of who knows what.
.

Tuesday, May 31, 2016

Adventures in Cake Decorating #4 - Monster Cakes

0 comments
The exploits in icing—and more importantly, the lessons learned from them—have been piling up these last few years thanks to The Birthdays. These would be primarily my niece and nephews' birthdays, but there are others I hope to document here as we get caught up.

We're way out of date—the first birthday cake I'm about to show you (that would be the first cake for a first birthday) was for a nephew who just this year turned four, so... yeah. But, begin at the beginning, right?

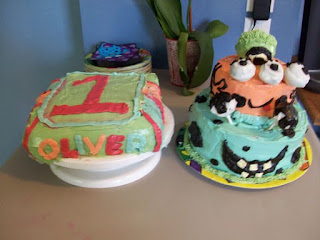
The Monster Cake

This was a fun cake. It was a ton of work, but I'd actually love to do it again because I have learned so much since then. First of all, I would make it less droopy.

This cake overcame such baking obstacles as:
  • The cake won't keep its structure.
  • The cake won't bear the weight of stacking.
  • The cake pops are falling apart when we dip them.
  • The dogs ate half the cake.
It's hard to say what was the biggest or most important lesson I learned while making the monster cake, but there were more than a few important lessons.

You're Probably Thinking Too Big
Sketch of the Grand Idea
I remember describing the initial concept of the cake to my sister as a "grand idea," but we could have executed it on a less grand scale. Or, she should have invited more people. This first birthday was a big party, so we used three boxes of cake mix—well, four, because of the dogs, but there was the equivalent of a whole cake leftover, maybe more. 

Now I'm more realistic in basing the cake size on number of servings. Search for a cake serving chart, and you'll see that an ordinary two-layer round cake can serve up to 20 people depending on how you slice it. (Although I know a certain family member who would just as well slice any round dessert into eight humongous servings and call it day). And, know your crowd. Often you can count on a small percentage who aren't going to eat any cake.

Freeze the Cake Balls and Shorten the Candy CoatingNot pictured except in my "grand idea" sketch were the cake pops we also made to complement the monster cake. We decorated a few of them to look like eyeballs and various little monsters until things got frustrating (cake balls falling apart, Candy Melts getting clumpy) and we were running out of time, and then we simply dipped them in clumpy white Candy Melts. Ta-da!

Cake balls or cake pops (just add a stick and now it's a fad!) can be easy if you follow some basic rules. They can be a picturesque fail if you don't. Form the balls, stick the sticks and then freeze them before you start dipping them in the melted candy coating.

Overheat the Candy Melts and they get clumpy. So microwave them gently and stir, stir, stir. If there are still some solid pieces, stir some more until they melt. It is OK to reheat them several times as needed, but for only 20 seconds at a time on a low power. The melted Melts are still rather thick and not an ideal dipping medium. Add a spoonful of melted shortening (vegetable oil also works) to slightly thin out the coating, and now dipping those cake pops is a cinch. Yeah, I said it.

Moisture and Structure are (Somewhat) Mutually Exclusive
Almost all cake mix boxes are labeled "super moist deluxe" or some such thing, but they're really just ordinary cake, aren't they? Plain old ordinary cake is what you want for a sturdy structure. The cakes that are truly super moist, like the ones with pudding in the mix or your chocolate cake recipe that calls for mayonnaise, are delicious for an ordinary-sized single or double-layer cake with no fancy stacking or shaping. But the extra delicious moisture provides no solid foundation and will not reliably support multiple tiers. The dowels are wont to tilt in that squishy loam of deliciousness.

We originally planned for a four-tier monster of a monster cake: A square on the bottom with fun stripes and birthday boy's name, then a round tier decorated as a blue and black polka-dotted monster with a toothy grin and googly cake ball eyes, topped with an orange monster with more cake ball eyes plus a tail that wrapped round the back, and a green hairy one-eyed cupcake-sized monster on top as the baby's personal "smash cake." The weight of the tiers was too much for the moist delicious cakes to hold, so the bottom tier became its own separate cake. We simply frosted over the mess on its surface caused by all the attempted stacking and piped on a giant number 1. In case anyone wasn't sure which birthday this was.

Icing Covers All Flaws
With the exception of deteriorating structural integrity, icing can mask just about any mistake on the cake, as mentioned just a few lines ago. Crooked line? Wipe it of and ice a new line over it. A misshapen edge? Just add more icing and smooth it out. Dogs ate half the cake? Bake more cake for a replacement section and use icing to glue it all back together.

"Remember this is the side the dogs bit off of, and we just won't serve any pieces cut from this side, OK?"


Friday, May 20, 2016

Just Skim the Mold Off the Top

0 comments
Skimming scum sounds like aquarium maintenance, not a step in a recipe, but we've been dabbling in fermenting foods. We already make our own yogurt, which led me to using leftover liquid whey for lacto-fermenting fruit juice into homemade soda, which led me to lacto-fermenting veggies, which are made with salty water rather than whey.

Vocabulary lesson: It's called lacto-fermenting because the bacteria in action here are lactobacilli, a beneficial strain that break down lactose (the sugars in milk) and produce lactic acid from the fermentation of carbohydrates. Like yogurt, lacto-fermented veggies are probiotic, so they're trendy—I mean, good for your tummy.

A few summers ago, we watched a sauerkraut demonstration at the farmers' market. We haven't tried it at home yet, but I recently learned that it's the same process whether you are fermenting cabbage—sauerkraut, kimchi—or any other suitable vegetable. The veggies sit submerged in a brine at room temperature, you occasionally skim mold or scum off the top of the liquid (but the veggies are OK because they are not touching the surface), and cultures of good bacteria turn the veggies into pickles. And by golly, it works! (We have also pickled veggies using vinegar. Dare I say expect a future post on that? Let's say, distant future.)

Hence our jars of sauerbeans. (OK, in actual German they'd probably be sauerbohnen, but I think "sauerbeans" is cute.) They're tart and crunchy and have not given us food poisoning.

Photo disclaimer: Plenty of websites have pretty pictures of pristine countertop pickles, but this is what they look like at home. Cloudy liquid is to be expected as a result of the lactic acid forming in there, and it's a sign the vegetables are culturing properly. Don't be scared.

Read on for the important stuff like how to do it and what else to expect besides cloudy brine.

Many people ferment their veggies in gallon-size mason jars or large pickling crocks. I don't like experimenting with food on such a large scale (because if it turns out nasty, then I've wasted so much food!), so my recipe here uses just two quart jars.

Simple Fermented Green Beans
2 quarts water (see note below)
3 ounces pickling salt (see other note below)
1 pound green beans, washed and trimmed
(Also see note on seasoning)

Heat the water and salt, stirring, until the salt dissolves. Cool to room temperature (or else the bacteria won't culture properly).

Divide the green beans evenly between two quart-size mason jars, breaking beans in half if necessary so they will all fit below the neck of the jar. Pour in the room-temperature brine, enough to cover all the beans, but do not completely fill the jar. (I filled the jar too high, and then when I weighed the beans down, my brine overflowed, which was just annoying.)

Weigh the beans down so they will remain safely below the surface of the brine, protected from surface molds that thrive on oxygen. (The salt in the brine will help inhibit mold formation, but you'll probably still get some. I saw minimal pinkish scum this time.) Meanwhile, the good, anaerobic bacteria get to work underwater. For keeping my beans submerged, I used an idea recommended by Food52 and put some extra brine inside a sealed plastic baggie and shoved the baggie into the top of the jar.

Cover the jars with loose-fitting lids or cloth secured by a rubber band. They should not be airtight—gases need to escape as fermentation occurs. Leave the jars in a dark corner of your kitchen where they can sit at room temperature for two weeks.

Check the jars every day and skim off any mold or scum that grows on the surface of the brine. You do not have to clear off every last speck; you just don't want it to overrun the place. Scum is supposed to happen, and the veggies remain safe beneath the surface. Feel free to fork out a bean occasionally to taste the progress. Many recipes advise tasting daily; I think that's unnecessary. The first couple of times, all I tasted was a really salty green bean, so I waited longer in between samples and tasted maybe four times total during the two weeks' fermentation. It was probably a week before I detected a hint of sauer. If your kitchen is warmer, maybe your beans will ferment faster, and then tasting every day might be useful.

The beans should be fully pickled after two weeks, so now you can move the jars into the fridge, where the beans will continue to ferment much more slowly. Like anything in the fridge. Eat them within two months.

Note on water: Chlorinated water from your tap contains, ahem, chlorine, which is a disinfectant—not exactly a hospitable environment for bacteria, good or bad. So, you can use filtered water or you can boil and stir some tap water to evaporate most of the chlorine. That's what I do, dissolving the salt at the same time, and my pet bacteria multiply quite healthily. Just remember to let the water cool to room temperature before pouring it over the beans.

Note on salt: Iodized table salt contains another bacteria fighter: iodine. Don't use it. Use pickling salt or sea salt or any other salt without iodine. The recipe measures the salt in weight so that no matter what kind you use, you'll have the right amount. You can imagine that a tablespoon of coarse kosher salt would not be the same as a tablespoon of fine sea salt. Weigh the salt.

Note on seasoning: The simple recipe above results in some tasty green beans, but they can be made even tastier with some smashed cloves of garlic or sprigs of dill or a hot pepper, for example. Submerge any of these in the brine along with your beans to infuse extra flavor into the fermentation.


Friday, May 13, 2016

Celebrating Bike Lanes

0 comments
Long time no see. Let's jump right in.

We're finishing up National Protected Bike Lane Week. These are the bike lanes protected from the main street by curbs, posts, planters or parking spaces, as opposed to the bike lanes separated from traffic by a stripe of paint. To celebrate, downtown Aurora hosted a group bicycle ride this perfectly sunny morning, followed by a ribbon-cutting ceremony for the River Street Conversion and Fox River Trail Bike Lane Connection.

I wish I could have been there, if only to score this cool key chain.

https://www.aurora-il.org/detail.php?dateID=8944

But day jobs, right? Always taking up the days.

.