Thursday, January 13, 2022

Two experiments in one! Instant Pot French onion soup with failed meat bread toasts

0 comments

This recipe was born of a very, very, very cold day and the impetus to use things up from the fridge and freezer.

French onion soup bowls under the broiler.

I typically approach with skepticism recipes for the pressure cooker and even slow cooker for foods traditionally made low and slow in the oven or on the stovetop. I still do approach them, however, because I am appreciative of convenience and speed, and I'll give these recipes a chance to prove themselves. This time, it was French onion soup, and I'd be conducting two experiments with this recipe. 

Experiment #1 was using the Instant Pot for this soup I've only ever made on the stove. Experiment #2 was swapping the baguette slices that traditionally top this soup for some failed meat bread I'd made for Christmas (but still wrapped and stored in the freezer because the failure didn't make it inedible or unsafe, so I wasn't about to just trash it). 

I started with this Instant Pot French Onion Soup Recipe from Simply Recipes, mainly because it was one of the first that came up in my search, and it lived up to the website's name, seeming simpler than the other recipes at the top of the list.

Below is my adapted version, the point of which is to encourage you, too, to wing it. But first, some answers.

What on earth is failed meat bread? Meat bread, when it is not a failure, is the name I know for a loaf of white bread with forcemeat (a seasoned, slow-cooked mixture of meat -- you might also call it a pâté) rolled up inside like a jelly roll. It requires a blog post all its own, and so let me just jot that on my to-do list. For now, a quick summary: Meat bread is a family tradition, and this year, I made two batches, because my first batch failed. The loaves did not rise. I hypothesize that I either killed the yeast with water too hot, or the meat mixture was too soggy and weighed down the dough, or both. But, I didn't throw out the failed meat bread! I was not going to waste good meat or the six or so cups of flour that went into it. It was edible. The meat part still tasted great. The bread part was just... stodgy, like a very heavy dumpling.

Meat bread should not be this squat.

Why did I use both apple cider vinegar and brandy instead of sherry? Common substitutes for sherry in a French onion soup are dry wine or vinegar. My stovetop recipe uses port. If you use wine, the addition of brandy approximates the fortified nature of sherry. I had no sherry or port or good dry wines at home, but I had brandy and cider vinegar. I didn't want to use an entire quarter-cup of the brandy just for soup! At the same time, I didn't want the vinegar alone to give the soup too much tang. So, I split the difference.

All other substitutions can be explained by this: That's what I had on hand, and it was certainly close enough. Also, the original recipe says it makes 6 servings -- I'd call it a solid 4 servings. It's so good, you don't want just a small bowl.
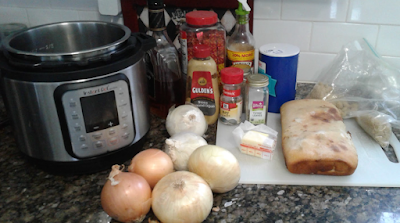
Ready to make Instant Pot French onion soup.

Ingredients

  • 1/4 cup unsalted butter
  • 5-6 medium onions of any kind (but preferably some sweet variety included), halved, peeled, and sliced 1/4-inch thick
  • 1 tablespoon brown sugar
  • 1 1/2 teaspoons salt
  • 2 tablespoons cider vinegar
  • 2 tablespoons brandy
  • 4 cups beef broth (I used 4 beef bouillon cubes and 4 c. water)
  • 1 teaspoon Worcestershire sauce
  • 1/4 teaspoon ground black pepper
  • 1/4 teaspoon dried thyme leaves
  • 1 bay leaf
  • 4 1-inch thick slices of hearty white bread (like French bread or a failed homemade white loaf with meat rolled in, like mine)
  • 1 1/4 teaspoons Dijon mustard
  • 4 slices Swiss cheese, any variety.
Directions
  1. Select the high sauté setting on your pressure cooker, which may default to a cooking time of 30 minutes. You will need at least 30 minutes to sauté the onions. (See my note in Step #3.)
    Add the butter to the pressure cooker. Once it has melted, add the onions, sugar, and salt and stir with a wooden spoon, separating the onion layers and coating them with the butter.
  2. Cover the pot (but keep lid unlocked or at least vented) and let the onions cook, without stirring, for 10 minutes.
  3. Uncover the pot. The onions will be softened but not brown yet. While wearing an oven mitt, hold the rim of the inner pot in place, and stir the onions vigorously. Continue to stir the onions every 2 minutes, making sure to scrape up any brown bits from the bottom of the pot, which will begin to develop more and more as time passes. Do this until the onions are caramelized and golden brown, around the time your pot's 30-minute sauté cooking program has ended and the pot turns off automatically.
    Note: I needed to hit the sauté button again and continue cooking and occasionally stirring for another 15 minutes or so, perhaps because my Instant Pot is a smaller one and so my onions were piled higher.
  4. While the pot is off but still hot, and the onions are sizzling, add the cider and brandy. Use the wooden spoon to thoroughly scrape any remaining brown bits from the pot bottom. Then stir in the broth, Worcestershire, thyme, bay leaf, and pepper. 
  5. Secure the pressure cooker lid in its sealing position, select pressure cook, and set the time for 5 minutes at high pressure.
  6. When the cooking program ends, let the pressure release naturally for at least 15 minutes, then vent any remaining steam. Discard the bay leaf.
  7. To make the toasts: Preheat the broiler on your oven. Place your sliced bread (meat or French) on a baking sheet and toast, a couple of minutes on each side, depending on your broiler and your preferences -- just watch the bread closely and flip when it's as toasty as you like. 
  8. To finish the soup and serve, place broiler-safe serving bowls on the baking sheet, ladle soup into the bowls, almost filling them. Spread the toast slices very sparingly with Dijon mustard (1/4 teaspoon per slice) and place them on top of the bowls of soup. Lay a slice of cheese onto each baguette slice. Broil the soups for 3-5 minutes, or until the cheese is bubbly and beginning to brown.
The verdict: Delicious. 

Experiment #1: The soup itself tasted fabulous. The Instant Pot recipe didn't skip the time you need to caramelize the onions, but it sped up the second half of the recipe where a long, low simmer would typically infuse the broth with flavor. I think my selection of 3 different onion types contributed to the complexity of the broth, and also, the combination of brandy and cider added the right amount of flavor depth and tang. Yes, I would make this Instant Pot French onion soup recipe again.

Experiment #2: The savory blend of pork and beef in the meat bread matched the flavor profile of the soup so well, you almost didn't notice it was in there... which arguably is a reason not to use meat bread as your toasts -- you're losing the star of the bread into the soup. However, it was an excellent way to use the failed meat bread slices, which, eaten alone, offered only the meat as a redeeming quality. Here, the bread soaks up the soup and holds the cheese like a good crouton should -- you'd almost never know it was a failed bread. Almost. I'll give myself a pat on the back for judicious use of a near-useless food item, but I would not make meat bread my first choice in French onion soup crouton, because: Why hide the meat bread (unless it was a failed loaf)?
.

Thursday, January 6, 2022

Upcycled Panda Purse

0 comments

This is the story of a panda purse.

My niece is into pandas right now. She's also into drawing, so she sometimes carries around a little notebook and pen. What better Christmas gift for her, then, than a panda purse? (I.e., a purse that features a cute panda face, not a purse made from a panda, of course.)

And so it was, on December 27, I spent a good portion of my day off work bringing this panda purse into existence. Because I like to salvage scraps and upcycle old things, this purse would require no new purchases -- just my time and anxiety.

I started with a black and white tote bag that was a bridesmaid gift from my sister's wedding ten years ago. From it, I cut the main body of the purse and a rectangle for a pocket. It also had straps, which I detached to reposition on the new, smaller purse. 

I nabbed a zipper from a black backpack that was falling to pieces (the backpack was falling apart; but its zippers are still in great shape, like they were designed for a much more durable bag). Here's a tip that may seem obvious: You can always make a zipper shorter. 

The panda's facial features came from my supply of felt and spare buttons, including two little white buttons that were spares to my wedding dress.

It all sounds rather perfect, doesn't it? Well, you know me and my improvisational sewing projects. Even if I do plan it out on paper and make patterns to cut certain shapes, I'm still sort of winging it, and so no project is ever finished until I've used my trusty seam ripper to pull something apart and start all over again.

I started smart by sewing on the pocket and the panda's face first. Then I assembled the purse's pieces inside out and stitched them together by machine, going around twice for reinforcement... 

When I turned the thing right-side out to gaze upon my finished project, I realized I'd sewn the panda's ears to the inside of the purse instead of the outside, and the straps were on the wrong side of the zipper so that they actually had to be tucked inside the purse for the zipper to close. Also, I should have used white thread for the zipper instead of black, because even though the zipper is black, the part of the purse to which it's attached is white. Dagnabbit.

Discouraged and annoyed, I carefully seam-ripped the top half of the purse, repositioned the ears and straps and pinned them into place, restitched the zipper, and then hand-stitched the straps and ears to the outside of the purse.

Voila!

OK, I'm not 100% satisfied with some of the finishing details, like, I should have folded under and ironed a neat seam around the pocket edges instead of sewing it on flat ragged, but it's still a cute purse, and I hope my niece likes it and uses it.

.


Thursday, December 30, 2021

One of my favorite things - sandhill cranes

0 comments

The first time I heard sandhill cranes bugling from afar, I was out walking the dog. It was a sunny December day not too many years ago, and a strange, distant cooing seemed to be all around me. What was it? Where was it coming from? 

I finally figured out I was hearing the calls of the numerous large sedges (new vocab word for you) of birds flying in loose V formations high, high in the sky, their loud, rattling bugle unceasingly filling the airspace beneath them. Not long after that, I saw a newspaper article about the sandhill crane migration, which prompted some Googling and a Youtube video to confirm that these were the birds I'd witnessed. It was a lucky coincidence I was outside at the same time as so many of the cranes were flying by on their way south. I had never heard or seen these birds before -- how is that possible? Perhaps I had simply never noticed.

Now one of my favorite joys of winter is a chance encounter--from a very great distance--with these noisy travelers. I went outside for a few minutes yesterday to stir the compost, and a group of cranes just happened to be flying by. Their calls filter down to the ground from such heights, I have to look around for a minute before I can pinpoint the sedge in the air. In the late winter or very early spring, I also enjoy the luck of noticing their return north.

This past October, I had a close encounter for the first time. I was driving into a church camp in southeastern Wisconsin, and there were two sandhill cranes just standing around in a field by the gravel road. I've read these cranes are tall, and up close they are surprisingly so. The red cap over their forehead only makes their curious gaze more intense and mysterious.

I don't know why the sandhills delight me so much. Maybe it's because their call is different from the other more commonly heard birds in the area. Maybe it's because of the encounter's brevity and reliance on happenstance; it's like finding a penny on the sidewalk. No matter, really, other than I just wanted to share one of my favorite things in this season of favorite things.

.

Thursday, December 23, 2021

More food by mail

0 comments

Almost a year ago, we ordered our first box from Misfits Market. We kept up our subscription for a short while, getting a new box of organic produce every other week, but then my excitement about the fruit and veggie selection began to wane, the delivery was sometimes inconvenient (if I felt I wasn't efficiently planning meals around it), and I thought I could get better prices just doing regular grocery shopping. I'll tell you something, though. There is still ginger in our freezer from that first ginormous bunch. I just used some the other day.

I haven't canceled our account; I just haven't ordered anything new in a while. Maybe I'll feel like it again in the new year, because sometimes facing an unexpected quantity of random ingredients inspires creativity in the kitchen. Other times, yeah, it exerts the pressure of "Do something with this before it goes to waste!"

In the meantime, I got sucked into a "come-back deal" from Hello Fresh. This is a meal kit service. It, too, costs more than regular groceries but less than dining out (or ordering in). You're paying for the convenience of not having to think too much about what's for dinner and then getting mostly pre-measured ingredients delivered to your doorstep. In some ways, it's more convenient than a produce box like Misfits, because the meal planning is done for me, and the amount of food that shows up is that exact amount we're going to eat. In that way, it does prevent food from going to waste, because every bit is consumed. 

However, unlike Misfits, Hello Fresh does not rescue food from the "reject" pile. And, it generates waste, as the pre-measured ingredients are often individually packaged. I concede that the company seems to  make a considerable effort to minimize the packaging, and most of the packaging is recyclable, with some even made from recycled materials. But, as I say on repeat, reducing is superior to recycling, which means throwing away even small wads of plastic with the preparation of each dinner does not sit well with me. I will likely discontinue this subscription at the conclusion of the discounted period. 

I have been saving some of the recipes, though. They're tasty, and some of them use things we typically have on hand. I'll also share a few tips I've learned through cooking with Hello Fresh and the like:

  • I could be doing more delicious things with rice. It's a pantry staple on which I've seldom relied outside of a stir-fry accompaniment, but it's so much more versatile. Butter, herbs, spices, lemon zest... Rice does not need to be a bland filler in need of soy sauce but can make a flavorful bed 'neath any meat or vegetable entree.
  • Gathering and prepping all equipment and ingredients, the well-known mis en place practice of chefs everywhere, is worth the the time upfront. Act like you're about to film a cooking show in your own kitchen -- they don't run to the pantry six different times during the recipe; they always have their ingredients ready to dump right into the mix. I don't go as far as measuring two tablespoons of flour into a tiny bowl, but I have the flour container and measuring spoon out on the counter. More important, I have the veggies washed and chopped.
  • Don't underestimate how much a quick sauce can elevate a recipe. There are condiments we already stock in our fridge that I could just use more frequently to recreate some my favorite recipes -- mayonnaise, Thai sweet chili sauce, hoisin sauce, broth concentrate... One large container tends to be less wasteful than several single-serve packets.
  • Season your food with a little salt (and maybe pepper, too) at each major step (in the water with the rice, when you add the veggies to the hot oil) instead of just once at the beginning or the end. But also, and here's what the meal kit won't tell you, taste it along the way! You may or may not want that final sprinkling of salt after everything comes together.

The moral of the story is you have to decide for yourself what conveniences are worth what cost to you, and what tradeoffs are acceptable to you when balancing time, effort, money, and sustainability.

What's next for us, then? I guess it's back to the usual meal planning based on what's in season, on sale, and/or already in our pantry or freezer at home, and trying to gather any needed ingredients in just one shopping trip, preferably combined with other errands in the vicinity. And don't you worry -- we always eat all our leftovers.

.

Thursday, December 16, 2021

Adventures in Cake Decorating #10 - Pineapple Cupcakes x 2

0 comments

And another cake flashback. Why? Because I haven't been baking as much fun stuff during the pandemic. Over the last two years, I think the Raphael Ninja Turtle cake was the last full-sized cake I made (early March 2020), and since then there have been just a couple of outdoor birthday parties, for which I made the Paw Patrol and Fireman Sam cupcakes. I had designs on making a very small wedding cake for a few of us to share as we virtually attended a relative's wedding, but neither the Zoom nuptials (and therefore) nor the cake materialized.

Last time we flashed back, it was to remember Teddy Graham sunbathers on beach cupcakes. Let's stick with that warm, sunny theme and look back at the two different cupcakes I once made for a luau at church.

Pineapple Upside-down Cupcakes

These came from a Betty Crocker recipe, and you can always trust Betty for a delicious time. Between the pineapple juice in the batter and the sugary syrup on the bottom (which becomes the top), these cupcakes are soaking in goodness. Don't let the photo mislead you -- these do not bake in cupcake wrappers. After flipping over the muffin tin to release these pineapple delights, I moved each into its own paper wrapper for easier individual servings at the luau party.

Pineapple Coconut Cupcakes

I'm disappointed in the trendy cupcake shops that decorate their baked goods so cutely but fail to deliver any oomph in flavor. A so-called salted caramel cupcake that has a stylized drizzle and tiny cookie atop its frosting but otherwise is a plain vanilla cake underneath -- not worth the hype (or money). Even Hostess cupcakes have a creamy filling! A so-called gourmet cupcake should at least have a caramel-flavored sponge if not also ooze liquid caramel once you bite into it. So, of course, I'm proud of these fully flavored cupcakes with a sweet surprise in the middle.

Any cupcake with a filling deserves bonus points, and this filling is so easy to execute... if you follow my tip here and not the original recipe. This recipe from The Little Epicurean is almost everything I want it to be -- coconut milk both in the batter and in the frosting, yes! But, with a fruit filling like pineapple, there is no need to find a 1-inch cookie cutter (who has that?) to punch the center out of each cupcake after they're baked. This isn't a custard or buttercream filling that can't go in until the cupcakes are cooled. 

Instead, I say, you just plop a spoonful of crushed pineapple into the center of the batter in each muffin cup. It will sink just a little bit, and then as the cupcakes bake, the batter will rise up and over it, hiding the pineapple filling for you. Voila!

.

Thursday, December 9, 2021

Cider update, late fall

0 comments

We've some catching up to do.

I promised in my previous cider update that we'd next talk about what I'll call the "regular" cider; i.e. the juice from what are technically crab apples because they're growing rogue in the suburban wild but look and taste pretty much like regular apples, as opposed to the small, puckery, dark pink crab apples.

So, in early September, we gleaned 191 pounds of various apples from public parking lots and easements. Using our Breville juicer, we juiced 147 pounds of these into fresh cider and mixed in three quarts of the pink crab apple cider we'd saved plus 6 cups of honey dissolved into 6 cups of water, to nearly fill two 5-gallon buckets. The remaining 44 pounds of apples became a little more than 2 gallons of fresh cider for the fridge.

After 1 week, we siphoned the fermenting cider into second buckets, leaving their sediment behind. They continued fermenting for another week, at which time we bottled the cider -- about 34 liters of it. Even though all 9 or so gallons came from one batch, each of the two separate 5-gallon buckets resulted in a slightly different fermentation, one slightly sweeter and less alcoholic than the other, although both have a mild flavor with a hint of honey. The hydrometer results for alcohol by volume were 6.2% and 5.5%

Just like the crab apple bottles, we let these sit out for a couple of days to recarbonate naturally, and then we cold crashed them all in the new used fridge we bought from some guy online.

Now, in late fall, we think the regular cider tastes even better having conditioned in the bottles for several weeks, and several of our family members and friends have enjoyed how easy it goes down. The tart crab apple cider is not for everyone, but good for lovers of sour farmhouse ales.

.

Thursday, December 2, 2021

Leaf mulching

0 comments

You know we love our compost, and we've always added some autumn leaves to the mix, but our yard collects far more leaves than we could possibly fit into our one average-sized home compost bin. I usually add light piles of leaves to some planted areas of the yard to serve as winter protection and later spring nutrients, but even still, there is an excess

The remaining options, then, are bagging the leaves for city pickup, which is fine. Those'll be composted somewhere. Or, I've seen people compress leaves into fire-starter bricks, which is project I'd maybe try. Maybe. Or, we could just leave the leaves be like a natural forest floor, but I think there are so many that our yard would indeed look like a forest floor--i.e., mossy dirt and leaves, because the heavy cover of leaves would kill the grass by smothering it or harboring mold. 

But there is yet another option. 

This year, we mulched the leaves. The smaller pieces will break down faster and mix more easily with  soil and other compostables, so we can add more of them to the compost bin and plant beds than we would have with whole leaves. Many of the chopped-up leaves can also be left to spread around the yard, because they can nestle down between blades of grass to the soil level, where they will break down faster while letting the grass grow through.

Some of the leaf bits will just blow away, sure, but because they are smaller, they can blow all over and disintegrate sooner rather than getting caught in a big pile along the curb where whole leaves tend to clog the storm drains.

Converting the thick carpet of maple leaves in our backyard into fall confetti.

We accomplished our mulching with our two electric leaf blowers that, handily, also work as leaf vacuums and mulchers. Guess where we got them.

Go on, guess!

All together now: Someone was throwing them out!

Actually, I think one of them may have been a Goodwill find. Regardless, here we are again with our second-hand lawn equipment, which may have required a little duct tape but worked out great. We attached a bag to one blower to collect some of the mulch for the compost bin and flower beds. The rest, we just let fly into the air and settle all across the lawn. (And in our hair and down the backs of our shirts...)

The yard looks messy by immaculate suburbanite standards, what with the mulched leaf bits all over the place, but there aren't piles of leaves anymore, and the grass shows through. My hope is that these chopped leaves will provide a little insulation to my bedded plants over the winter and then decompose into leaf mold (a.k.a. composted leaves, not to be confused with fuzzy mold that grows in damp places) where they sit, thereby feeding the grass and flower beds throughout the spring thaw.

.